Remember that time when my blog was broken… for like two months… and then Tim and some friends fixed it?
Yeah, they fixed it just because they’re nice people.
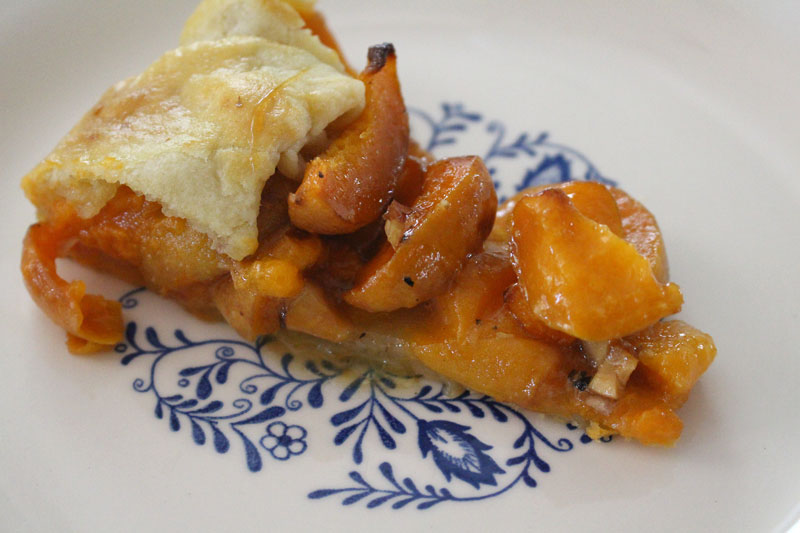
So I made them a galette.
Sometimes thank you needs to be said in the form of food.
David, Andy, Vic, and of course Tim, thank you. I can cook the food, take the pictures, and type some letters in here. But, when something breaks, it takes brains like yours to know how to make things better. I am grateful.
So grateful that I’m sharing our stone fruit. Sharing it and converting it into a thank you treat.
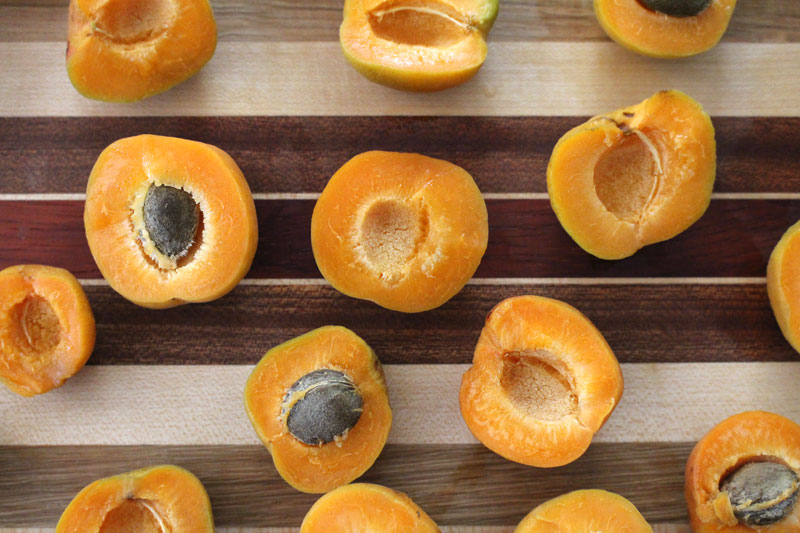
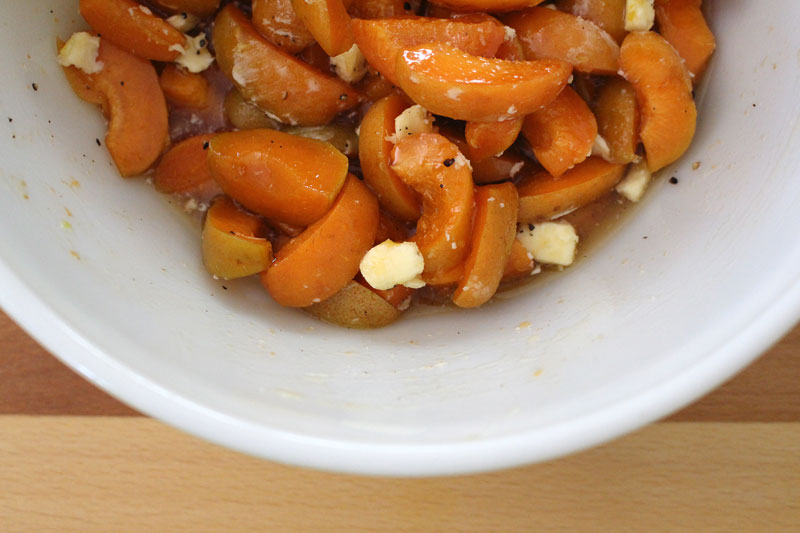
We had some over-ripe apricots in the fridge. You know, the ones that are kinda wrinkly and you think they might be good for nothing? Instead, you find that they’re super soft and sweet. Just perfect for a galette.
Nectarines, peaches, plums, apriums, and pluots could all be substituted. You know, use what you have on hand.
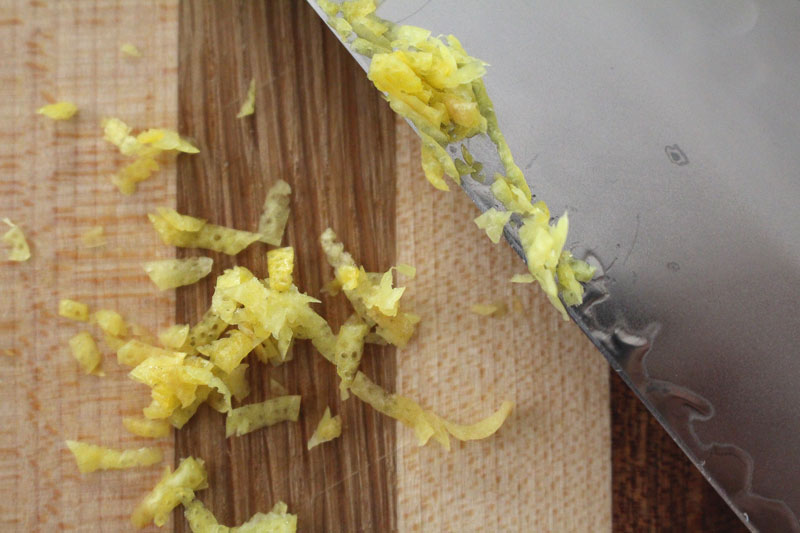
Lemon zest. It needed to be a part of this dish. I just can’t get enough. It’s an essential part of my pantry, so I try to have lemons on hand no matter what the season. They brighten almost any dish.
Apricots are combined with a bit of butter, some honey, and maple syrup.
Aaaand black pepper.
Don’t skip this. Black pepper goes really well with stone fruit.
Seriously!
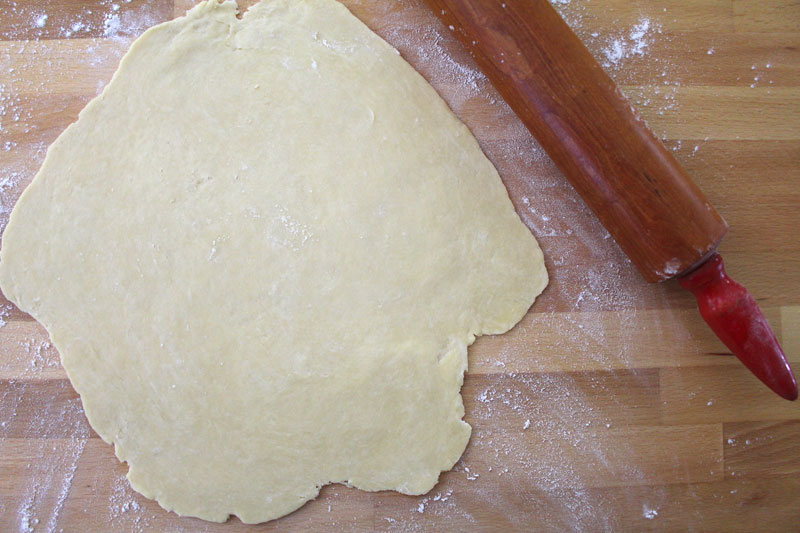
I made a pie crust. I used Alana’s recipe from her cookbook, which is one of my favorites, called The Homemade Pantry (it’s on page 150). It was super easy and I really liked how it turned out. Sooo yeah, I’ll be making that again (along with her Maple Popcorn which I’ve made twice and can’t stop stuffing into my face).
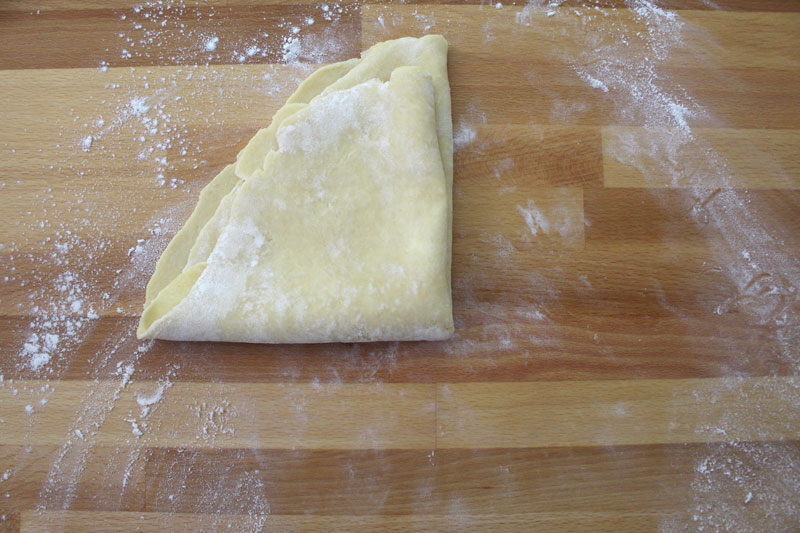
Alana suggests folding the crust in half and then in half again to move it from the counter to the pan. I did this. It worked well.
Winner.
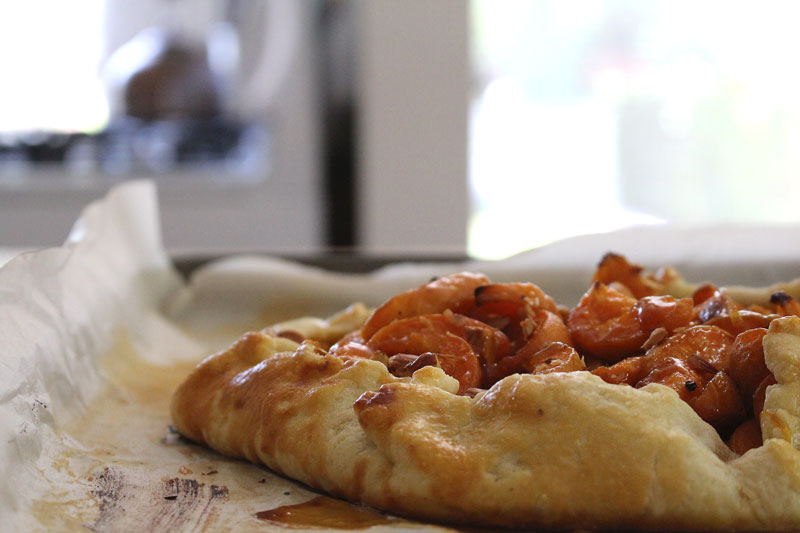
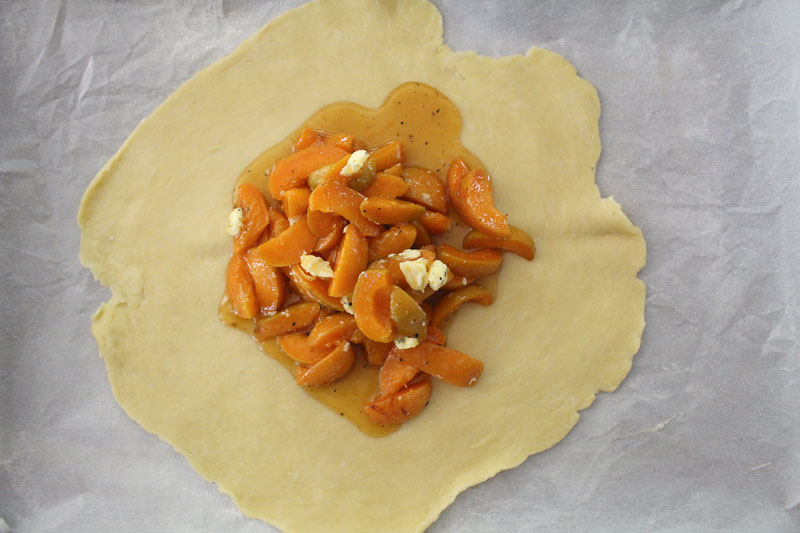
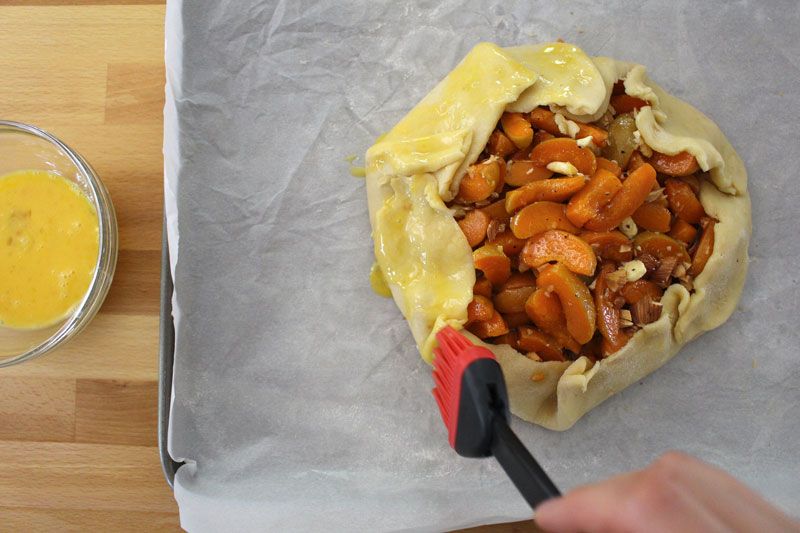
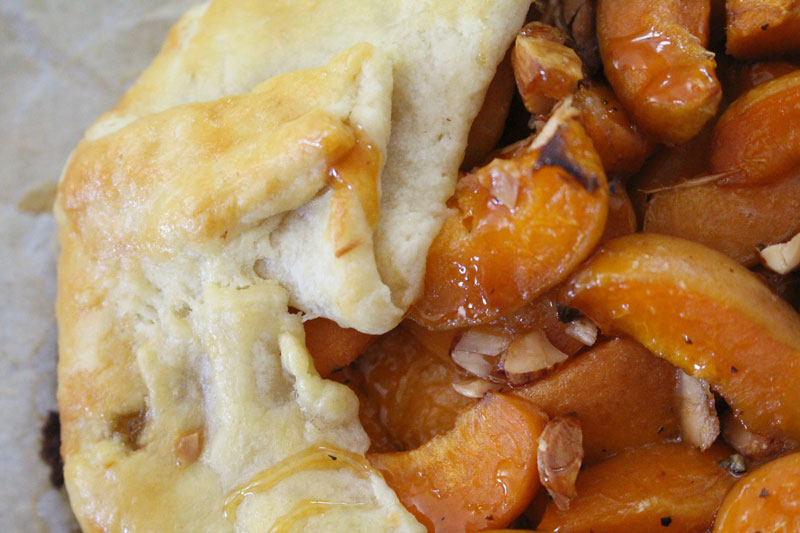
All that sweet filling is plomped in the center of the crust.
I think this is gonna be good.
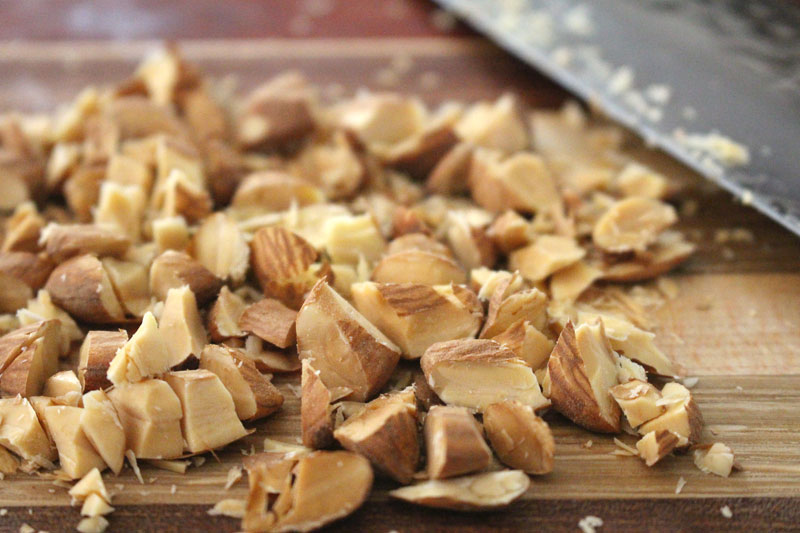
The filling is sprinkled with chopped almonds. For crunch. Walnuts would be great too. Or if you’re not nuts about nuts (sorry, I couldn’t resist), leave ’em out.
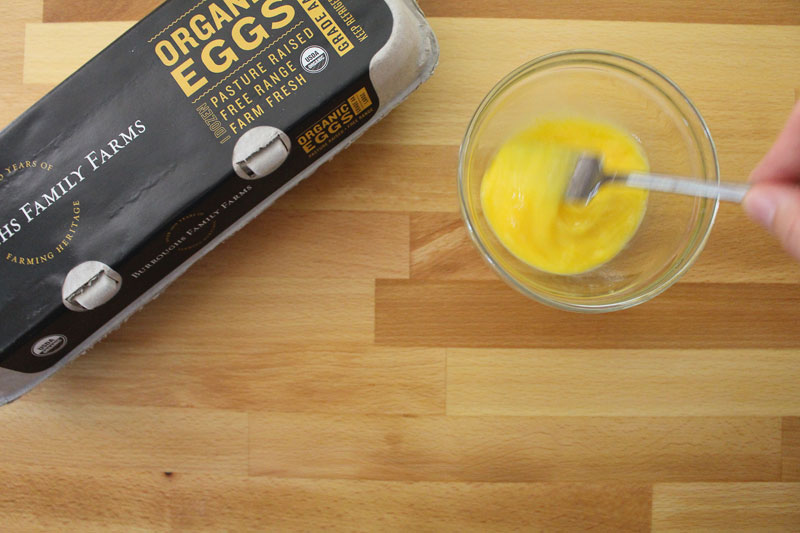
To make the crust all shiny and pretty I whisked an egg and brushed it onto the crust. You don’t have to do this, but it’s an easy way to make your galette go from pretty to spectacular.
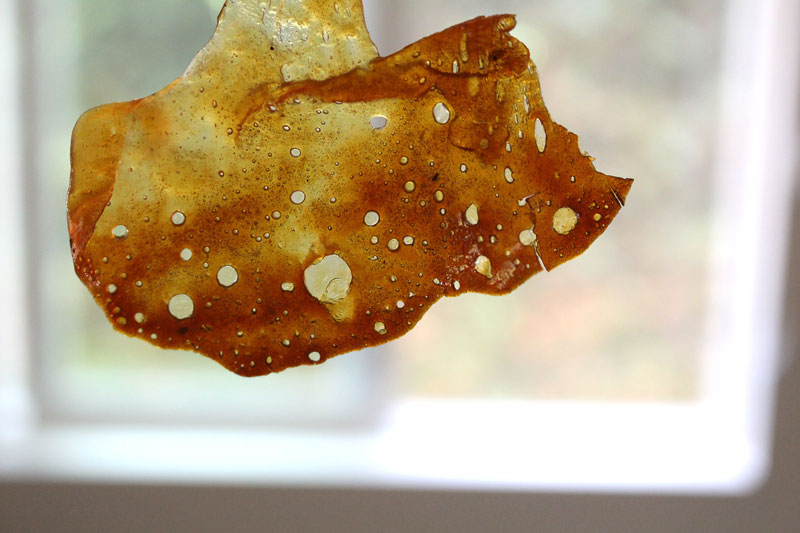
I was all proud of myself for making a crust that held together and didn’t have any holes for the filling to leak out of.
Wrong.
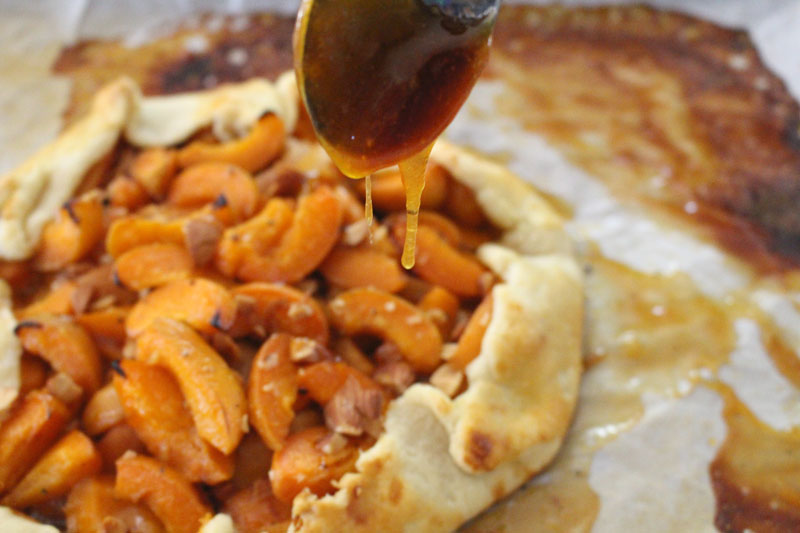
It leaked all over the place. (This happened the first time I made a galette too.)
The good thing is that it turns into candy.
Accidental candy.
I ate most of it.
The rest I scraped off the pan and drizzled over the galette.
Yep, now the galette has caramel sauce on it.
Super fancy.
(If your galette doesn’t leak, pat yourself on the back and then email me to tell me how you did it. Ok? Ok.)
The whole process took me a while, from pie crust start to drizzling finish. But, it’s not all that complicated or difficult. And it’s so worth it.
Make this ahead of time and then invite your favorite people to join you for dinner. I would like to eat this outside, under a nice shade tree, after some barbecue and potato salad. And the leftovers, if there are any, might get a dollop of Greek yogurt and turn into breakfast.
That’s how we roll at our house.
Happy Eating!
Apricot and Black Pepper Galette
Recipe Type: Dessert, Fruit, Summer
Author: Rachel Oberg – De Ma Cuisine
Prep time: 75 mins
Cook time: 30 mins
Total time: 1 hour 45 mins
Serves: 6
Ingredients
1 pie crust
1/8 to 1/4 C honey
1/8 to 1/4 C maple syrup
1 t lemon zest
1 T lemon juice
pinch salt
1/4 t freshly ground black pepper
3 C super ripe apricots (plums, peaches, nectarines, pluots, apriums could be substituted or added)
1 T butter, cut into small pieces
butter, for baking
flour, for baking
2 T almonds, chopped
1 egg, whisked
Instructions
Prepare pie crust and chill for an hour. Remove from fridge 15 minutes before rolling out.
Pre-heat the oven to 375F.
Whisk together honey through pepper. Add apricots and butter, tossing gently to combine.
Butter and lightly flour a piece of parchment paper, that’s on a baking sheet.
Roll out pie crust to be about 12-14″ in diameter. Gently fold in half and in half again, and pick it up to place on the parchment paper. Unfold.
Scoop the apricot mixture into the center of the crust. Sprinkle with almonds. Gently fold the crust up and around the filling, leaving the center open. Make sure there are no cracks, or the liquid will run. Brush crust with egg and bake for 25-30 minutes, or until the crust is golden and flaky.
If any sauce leaks out, scrape off the pan with a spoon and drizzle over the galette (it will be like a caramel).
One of my favorite things about summer is the fruit. The nectarines are amazing, the plums are incredible, and the berries… they are the best!
We had raspberries in the garden growing up, so they are my emotional favorite. Tim’s family has blackberries, so they’re a favorite too. But there’s just something about blueberries and strawberries… I love ’em.
I’m always so sad when their season ends (as it is ending now). I’m thankful for the others, don’t get me wrong. But, I want berry season to last as long as possible.
There are plenty of ways to preserve these summer treasures. You can freeze washed berries, pitted cherries, and halved stone fruit on a baking sheet, and then pop them into a bag. You can make tons of crisps and cobblers and wrap them up really well and freeze them for November. You can make sauces and smoothies to be pulled out when the weather has turned cold.
And, you can make jam.
Last summer I decided that I would try. Surprisingly, it turned out. The catch was that I wanted to make it sans pectin and sugar. I didn’t know if you could, but I wanted to.
And I did.
I made three kinds: cherry, strawberry, and blueberry.
We ran out a few months ago. This year, I don’t intend to run out. So I made a ton. First strawberry (which follows the same recipe), then blueberry.
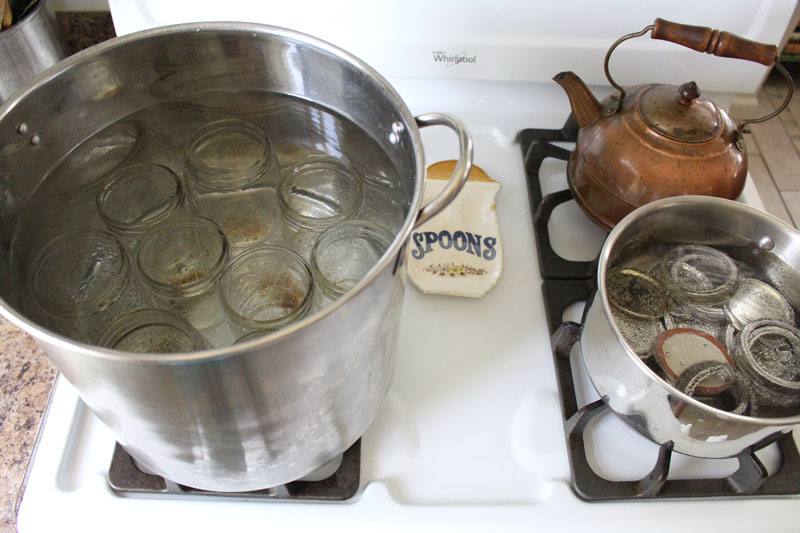
Before you start, make sure you have clean jars and lids (the lid is the flat piece, and is not re-useable if you want them to seal, the band is the part that wraps around the jar and screws into place).
I don’t have a dishwasher, so I used a pot of boiling water and boiled for about ten minutes.
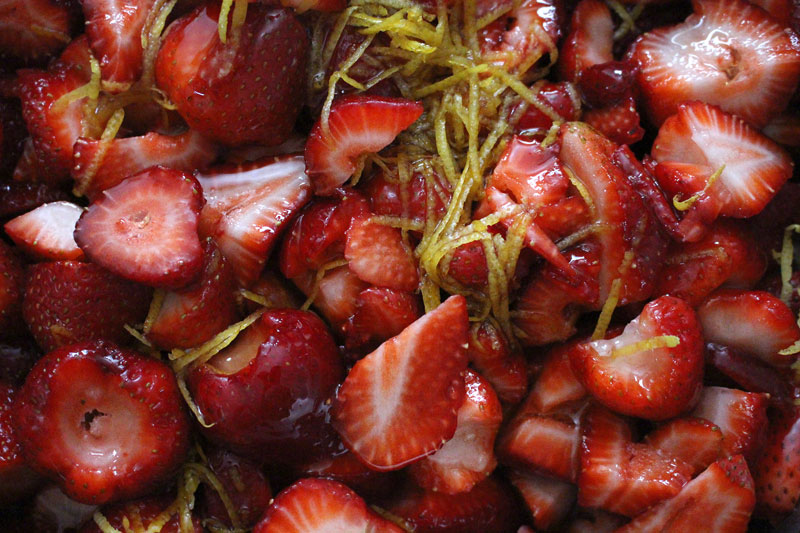
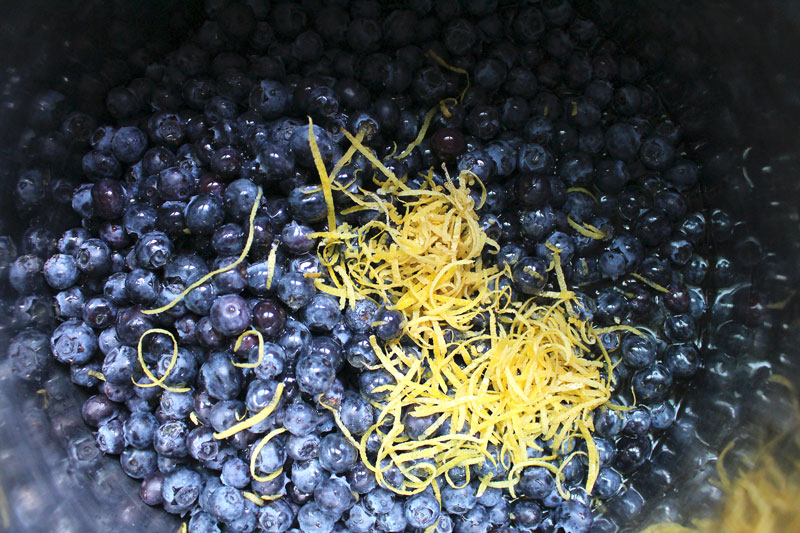
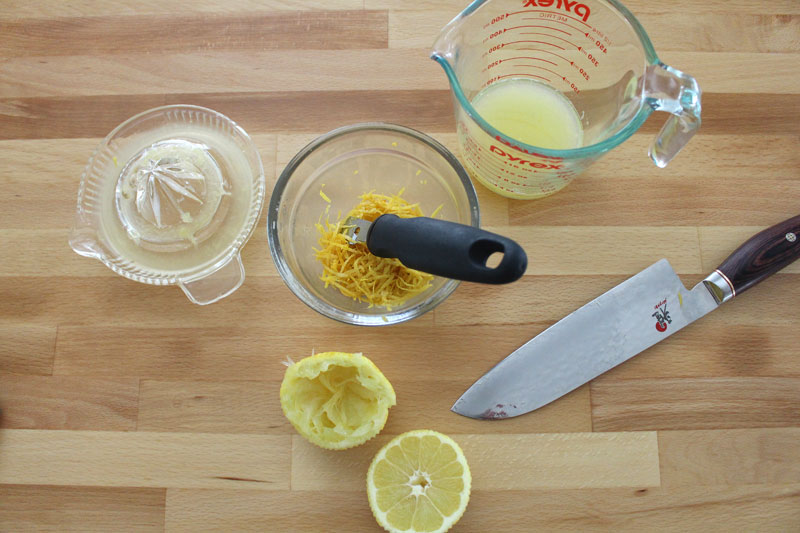
I love lemon zest, so I opted to add a bunch for a hint of brightness, instead of only using lemon juice.
In general, if possible, any time I use a lemon, I zest it first. Why waste such goodness?! If there’s any extra, it goes into the freezer.
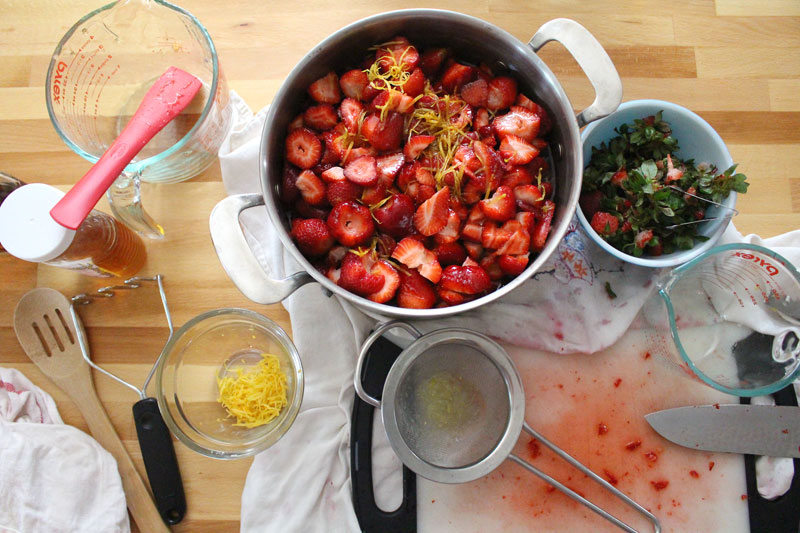
Strawberry jam is a bit more of a process than blueberry. There’s hulling and chopping involved.
It’s gonna be messy.
But it’s worth it.
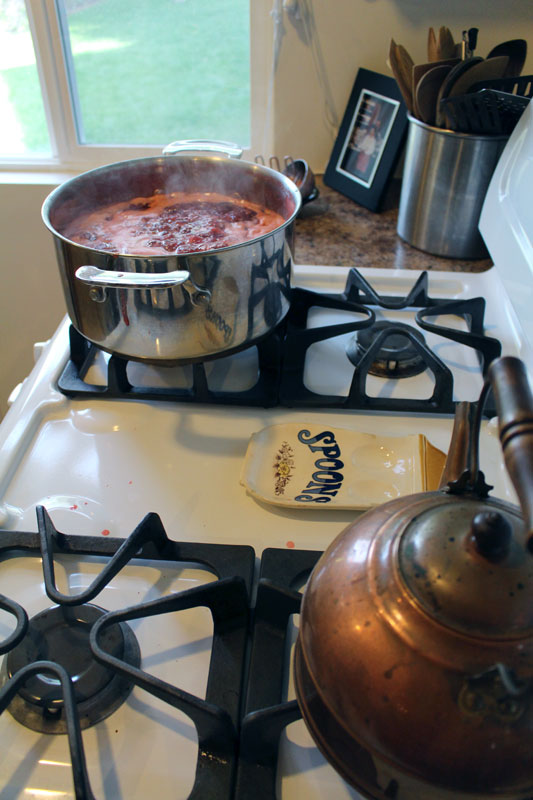
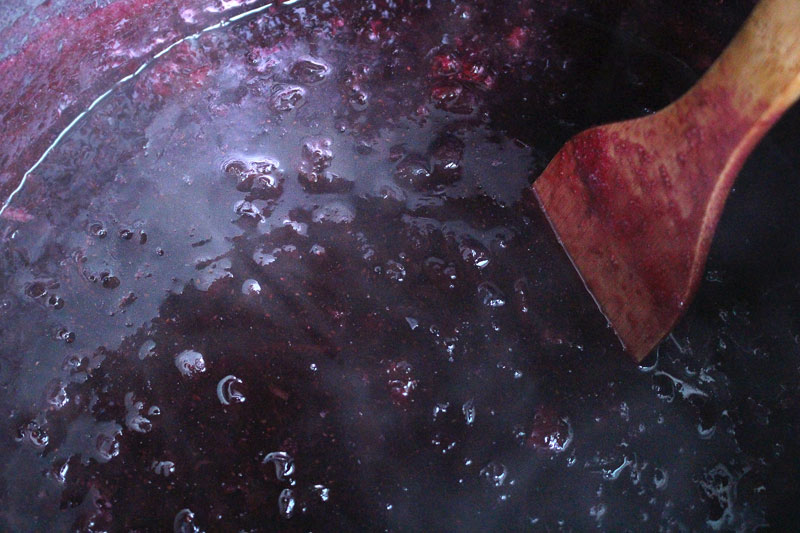
When I was making the strawberry, I forgot how much the stuff bubbles up. I had to move it to two pots, since the one was a bit too small.
I was wiser with the blueberries.
It’s not going to be thick thick, like jam made with pectin. But, it will thicken up a bit. Cook it until it’s as thick as you want it (you can test it by putting a plate in the freezer and putting a dollop of jam on it so it will cool quickly, then test to see how runny it is), even if that’s longer than the time listed in the recipe.
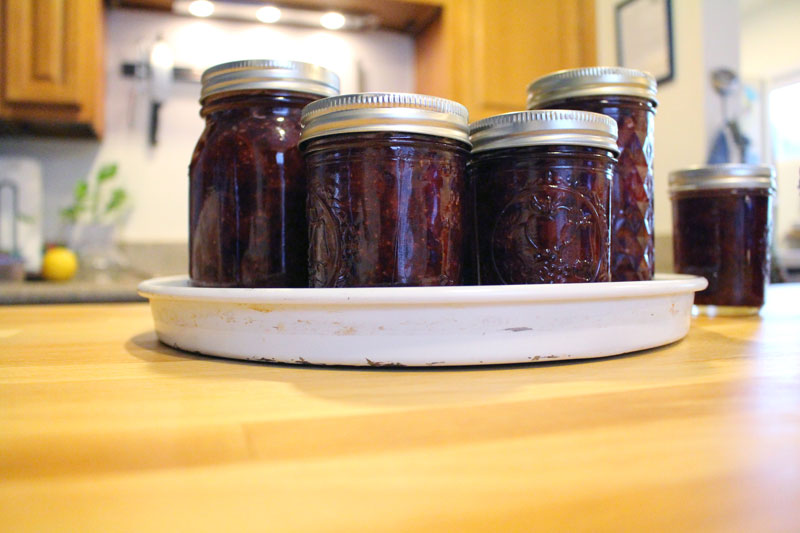
Jars are filled and left to cool on the counter for a bit. You should hear the lids popping as they seal. Sealed or not, I like to store them in the freezer (after fully cooling in the fridge), even after they’re opened. (There are different opinions on how long properly canned homemade jam will last unrefrigerated. (1) Since I didn’t pressure cook or process the jam in boiling water after adding it to the jars, I opted to be extra safe and keep them in the freezer, even if they did seal. In my experience, they have lasted as long as it took to consume them – less than a year, in the freezer. I hope that this summer’s batch will last more than a year, stored in the freezer. Once opened, stored in the fridge, they usually are fine for a month or two, maybe more. Just keep an eye out for mold. Jams with less sugar and that aren’t commercially prepared tend to have a shorter shelf life. (1) So be mindful of that, and whether or not you have pressure cooked them, when deciding where to store them.)
This jam is perfect for the usual toast or English muffin, to top ice cream, or to be eaten by the spoonful by a hungry food blogger.
A few weeks ago we were invited to a barbecue at the house of some friends. I brought the dessert. The only dessert.
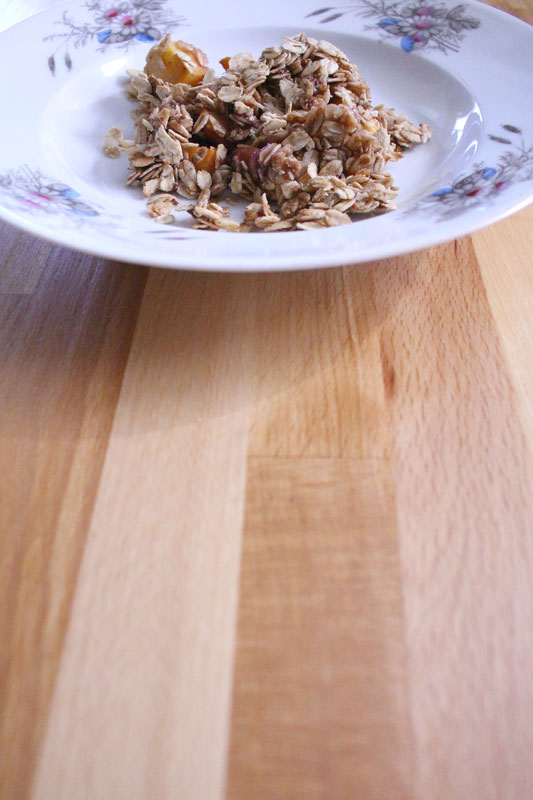
One of my favorite go-to desserts is fruit crisp. I like to make it because it’s easy and because my mom used to make it all the time when I was growing up, so I have a sentimental attachment to it.
For this particular evening, I chose to make it because the friends who hosted are vegans. I wasn’t sure about trying to make a vegan cake. So I went with simple, and adapted my crisp to suit them.
Their son, Theo, was not impressed. He was expecting dessert. To a three year old, dessert means cake.
Oops.
The still warm crisp was dished out. Generous helpings. I was anxious to know if they liked it. As Theo was handed his plate his little face just crumpled and the cutest three year old voice says, “That’s not desse-wrt! Where’s the cake?”
Thankfully his parents liked it. 😉
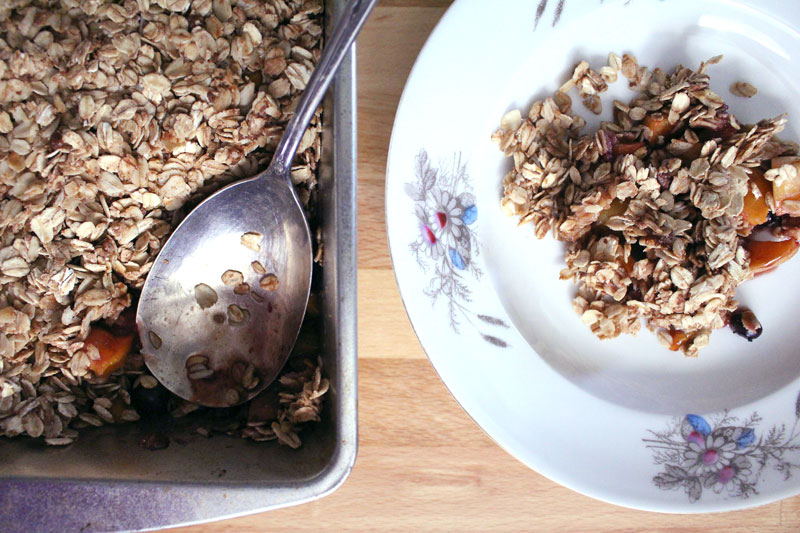
It’s the perfect dessert for whatever fruit is in season. Spring and summer: berries and stone fruit. Fall and winter: apples, pears, persimmons, and grapes. And it makes a fabulous breakfast the next day. Cold with some Greek yogurt, that’s how I like it. Or just standing in front of the fridge with the door open, shoveling spoonfuls into my mouth as I try to decide what to make for dinner. (I know, I know, I’m not supposed to decide with the fridge door open… My mom has told me a thousand times…)
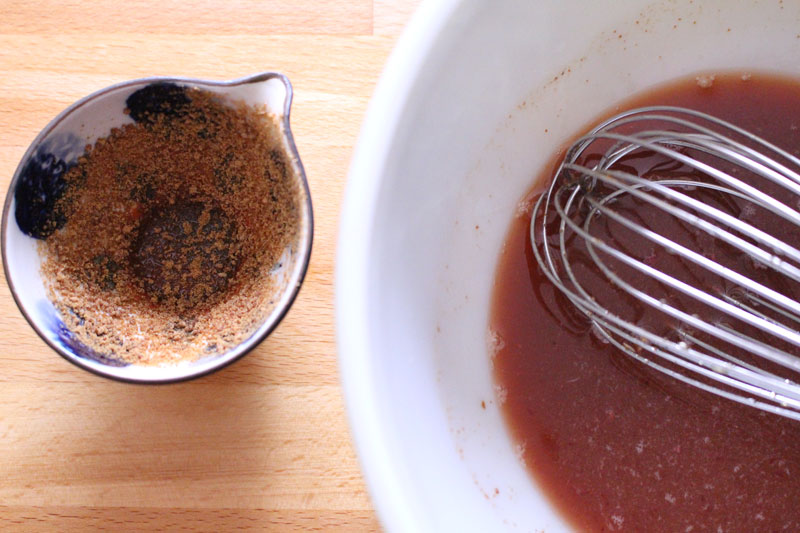
Sugars and juice are whisked together. Sweet sweet. But, it’s honey, maple syrup, and coconut palm sugar. No refined white sugar here. You can use white or brown sugar if you prefer. This is how I like it though.
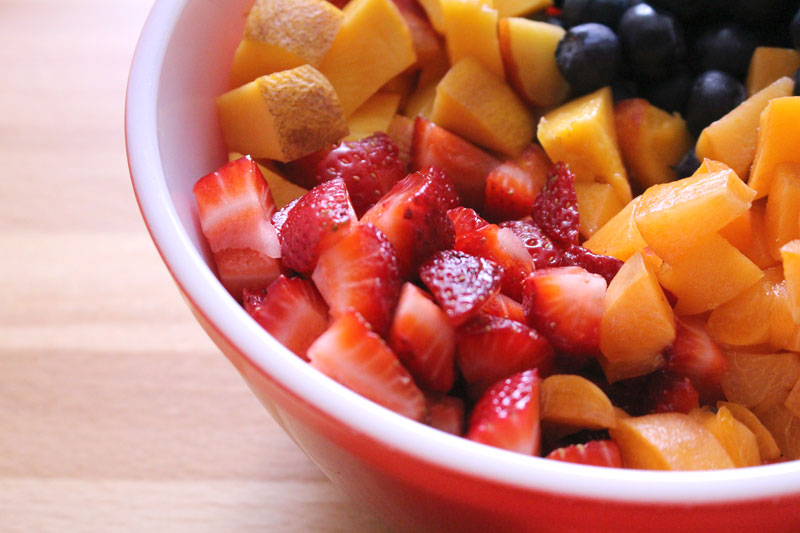
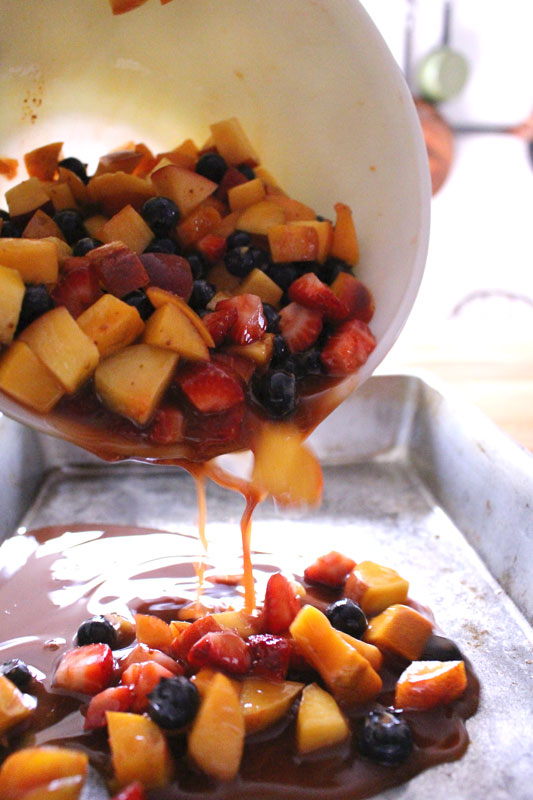
Super sweet and juicy, the fruit is tossed with the liquid and poured into a greased baking dish.
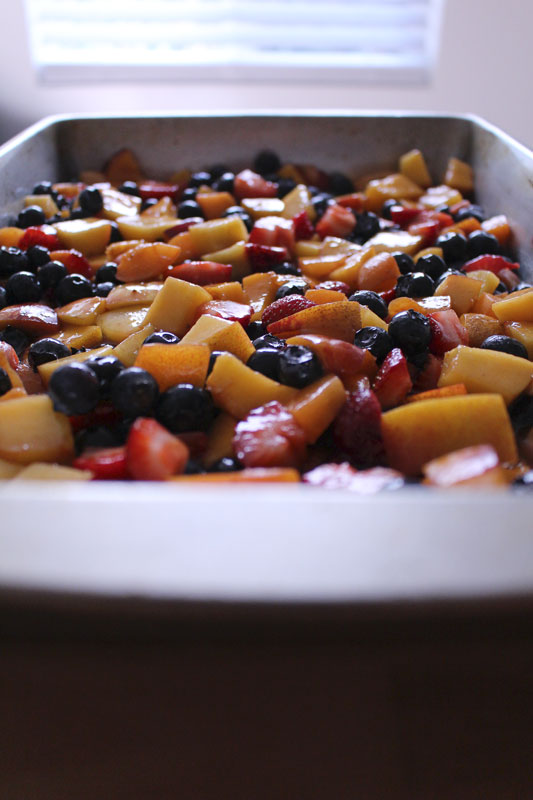
I opted for summer fruits, because that’s what’s in season. Aren’t the colors pretty?
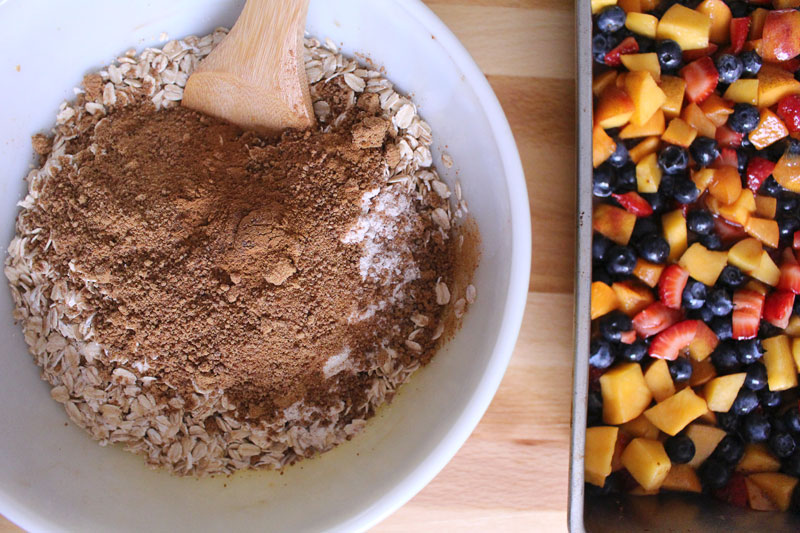
A slightly less sweet, oaty, crumbly mixture will top the fruit.
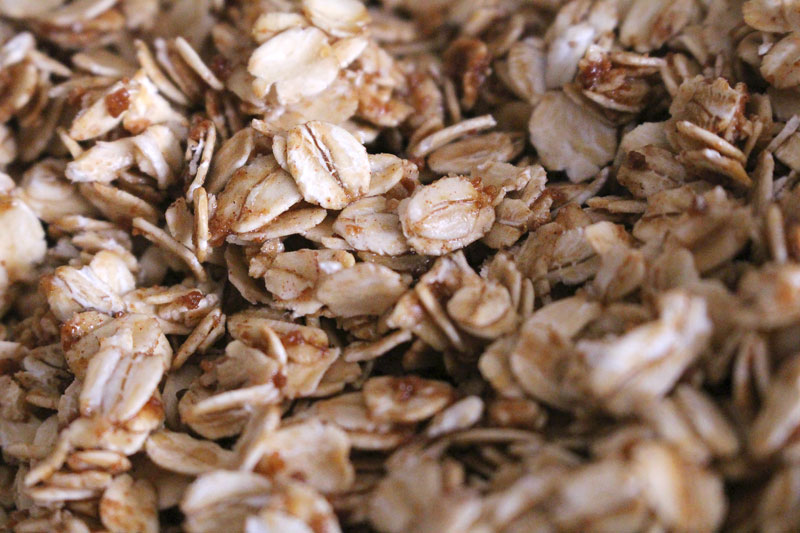
Oats for hearty goodness. And to make this a perfectly acceptable next day breakfast.
Invite your favorite people over, or bring this to a barbecue.
Just be sure to remind them that it’s not cake.
(Sorry Theo.)
Happy Eating!
Vegan Fruit Crisp
Recipe Type: Dessert, Vegan, Fruit
Author: Rachel Oberg – De Ma Cuisine
Prep time:
Cook time:
Total time:
Serves: 8-10
Perfect for any time of year, for vegans and non-vegans alike.
Ingredients
2 C blueberries
1 C strawberries (could sub blackberries), chopped
2 C (heaping) nectarines (could sub apples, pears, plums, persimmons), chopped
1/2 C apriums/apricots (could sub peaches), chopped
1 T cornstarch
1 t vanilla extract
3 T orange juice
pinch salt
1/3 C honey
1/3 C coconut palm sugar (honey, maple syrup, or brown sugar will work too)
1/3 C maple syrup (or honey)
4 C oats
1/3 C coconut palm sugar
2 T whole wheat or Gluten-free flour
1 t cinnamon
dash nutmeg
pinch allspice
1/3 C maple syrup
3 T coconut oil, melted
2 T honey
1 T coconut oil, plus more for greasing the pan
Instructions
Pre-heat the oven to 350F.
Combine fruit in a bowl.
Whisk together cornstarch, vanilla, orange juice, salt, honey, coconut palm sugar, and maple syrup. Toss with fruit.
Combine oats, flour, coconut palm sugar, cinnamon, nutmeg, and allspice. Add maple syrup, oil, and honey.
Pour fruit into a greased 9×13 baking dish. Top with oat mixture. Press down slightly with a spatula. Bake for about 45 minutes, or until bubbly and hot.
Let stand for at least 10 minutes before serving – it’s best just a little warmer than room temperature.
Notes
If you’d prefer a non-vegan crisp, use butter instead of coconut oil. If you have vegan friends who don’t eat honey, just use maple syrup. For gluten-free, use your favorite GF flour and oats.
So I had this idea. I’m beginning what I hope will be a regular series based on my experiences in planning dinner parties around our seasonal produce. I’m going to share plans, tips, suggestions, recipes, thoughts, and ideas. I think it sounds like fun. I can always talk about food…
There are people who are experts at party planning. I know some of them personally. I respect and admire their skills.
I am not such a person.
I do, however, love to menu plan and enjoy spending time with friends and family. One of my favorite things to do when hanging out is eat. Food makes things even more fun, so says me.
We are fortunate to have access to amazing organic produce. Our weekly menu is generally planned around what we get in the box. So are the dinner parties that we throw.
And what’s more fun than a themed dinner party?! Maybe lots of things… but I sure enjoy them.
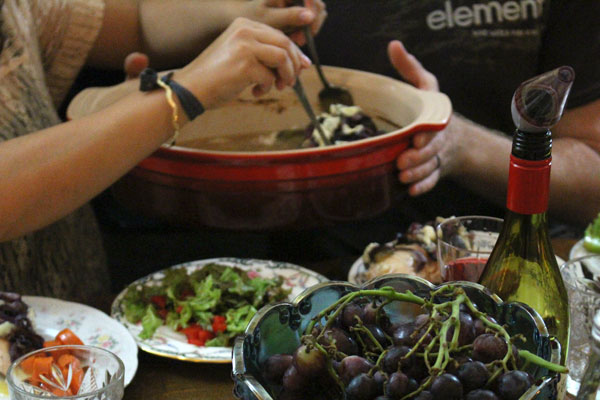
For this first event we kept it small. Six friends: Dave and Bekah, and Nolan and Joanna, and us. I was inspired to get creative with roasting fruit. Figs and grapes are in season right now and are both so yummy when roasted. They get this deep, rich sweetness that is so different from eating them fresh. They are the main component to this meal. All the other dishes were created to compliment them.
Lucky figs.
Lucky grapes.
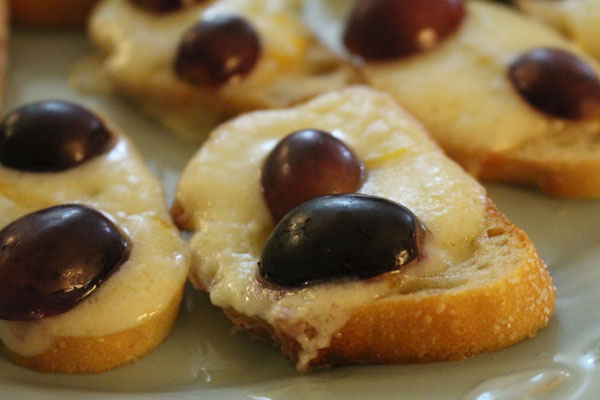
For our appetizer I made crostini with grapes, havarti cheese, and one sliver of lemon zest. They were gooey, bright, and really tasty (or so I gather – of the 18, I only got 1 ;)).
I made a simple salad with lettuce and tomatoes. The dressing was a basic vinaigrette with olive oil, balsamic vinegar, maple syrup, and roasted garlic.
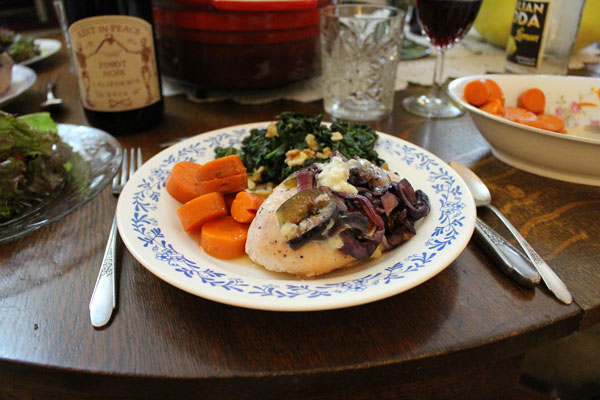
The main dish was Roasted Chicken with Gorgonzola and Figs. The chicken was topped with figs, salt, pepper, and browned butter (which I had to make twice because I burned it the first time), then roasted for about an hour. For serving, sweet caramelized onions and tangy gorgonzola cheese are piled on top.
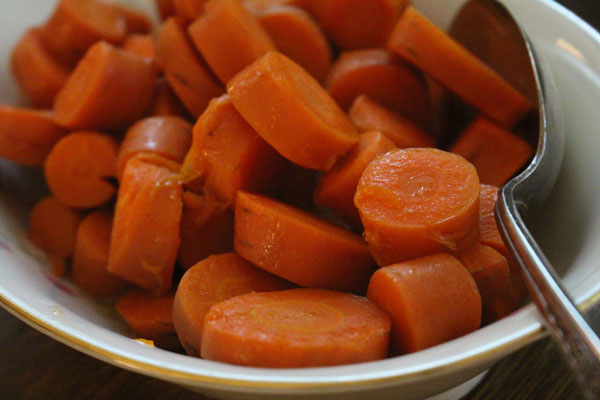
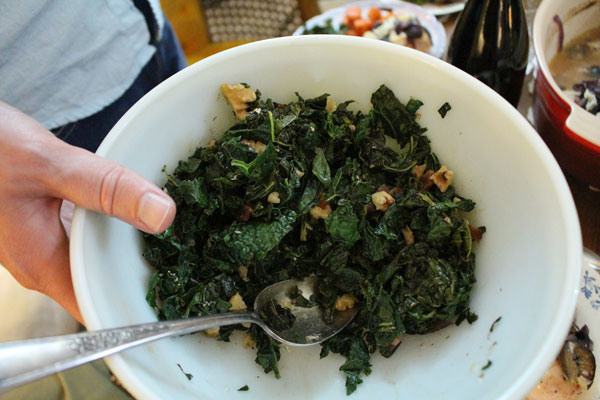
I made two sides. One was more of a classic; a simple every day dish. Steamed carrots with butter and honey. But, they didn’t taste normal or boring. The second side was wilted kale with walnuts and bacon. Ok so bacon (good bacon) is always a winner in my book. In this dish it was no different. The bacon worked so well with the nuts and the wilty wilty greens.
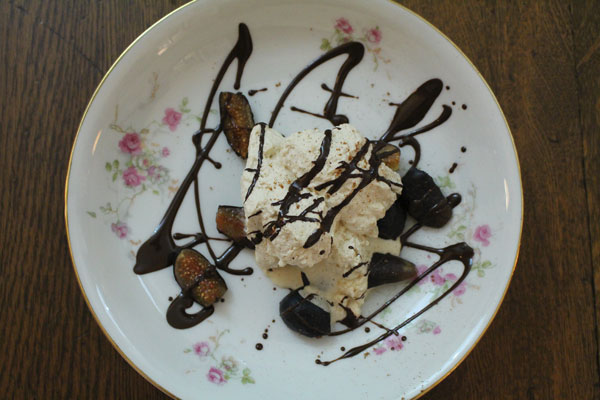
And then, dessert. This may have been my favorite part of the meal, and I’m not a sweets person. I roasted some figs. Nothing on them – just figs, parchment paper, and a 375F oven. I melted some chocolate over a double boiler (which was actually a glass bowl resting on a pot of boiling water). I whipped some cream, sweetened slightly by coconut palm sugar, with a hint of vanilla. The figs were a bit crispy, kinda caramelized, super deep and sweet. They’re topped with whipped cream and drizzled with chocolate. Then cinnamon is sprinkled over it all. Not too much, just a hint.
We have a tiny apartment, so we don’t have room for a large dining table. Um and the dining room is my office, so we really don’t have room. But, we make do. We added a couple leaves to the table and plopped it into the middle of the living room (about 4 feet from where it normally lives, leafless). We squeezed 6 chairs around it. It still left just a small surface area, so the centerpiece was a bowl of grapes from the week’s box. Oh and the bowl was a family heirloom – it used to belong to Husband’s grandma. I set the table with mismatched china that we’ve collected over the years. We used silverware that was also from Husband’s grandma, wine glasses that we found at a yard sale, cloth napkins that were a wedding gift. To be honest, with the friends that we were hanging out with, I knew that we were just happy to be together, eating, sharing, fellowshipping. So, there wasn’t too much pressure to have the perfect table or even the perfect food… from them… the pressure was all from me. 😉
A few things that either I did do that are a good idea, or that I will do next time:
Let my friends contribute. Making all the food myself is a daunting task.
Write out a plan. Figure out what can be made ahead of time (the day before, the morning of). It helps things run a lot smoother and allows for less panicked, more relaxed cooking. For example, I made a list of things that could be done early (you don’t have to make a list, I just love lists). Then in the morning I chopped fruits and veggies, roasted the garlic, cooked the bacon, and made the salad dressing. It made the afternoon much less stressful.
Have an appetizer for guests to snack on while I finish last minute preparations, photographing, and setting up.
Let guests know that I’m going to be taking photos/videos. (The photos will look better and guests will be much happier if they know in advance that they’re not just there for the food. ;))
Last modified on 2013-10-27 23:51:50 GMT. 2 comments. Top.
Green Salad with Tomatoes and Maple Vinaigrette with Roasted Garlic
Recipe Type: Side, Salad, Vegetables, Vegetarian, Fruit
Author: Rachel Oberg – De Ma Cuisine
Prep time:
Cook time:
Total time:
Serves: 6
Ingredients
8-10 C lettuce, torn
2-3 tomatoes, chopped
dressing: 3 cloves roasted garlic
1/4 to 1/3 C balsamic vinegar
salt
pepper
1 T maple syrup
1 t dijon mustard
3/4 C olive oil
Instructions
Drizzle garlic with olive oil and wrap in foil. Roast for 45-60 minutes. Remove from oven. When cool enough to handle, squeeze pulp from 3 cloves garlic and mash with a fork. Set aside.
Whisk together garlic, balsamic vinegar, salt, pepper, maple syrup, and dijon. Slowly stream in olive oil, whisking as you do, creating an emulsion.
Chicken is roasted with browned butter and figs then topped with some sweet caramelized onions and tangy gorgonzola cheese.
Ingredients
1 t olive oil
6 cloves roasted garlic
2 T butter
1 to 1 1/2 C water
6-8 chicken breasts
8-12 figs, sliced in 4
salt, to taste
pepper, to taste
2 onions, sliced
1 T honey
1/4 C (or more) gorgonzola cheese
Instructions
Pre-heat oven to 375F.
Drizzle garlic with olive oil and wrap in foil. Roast for 45-60 minutes. Remove from oven. When cool enough to handle, squeeze pulp from 6 cloves garlic and mash with a fork. Set aside.
Brown butter in a small skillet (watch carefully so it doesn’t burn).
Grease a large ovenproof dish. Add water. Add chicken. Top with figs, salt, pepper, and then drizzle browned butter over.
Bake uncovered for 45-60 minutes, or until internal temperature of chicken reaches 170F.
Add onions and honey to a dry skillet. Cook over low heat for 30-40 minutes, stirring occasionally.
Remove from oven and top with mashed roasted garlic, caramelized onions, and dot with gorgonzola.
Last modified on 2013-10-27 23:51:45 GMT. 2 comments. Top.
Steamed Carrots with Butter and Honey
Recipe Type: Side, Steamed, Vegetables
Author: Rachel Oberg – De Ma Cuisine
Prep time:
Cook time:
Total time:
Serves: 6
Ingredients
4 large carrots, cut into chunks
water
pinch salt
1-2 T honey
1 T butter
Instructions
Add water to the bottom of a pot with a steamer basket (about an inch deep, or not touching the bottom of the basket). Add carrots to the steamer basket. Cook until tender, about 15-20 minutes or so.
Last modified on 2013-10-27 23:51:48 GMT. 0 comments. Top.
Wilted Kale with Walnuts and Bacon
Recipe Type: Side, Vegetables, Meat, Pork, Nuts, Stove Top
Author: Rachel Oberg – De Ma Cuisine
Prep time:
Cook time:
Total time:
Serves: 6-8
Ingredients
4 slices bacon
1 T olive oil
3 bunches kale, stems removed, sliced into long ribbons
pinch nutmeg
salt
pepper
2 T balsamic vinegar
1/2 C walnuts, chopped
Instructions
Cook bacon. Drain on paper towel. When cooled, crumble and set aside. Discard fat from pan (or reserve a bit for cooking).
Add olive oil (if all bacon fat was discarded), when hot, add kale and some seasonings. Use tongs to turn and mix kale, as it wilts down, add more kale and more seasonings. Cook over medium-low heat for about 10-15 minutes, or until all kale is wilted. Add 2 T balsamic vinegar. Taste and adjust seasoning if needed.
Serve topped with walnuts and bacon.
3.2.1255
Roasted Figs with Whipped Cream Chocolate and Cinnamon
Figs are roasted and topped with a cloud of whipped cream, a drizzle of chocolate, and a sprinkle of cinnamon.
Ingredients
12-18 figs, quartered
1/2 to 1 pint whipping cream
1/8 to 1/4 C coconut palm sugar
1 t vanilla extract
3.5 oz. dark chocolate
cinnamon, for topping
Instructions
Pre-heat oven to 375F.
Line a baking sheet with parchment paper. Place figs on baking sheet with a bit of space between them if possible. Roast for 10-20 minutes, or until figs are slightly crispy and caramelized.
Whip cream with sugar and vanilla using an electric mixer or by hand. Whip until stiff peaks form.
Heat about 1 C water in a pot. Place a bowl in the pot – it needs to be large enough so that it rests on the edge of the pot on its own and does not touch the boiling water. Break chocolate into pieces in the bowl. Stir with a spoon as it melts. Once melted, remove from pot (carefully, bowl will be hot).
Spoon figs into a bowl and top with whipped cream, a drizzle of chocolate, and a sprinkle of cinnamon. Serve immediately.
I love to cook. That’s not a secret. I’m better at it than some, much worse than others. I fail and I succeed.
I made some Fish Tacos the other week. They were a definite fail. But, today, my friends, was a good cooking day because of a little thing called Tart (it might actually be more of a dessert pizza, but I like the word tart, so that’s what I’m calling it).
It surprised me with it’s deliciousness. I love surprises. But, usually culinary ones are more along the lines of “Wow! That’s really gross,” or “Darn, the pan with the sauce for today’s main dish fell on the floor”… You know what I mean?
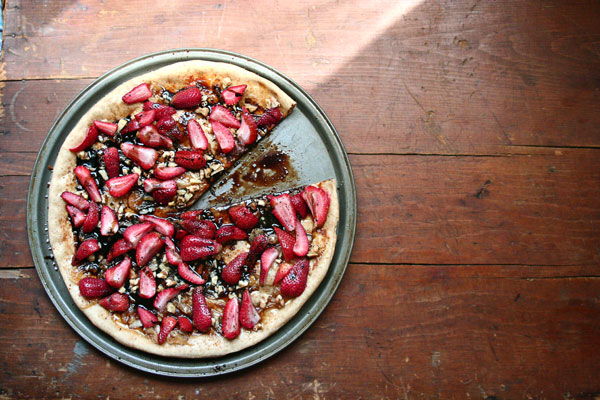
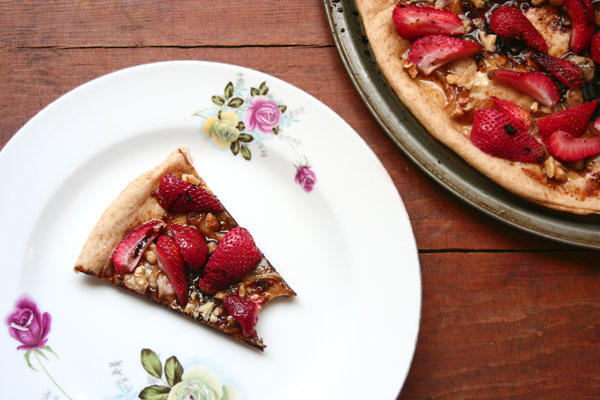
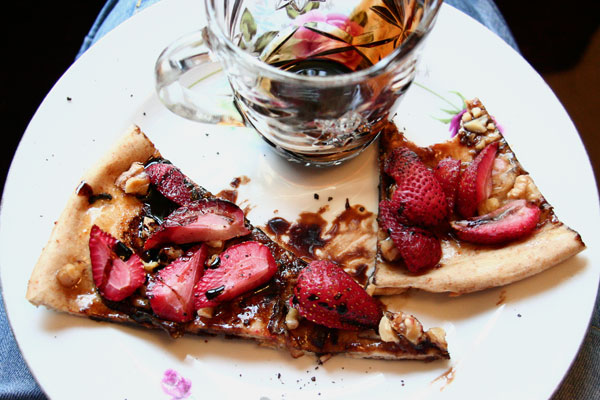
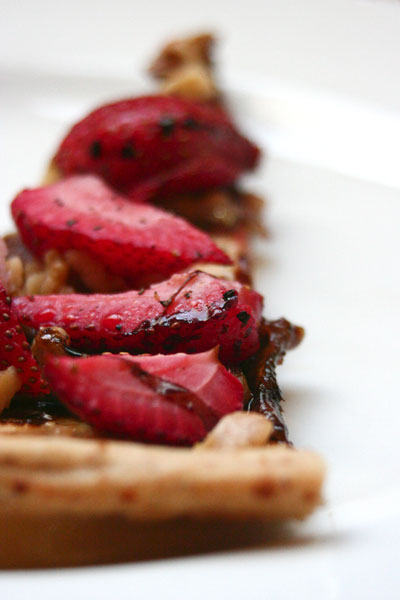
But this tart, this little Strawberry-Balsamic Tart, is the good kind of surprise.
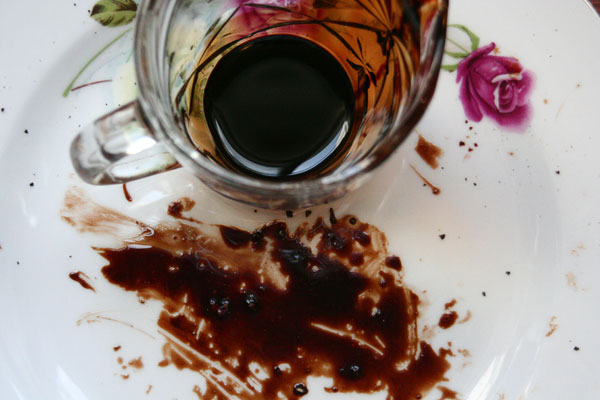
Strawberries get all melty and soft when they’re roasted. Reduced balsamic vinegar is syrupy and thick. Pizza crust is thin and crispy. Walnuts are slightly toasted and crunchy. Onions are caramely and sweet. And, maybe the most surprising ingredient, black pepper, adds just the right tiny kick of spice.
Be still my heart.
I can’t stop thinking about this tart.
It was love at first bite.
I ate this on its own for lunch… and had a hard time not eating the entire thing by myself. However, should you want to share, I think it would be great alongside a Spinach Salad topped with Shredded Chicken (use leftover Roasted Chicken), Walnuts, and Strawberries. It could be a brunch food – how about with the Spring Frittata I made a few weeks ago?! Or maybe serve it as an appetizer? Why not?! You could also also also serve it with a dollop of vanilla ice cream and call it dessert.
1 pint strawberries, hulled, and quartered lengthwise
pinch nutmeg
1-2 medium onions, sliced
2 T honey
pinch salt
1/2 C balsamic vinegar
1 pizza crust
1/4 C coconut palm sugar (or brown sugar)
1/4 C raw walnuts, coarsely chopped
pinch freshly ground black pepper
Instructions
Pre-heat oven to 425F. Melt butter.
In a hot, dry skillet, add onions, honey, and salt. Cook over medium-low for about 15-20 minutes, or until they are caramelized, stirring occasionally.
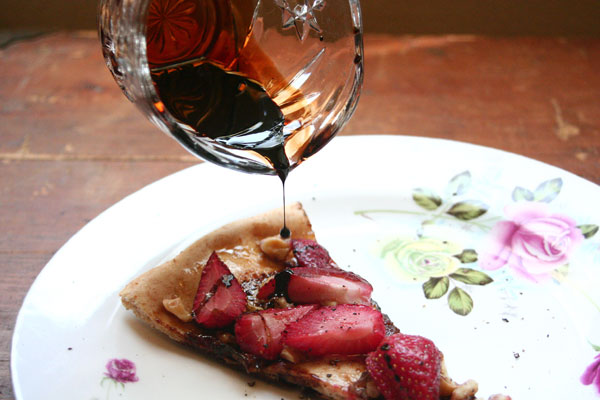
While onions cook, in a small saucepan, bring vinegar to a boil, then reduce to a simmer. Cook until thickened and syrupy, about 12-18 minutes (being careful not to let it burn).
Meanwhile, roll out pizza crust. Par bake for 5 minutes.
Toss strawberries with 1/2 T melted butter and nutmeg.
Brush crust with 1/2 T melted butter. Sprinkle with sugar and press into crust slightly (with a spatula or fingers). Top with onions, walnuts, strawberries, and black pepper. Bake for 7-9 minutes (or according to your pizza dough's recipe instructions), or until crust is done.
Let stand for a few minutes.
Drizzle with balsamic vinegar. If you can wait that long, serve at room temperature. If not, I totally understand. 😉