De Ma Cuisine

Vegetarian Archive

Saturday

11

July 2020

0

COMMENTS

Pasta with Otamot

Written by , Posted in Affiliate Post, Beans, Beef, Burlap & Barrel, Dairy-Free, Dinner, Gluten Free, Kid-Friendly, Main Dishes, Meat, Otamot, Pasta, Pork, Poultry, Quick and Easy, Sauces, Sausage, Vegan, Vegetables, Vegetarian

The flavor of a tomato that’s been warmed by the sun. It’s simultaneously bright and deep, acidic, sweet, and deeply rich. The warmth of the sun mellowing its sharp acidity, turning it into a gentle escape. I know these tomatoes. I can still taste them on my tongue. A childhood memory that’s grown up.

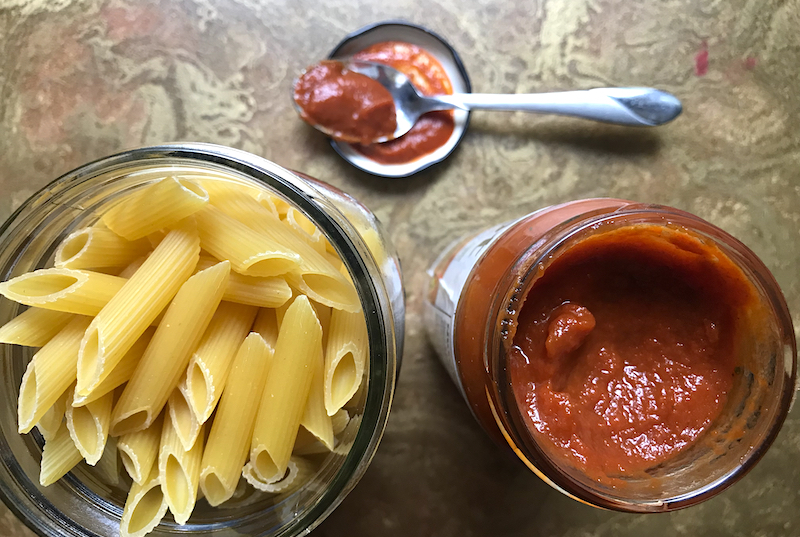
This summer I will consider it an accomplishment if I can coax tomatoes out of what last spring was just lawn. The cherry tomatoes will be eaten out of hand. Dirt brushed off while the sun kisses our cheeks. Each tomato bursting as we bite into it. Beefsteaks will be sliced thick and served on toasted bread with a smear of mayo or a drizzle of very good olive oil, topped with fresh basil leaves and a sprinkle of Maldon salt. San Marzanos will be saved for sauce. Thick, rich, flavorful sauce that will envelop penne, luxuriate over meatballs on a sub, or gently braise meat. I love to make my own sauce. I think I’m good at it too. But, the other day I tried a sauce that gives mine some tough competition.

Otamot.

The Brooklyn based company started because the founder, Andrew Suzuka, wanted fewer battles over food with his daughter. (That’s fair.) So he created a tomato sauce that doesn’t have added sugar or preservatives and packed it with veggies and nutrients.

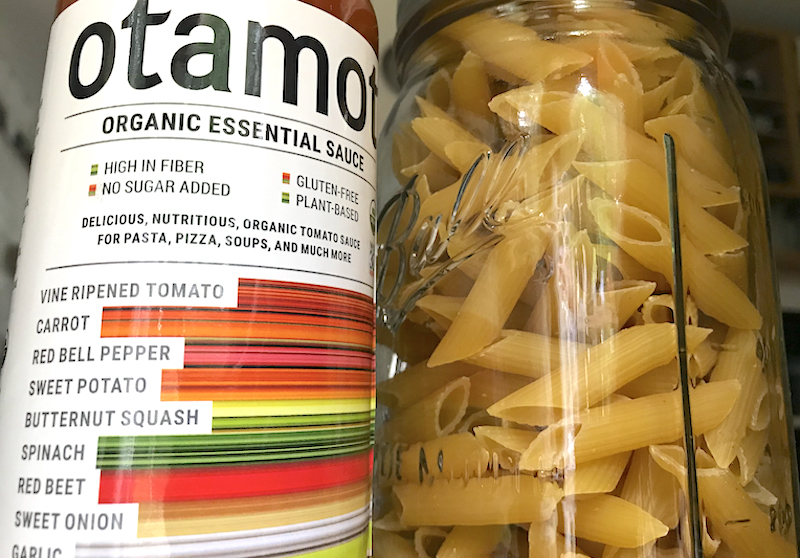
Tomato, carrot, red bell pepper, sweet potato, butternut squash, spinach, red beet, sweet onion, garlic, and shiitake mushroom are blended up to a thick purée that begs to have crusty garlic bread swiped through. (Have you tried Burlap & Barrel’s Purple Stripe Garlic yet?? It makes the most amazing garlic bread!)

I compared Otamot to another popular sauce brand. The other one could be fine. But, I want more than that. Otamot is a nutrient dense food that’s got 25% of your daily recommended vitamin E, 10% vitamin C, 20% vitamin A, 15% vitamin B3… Read the label. It’s really good stuff.

Sometimes I don’t have the energy to make food that’s this healthy and delicious. Or I don’t have all the ingredients on hand. Maybe it’s 5:30pm and I’m still working on a blog post and dinner needs to be quick and right now. I’m thankful that there are companies out there making truly high quality food that allows us to easily feed ourselves well.

I learned about Otamot at the virtual Yellow Co conference in June. A free jar was in our virtual goodie bag. Yes please! I used the entire jar to make a simple pasta. I’m regretting not saving some for pizza night though. ¯\_(ツ)_/¯ Next time I think I’ll get the Otamot Organic Mixed Sauce 4-Pack. It’s a good deal and I’d get to try all the flavors. And, youguys, Otamot is offering 10% off to my readers (code RACHO10)!

Here’s an easy dinner to make with your Otamot. Use the veggies that you have on hand. Sub any type of ground meat, or try a meat free option like cannellini beans, seitan, or vegan sausage.

Happy Eating!

Pasta with Otamot

Serves: 4

Prep: 10 minutes Cook: 15 minutes Total: 25 minutes

Ingredients

  • 1 pound penne or rigatoni pasta (wheat or rice)
  • 1 pound ground beef/pork/chicken/turkey, vegan sausage, seitan, or 1 can cannellini beans (drained)
  • 1 bell pepper, chopped
  • 1 yellow onion, chopped
  • 8 button mushrooms, chopped
  • 1-16 ounce jar Otamot (Organic Essential) sauce
  • 1 cup pasta water
  • to taste salt
  • 1 t unsalted butter or olive oil (optional)

Directions

  1. Bring salted water to a boil in a large pot.
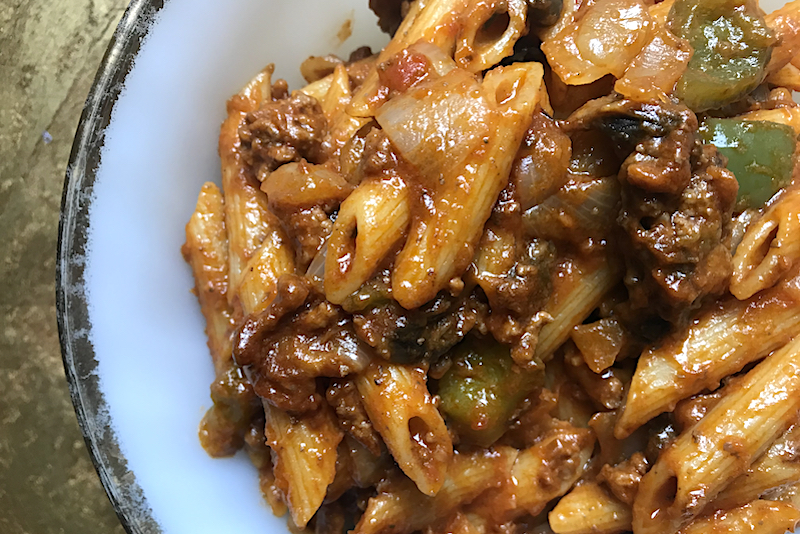
  2. Cook your protein in a large skillet for about 3-5 minutes. Add the bell pepper, onion, and mushrooms. Cook until the veggies are tender, stirring occasionally, about 5 minutes more. Add the Otamot sauce and cook until it’s bubbly.
  3. While the veggies cook, cook the pasta to just shy of al dente. Add 1 cup pasta water to the sauce before draining the pasta. Stir the pasta into the sauce and let it finish cooking. Add salt if desired. Stir in butter, if using. If not, drizzle each serving with a bit of olive oil.

Otamot and Burlap & Barrel are affiliate links. I get a small commission for any sales generated from these referrals.

Friday

3

July 2020

0

COMMENTS

Simple Garden Salad

Written by , Posted in Dairy-Free, Eggs, Gardening, Gluten Free, Herbs, Lunch, Main Dishes, Nuts, Quick and Easy, Salads, Thoughts, Vegan, Vegetables, Vegetarian

I have so much to say that I feel as though I might burst. My thoughts seem to tumble about and get muddied because there are too many to organize. I don’t know where to start.

I guess I’ll begin here. In the garden.

I feel like I should be talking about something other than plants and seeds and watering schedules. But, right now the world is showing me that there’s not a lot of joy out there. So, I’m going to share something that brings me a bit of happiness in the midst of turmoil.

I’ve been growing vegetables for years. My first garden was planted in hard-packed sandy dirt. It was at the top of the driveway of the second Central California house that Tim and I lived in during our second year of marriage. It resulted in five foot tall tomato plants with more fruit than we could eat. It was glorious.

The next garden was in raised beds set on a cement patio in our third house. That garden’s potato yield was incredible. A year or so later we moved again. This time to an apartment in Southern California. We brought a few of the garden boxes along with us and tried to grow herbs and tomatoes. They were always covered by a thin layer of soot from the nearby freeway. But, the real thwarmp that killed them was when the landlord renovated the unit above us and blew tiny paint droplets out the window and all over the garden. I was furious. I demanded to be compensated for the loss. I was. But, it didn’t fix the ruined garden. A couple of years later we moved into a house with a small front yard that served as our outdoor space. We put the garden boxes on the tiny cement patio. I was able to coax some tomatoes and basil to grow, but not much else. The next year I grew one acorn squash and some basil, but the tomatoes got blight.

We finally gave up on Burbank’s insane cost of living and moved to the East coast. Going from an almost year round growing season to one that’s about four months long has been a challenge. Last year I got three tomatoes. Total. And they were green when I picked them the day before the first frost. Green beans have grown well for me in this climate. My hope this summer is for jars and jars of dilly beans. I made some last year and they were delicious. I’d wanted to make pickles again too, but something has eaten all of my cucumber plants. Last year’s pickling cucumbers produced enough to can two quart sized jars. I can’t tell you how disappointed I am that that probably won’t happen this year.

Of all the gardens we’ve had, this one is my favorite. Last summer Tim worked so hard to build it. He cemented eight foot posts to keep the fence strong and the deer out, buried the coated chicken wire a foot deep to deter pests, and made it as perfect as I could have hoped for. This summer we’ve added solar powered lights, an umbrella that Tim found at the dump, and mulch to cover the weed mat that lined our pathways. We’ve planted sunflowers, nasturtiums, and morning glories around the perimeter of the garden. Some hanging in pots, some in the ground. I had great hopes that the English peas would grow up the sunflowers. But, the sunflowers have had a rough spring. The same thing that’s eaten my cucumbers seems to like them too.

Whether or not the cucumbers survive, the sunflowers grow, or the tomatoes produce, in the garden is one of my favorite places to be. Nature is great, from a distance. I don’t like to hike or be outdoorsy. So this little space is just perfect for me.

I don’t know if this is where we will stay for years and years. It’s been a tough place to fit in and feel like we belong. That doesn’t mean we should leave. I love lots of things about where we are. The main thing being my home with Tim and Brando. They are not specific to this place. Home is where we are together. For now, this little piece of the East coast is it. And we’ve built a glorious garden to play in during the warm months.

Yesterday I picked some greens to use in a salad for lunch. It’s so simple that it doesn’t require a recipe. Here are the basics:

Simple Garden Salad

Ingredients

  • greens (arugula, spinach, beet, baby kale)
  • fresh herbs (basil) (parsley and chives could be great too)
  • seeds (pepitas, sunflower seeds, sesame seeds, flax seeds) (chopped nuts would be great too)
  • homemade dressing (olive oil, balsamic vinegar, a splash of maple syrup, dijon mustard, and salt)
  • fried eggs or crispy tofu
  • Burlap & Barrel Black Urfa Chili*
  • Maldon salt

Directions

  1. Wash the greens well. Tear into bite sized pieces.
  2. Sprinkle the greens with seeds and drizzle with dressing. Top with fried eggs or crispy tofu. I like my eggs over medium: whites cooked, yolks still runny so that they become a second dressing. Sprinkle some Black Urfa Chili* and Maldon salt on the eggs or tofu.
  3. Serve alongside last night’s reheated leftovers.

*Black Urfa Chili is an affiliate link, which means that I get a small commission for any sales generated from referrals.

Thursday

26

March 2020

0

COMMENTS

Black Bean and Cheese Quesadillas

Written by , Posted in Appetizers, Beans, Cheese, Dairy-Free, Dinner, Gluten Free, Herbs, Kid-Friendly, Leftovers, Legumes, Lunch, Main Dishes, Meat, Quick and Easy, Rice, Vegetables, Vegetarian

There’s a little more time to think these days. Sometimes my brain gets overrun with thoughts about the what-ifs, the economy, the future. This is weird. It’s like nothing I’ve ever experienced before. It’s the only thing we want to talk about. For good reason. I’ve been trying to distract myself with cookbook writing, furniture rearranging, and, as our supplies dwindle a bit, using what we have well, and returning to a lifestyle where we’re making things from scratch again.

We usually have a well stocked pantry. I rely on things like beans and tuna and pasta. I love having jars of homemade jam, dilly beans, and dill pickles to get us through winter. And I almost always have at least one extra jar of Sir Kensington’s Chipotle or Sriracha mayo on hand. A few weeks before COVID-19 became a pandemic we stocked up a little more. We set aside some food in a plastic bin that we can grab and take with us in an emergency. There isn’t a can opener in there, so we have no way to eat it. But, it’s there if we need it. And between the pantry and what’s in cold storage, I think we could eat for two or three months using just what we have on hand. I think many people have done the same. Our pantries are stocked. We’re ready to ride this thing out at home. But, what to do with all those supplies now that we’re here… There’s the open can, eat with spoon option. Provided you didn’t forget the can opener. But, maybe we could try something a little more fun?

Today, we had Black Bean and Cheese Quesadillas. They could be eaten as a very basic quesadilla. Beans, cheese, tortilla, and something to dip them in. Great. But, you could also make them into something more.

To start, Tim made the flour tortillas from scratch. We are ruined. We should never buy store bought tortillas again. You can use corn tortillas too. Either way you’re winning.

We mashed up some black beans with some taco seasoning (Tim makes this from scratch too) and a pinch of salt. Easy. You could switch it up and use pinto or cannellini beans or even chickpeas.

We added colby and cheddar cheese. You could use queso fresco or try a great vegan cheese if you like. I like colby for the meltyness and cheddar for the taste. If we had pepper jack I’d add that for some spice.

Leftover chicken, pork, or beef? Add it. Some crispy bacon left from BLTs? Perfect. I wanted leftover chicken in these quesadillas. But, we didn’t have any. Next time.

Jarred roasted bell peppers? Good idea. Scallions that are getting a little wilty in the fridge. Do it. Onions and fresh bell peps? Sauté and add.

Leftover rice from dinner last night? Reheat it and mix it in with the beans. Oh! You made chili for dinner? Plomp it onto the tortilla and top it with cheese. Save the cans of beans for another time. Fold. Heat. Done.

Have a little leftover cream cheese and no bagels to eat it with? Smear it on the tortilla before you top it with the beans. Add a little sprinkle of garlic powder for good measure.

There are a million ways to quesadilla. And a zillion ways to use your pantry treasures for good. Oh, and if you feel like you may have over bought, our local food banks are hurting right now. So, grab some sanitizer wipes, clean those cans, find your local food bank, and drop them off (while you know, social distancing) and help someone in need.

I’ve got lots more ways to use those pantry items creatively. If you want help, send me an email at demacuisine@racheloberg.com. I always love to talk about menu planning.

Happy Eating!

Black Bean and Cheese Quesadillas

Serves 2

Ingredients

  • 8 (8-inch) cooked flour or corn tortillas (for ours, Tim used the recipe for flour tortillas from America’s Test Kitchen’s Bread Illustrated cookbook. There’s an almost identical recipe here.)
  • 1 1/4 cups mashed black beans
  • 1 1/2 teaspoons taco seasoning
  • 1/8 teaspoon salt (Morton’s Kosher)
  • 1/2 cup grated colby or pepper jack cheese
  • 1/2 cup grated cheddar cheese
  • additional goodies: meat, rice, roasted bell peppers, scallions, green chiles, rice, cream cheese etc…

Directions

  1. Re-heat anything that needs to be very hot (like meat and rice), or cook any fresh veggies or meat that you want to add. Set it aside.
  2. Mix the black beans with taco seasoning and salt. Heat it over low until it’s hot, and then mash well. Divide the beans and the cheese between the tortillas. Top half of a tortilla with the black bean mixture and top with a bit of each type of cheese. Add any of the additional goodies, then fold the un-topped side of the tortilla over the topped side.
  3. Heat a skillet over medium. Add the quesadillas and cook, flipping once, until the tortillas are browned and a bit blistered, the filling is hot, and the cheese is melted.

A great paring for these quesadillas is corn chips with some homemade guacamole, made with avocados that you bought last week and forgot about.

Thursday

21

November 2019

1

COMMENTS

Roasted Brussels and Bacon

Written by , Posted in Dairy-Free, Dinner, Gluten Free, Holiday, Main Dishes, Meat, Pork, Quick and Easy, Roasting, Sides, Vegetables, Vegetarian

As I park the brussels in the oven, my mind goes to what I can do while they cook. I could start the laundry, do the dishes, plan next week’s Thanksgiving table decor… Dishes first. Then laundry. Then some quick pics of the dish before it inevitably becomes my lunch. Such is the life of a food writer who works from home. I’m constantly torn between the work and home to-do lists.

I can’t imagine that this is uncommon, for those who work from home. I have a dedicated office space. But, it’s in our house. So, I will hear the washer stop washing and know it’s time to change the load. I will see the full dishwasher and empty it.

This isn’t a complaint. I love working from home. I just need to be better at prioritizing work during work time, and home stuff during home time. I’m getting there. Slowly.

This dish is a mish mash of work and home. It may end up on our Thanksgiving table. But, I wanted to share it here in case you need some help with your menu. It’ll be great alongside the turkey and stuffing. But, it will also make a great, easy weeknight dinner. I might serve it alongside some polenta, or with a big salad and some cornbread.

If you’re gonna make it for Thanksgiving, it may be the easiest Thanksgiving side dish. Ever. Unless you’re a can of cranberry sauce lover. Are you? I’m not, but I’ll eat it gladly if it’s served to me.

I tossed some halved brussels sprouts with oil and salt. Then I added some chopped bacon. Optional, but delicious. If you don’t eat bacon, you could throw in some tempeh bacon at the end.

My brussles were a little old. Read: farty smelling. Opt for the freshest brussels possible.

I roasted them on high heat for a bit, then tossed them with some balsamic vinegar, maple syrup, and garlic.

After their tossing, they roasted for a bit longer. Then, done. I added a bit more balsamic, some spicy pepitas, and a bit of Maldon salt. It made for an easy, sweet and savory dish.

Happy Eating!

Roasted Brussels and Bacon

Serves: 4

Ingredients

  • 1.5 pounds brussels sprouts, ends trimmed, halved
  • 1 tablespoon oil (I used grapeseed)
  • 1 teaspoon salt
  • 4 strips bacon, chopped (optional)
  • 1/4 cup balsamic vinegar
  • 1 tablespoon maple syrup
  • 1 tablespoon minced garlic
  • topping: more balsamic vinegar, Maldon salt, spicy pepitas

Directions

  1. Pre-heat the oven to 425°F.
  2. Toss the brussels sprouts with the oil and salt. Lay them cut-side down on a baking sheet and sprinkle the bacon around the pan. Roast until they’re beginning to brown, about 15 minutes.
  3. Whisk the balsamic vinegar, maple syrup, and garlic. Pour over the brussels sprouts and toss so they’re evenly coated and spaced out. Return to the oven and bake until sprouts and bacon are crispy, about 10 minutes more.
  4. Serve topped with a drizzle of balsamic vinegar, a sprinkle of Maldon salt, and some spicy pepitas.

Friday

8

November 2019

0

COMMENTS

Breakfast Burritos

Written by , Posted in Beans, Breakfast, Brunch, Cheese, Dairy-Free, Eggs, Gluten Free, Herbs, Kid-Friendly, Low Carb, Lunch, Main Dishes, Quick and Easy, Vegan, Vegetables, Vegetarian

Monday was a very bad day. Tuesday morning started out kinda the same. Remnants of the crappy yesterday had stuck around. I hadn’t been this angry about something in a while.

My response to crisis is usually food. Food is comfort. That can lead to mindless eating. But, sometimes it leads to a really good breakfast that makes for a better start to the day.

I had cereal for lunch with zero plans for dinner. But, at least breakfast was good.

I started it simply, with chopped bell pepper and some minced cayenne pepper from the garden. I don’t know why they didn’t turn red. But, the seed pack said cayenne, so that’s what they are.

You could add a million other things in there too. Leftover potatoes, chopped onions, broccoli, leftovers from last night’s dinner… pretty much any veggies you think would be great probably will be.

After the peppers cooked in some oil for a few minutes I added some beans. I had pinto on hand. Yum. Black beans would also be great. And if all you have are kidney, or cannellini, use them! Why not?!

After the beans got hot, I added some whisked eggs. To keep it vegan, add in some crumbled tofu. Easy.

I took a pic of the tortilla being topped. It looked not amazing. The eggs had turned a bit grey from being cooked with everything else. If you want them to look amazing and yellow, scramble them separately. And then wash that extra dish. Yeah. No thank you. Less dishes is always the best option.

I laid out the tortillas, topped them with a handful of cheese, then the bean mixture. I used a mixture of cheddar and monterey jack, but if you’re going vegan, my favorite is Violife (just like cheddar or just like mozzarella shreds are great!). They got rolled up and then, the best part. A clean skillet with hot oil, cook that burrito on all sides until it’s shatteringly crisp. Yes please!

For topping or dipping, I like avocado with a bit of salt, and some sour cream. Tim likes salsa. Some people might like cilantro or some diced tomatoes.

However you serve them, they’re pretty quick and easy and make for a great start to the day.

Happy Eating!

Breakfast Burritos

Yields 3 burritos

Ingredients

  • 1 tablespoon oil (I used grapeseed)
  • 1/2 of a medium-sized bell pepper, diced (could also use: onion, cooked potatoes, cubanelle pepper, broccoli… whatever you have on hand)
  • 1/2 of a small hot pepper (I used cayenne), ribs and seeds removed, minced
  • pinch of salt
  • 1-14 ounce can of beans (pinto or black), drained
  • 4 eggs or half a brick of firm tofu
  • a little more salt
  • sprinkle of chili powder
  • handful of shredded cheese for each burrito, vegan (I like Violife) or conventional (I like a mixture of cheddar and monterey jack)
  • 3 burrito-sized tortillas (whole wheat, white, or gluten-free)
  • topping options: salsa, sour cream, cilantro, avocado, diced tomato, Sir Kensington’s Chipotle or Sriracha Mayo
  • a bit more oil, for crisping

Directions

  1. Heat the oil in a skillet over medium heat. Add the bell pepper, hot pepper, and any other veggies, and a pinch of salt. Cook until the veggies are tender, about 4-5 minutes, stirring occasionally. Add the beans and cook until the beans are heated through, about 4 minutes.
  2. Whisk the eggs, or crumble the tofu, in either case, with a pinch of salt and a sprinkle of chili powder. Add to the skillet with the beans and cook until eggs are set or tofu is hot (or you can cook the eggs separately if you want them to stay yellow – have fun washing that extra pan). Taste for seasoning.
  3. Top each tortilla with some cheese. Divide the bean filling between the tortillas and roll them up.
  4. In a clean skillet, add a bit of oil and crisp up the burritos, turning until they’re golden brown and delicious.
  5. Serve burritos cut in half with desired toppings.