Leeks get caramelized in honey and added to pizza topped with Gruyere cheese.
Ingredients
1 pizza crust (I use my pizza crust recipe)
1 C Gruyere cheese, grated
1/4 C Parmesan cheese, grated
1 C leeks, chopped in rounds
1-2 T honey
1/4 C walnuts, chopped
1 clove garlic, minced
1-2 T olive oil
smoked sea salt
1 C chicken, cooked and shredded (optional)
Dipping Sauce:
1 T spicy brown mustard
1/4 C plain yogurt (Greek or regular)
1/4 C reduced balsamic vinegar
Instructions
Pre-heat oven to 475F. Cook leeks in a dry pan with honey until caramelized and golden in color. In last 2-3 minutes of cooking, add garlic. While leeks cook, bring 1/2 C balsamic vinegar to a boil. Reduce to a simmer, keeping an eye on it so it doesn’t burn, until it’s thickened and syrupy.
Roll out and bake crust for 5 minutes. Remove from oven and top with: olive oil, smoked sea salt (opt.), half the cheese, chicken (opt.), leeks, walnuts and remaining cheese. Bake an additional 6-8 minutes.
Whisk together mustard, yogurt and balsamic vinegar.
Serve pizza with sauce for dipping.
Notes
Would also be good as an appetizer, perhaps without the chicken.
Would be good (with or without the chicken) alongside a pureed soup.
Cook bacon. Remove from pan and drain on paper towel. Remove all but 1 T fat from pan. Cook mushrooms and onions in bacon pan with honey. Cook until caramelized.
On a floured pan, roll/stretch out pizza dough. Bake at 475F for 5 minutes. Remove from oven and top with olive oil, some of the cheese, bacon, mushrooms and onions, and the rest of the cheese. Bake an additional 6-8 minutes more.
My brother-in-law, Travis, is a great baker (in addition to being a talented musician!). He makes awesome sourdough bread. Over Thanksgiving, I asked him to teach me, and together we made a starter (which we named, “Olga’s Starter”) and of course he made some of his bread from the La Habra Starter. I asked if he would be willing to share his knowledge with you. I hope you enjoy! (And if you’d like to make your own starter, he will be doing a follow-up post in the new year!) I took Olga’s starter home with me to care for. It’s almost ready to bake with… I can’t wait to try it!
Here’s Travis…
Hello, my name is Travis and Rachel married my brother, so now we’re family. She asked me if I would be into sharing what I’ve learned about bread here and I couldn’t have been more excited to share. I have an interest in bread. I love it. I love it with jam. I love it plain, with a spread of butter or peanut butter, I love it with sandwich things between it. And the smell of baking bread is definitely a favorite of mine. There is nothing better than fresh bread. Except maybe bacon.
So, about ten years ago I started looking into baking my own bread, and being kind of a science nerd I started learning about the way bread starters are used and made. I like sourdough bread and found that essentially a bread starter is a sourdough starter, so I dug a little deeper and found out that with a little patience and time it’s simple to make your own. And with a stable healthy starter you can make so many types of bread it’s crazy. You may also buy many good sourdough starters and each has a different story, which in itself is interesting especially if you like history. Check out the story of San Francisco sourdough.
Like many essential things, when you dig you find a lot of really sweet and interesting things.
Anyway so, here is an easy recipe for a simple sourdough bread, named after a starter I began in La Habra, CA. All good starters should have a good name.
La Habra Sourdough Bread
Author: Travis Oberg
Prep time:
Cook time:
Total time:
Serves: Two Loaves
Ingredients
1 cup “fed” sourdough starter
1 1/2 cups lukewarm water
5 cups flour
1 tablespoon sugar
2 1/4 teaspoons salt
Instructions
Combine the starter, water, and 3 cups of the flour. Beat vigorously.
Cover, and let rest at room temperature for 4 hours. Refrigerate overnight, for about 12 hours.
Add the remaining ingredients, kneading to form a smooth dough.
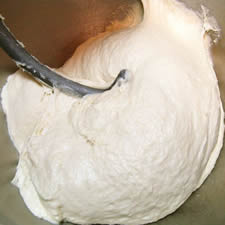
Allow the dough to rise in a covered bowl until it’s relaxed, smoothed out, and risen. Depending on the vigor of your starter, it may become REALLY puffy, as pictured; or it may just rise a bit. This can take anywhere from 2 to 5 hours. Understand this: sourdough bread (especially sourdough without added commercial yeast) is as much art as science; everyone’s timetable will be different. So please allow yourself to go with the flow, and not treat this as an exact, to-the-minute process.
Gently divide the dough in half.
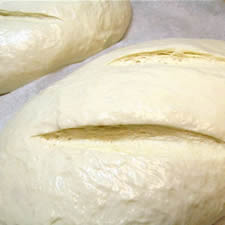
Gently shape the dough into two oval loaves, and place them on a lightly greased or parchment-lined baking sheet. Cover and let rise until very puffy, about 2 to 4 hours. Don’t worry if the loaves spread more than they rise; they’ll pick up once they hit the oven’s heat. Towards the end of the rising time, preheat the oven to 425°F.
Spray the loaves with lukewarm water.
Make two fairly deep horizontal slashes in each; a serrated bread knife, wielded firmly, works well here.
Bake the bread for 25 to 30 minutes, until it’s a very deep golden brown. Remove it from the oven, and cool on a rack.
Notes
Hands-on time: 15 mins. to 20 mins.[br] Total time OVERNIGHT, about 23 hrs
3.4.3177
In keeping a usable starter you use a lot of flour, and are discarding about a cup of starter every three days or so. I started to think about ways to use the removed cup of starter and made up this sweet pancake or waffle recipe.
I hope you had a wonderful weekend! We had a fairly quiet one, filled with a few fun things. We got our Christmas tree (from Oliver Holt & Sons & Daughters a local family business, located at 4201 Magnolia in Toluca Lake – great people, great experience, always great to support a family business), finished our decorations, watched many Christmas movies, ate Grilled Cheese and Tomato Soup, and had lunch at Fudruckers with friends… just to name a few things.
We also had our traditional Pizza Friday! The tradition started when I was searching for the best pizza crust recipe. I found one that I loved right away, but continued the tradition, since it was fun to have a different kind of pizza every week. It’s forced me to be creative, and has been so fun (and yummy!!). I had to be especially creative when our oven was broken for 3 weeks. Thankfully we have a toaster oven. I came up with a Layered Pizza (in baking dish that fit in the toaster), Strombolis, and Stovetop Pizza. They all turned out surprisingly well!
Over time I have been tweaking and changing the recipe to my own specifications. So, today, I’m going to share it with you; my version of Pizza Crust. It still might need a bit of tweaking, but, since it’s being featured on this week’s upcoming A Cooking Show with Rachel O – This Week’s Feast, I’ll share it now, and post updates if necessary.
Happy Pizza Eating!!
Rachel’s Pizza Crust
Author: Rachel Oberg – De Ma Cuisine (Adapted from My Recipes.com*)
Prep time:
Cook time:
Total time:
Serves: 4-6
My version of pizza crust!
Ingredients
1 to 1 1/2 t salt
1 t plus 1 1/2 T honey
1 1/2 T olive oil
3/4 C whole wheat flour
2 1/4 to 3 C all purpose flour
1 C water (between 100-110 degrees F)
1 T yeast
rosemary, oregano, thyme, basil or other fresh herbs (optional)
Instructions
Mix yeast, 1 t honey and hot water (between 100-110 degrees F) together with a whisk. Set aside and let it sit for 5-10 minutes.*
Mix all the whole wheat and 2 1/4 C all purpose flour and salt together. Add honey and oil. Add yeast mixture and mix with a spoon. (You can also mix all wet ingredients together first, then add to flours and salt. I’ve tried it both ways, and both work.)
As the dough starts to come together, it will be sticky. Add more flour as needed. When you can no longer mix with a spoon, flour the counter (or other favorite kneading spot) and begin to knead dough, adding more flour as needed. Knead for about 5 minutes.
Oil a bowl (doesn’t have to be a new bowl). Place dough in bowl, turning to coat. Place in a warm spot, and cover with a clean, damp tea towel and let rise until doubled in size (about 1 hour). If you’re not going to use the dough that day, leave in the fridge for a day or so, or freeze** it.
When you’re ready to bake, divide the dough in half, flour a pizza stone (or pan). Roll out, or stretch out dough (or you can toss it if you know how). Either roll out over the edge of the pan and fold back up to make crust, or just make an indent all the way around the edge with your finger, to make crust.
Bake 5 minutes at 475F.
Remove from oven. Top with desired toppings. Bake 6-8 minutes at 475F.
Notes
*Yeast should be foamy on top when you use it. If nothing has happened, after 10-15 minutes, you should start over. The water could have been too hot or too cold (I use a meat thermometer to check), or the yeast could be old.[br] ** To defrost pizza dough: remove from freezer and leave in the fridge the day before you want to use it. Or, if you forget to take it out of the freezer, place sealed bag in a bowl of hot water. Let it sit until it’s soft (maybe 30 minutes or so). To speed it up, you could add more hot water once or twice.[br] You could try this without kneading or letting it rise – I’ve made other recipes this way and they’ve worked… let me know if you try it and how it turns out![br] Recipe makes 2 crusts.