De Ma Cuisine

Roasting Archive

Monday

10

August 2015

0

COMMENTS

Chile Pepper Poppers

Written by , Posted in Appetizers, Cheese, Dairy-Free, Dinner, Gluten Free, Grains, Herbs, Legumes, Lentils, Quinoa, Rice, Roasting, Sides, Vegan, Vegetables, Vegetarian

StuffedHotPeppers-4

Try saying “chile pepper poppers” over and over again. I like how it feels to say it. Kinda like how I like the feel of the word “cake”. I think I like the word “cake” more than I actually like cake itself.

I’m done now.

I’ve seen different varieties of pepper poppers before, but never actually tried to make them. They’re often filled with cheese. Yum! But, I wondered if maybe they could be filled with something a little more nutrient dense. Cheese, I’m down with, but let’s add a little more.

StuffedHotPeppers-1

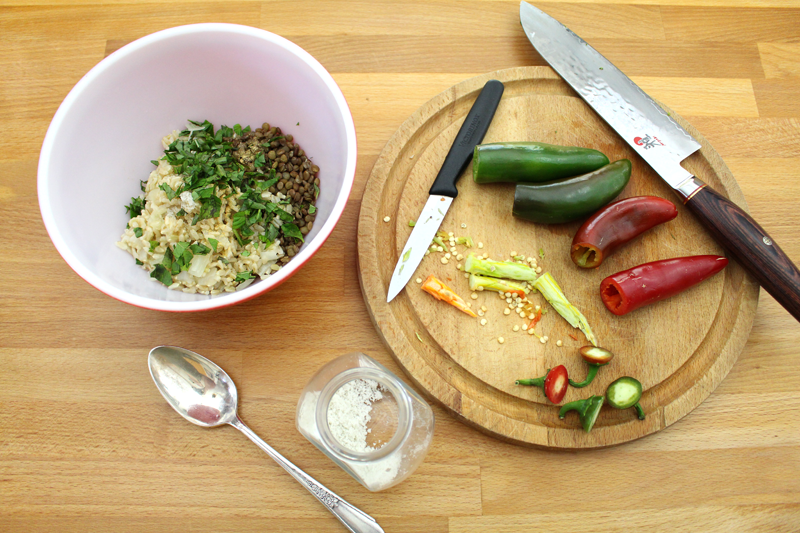
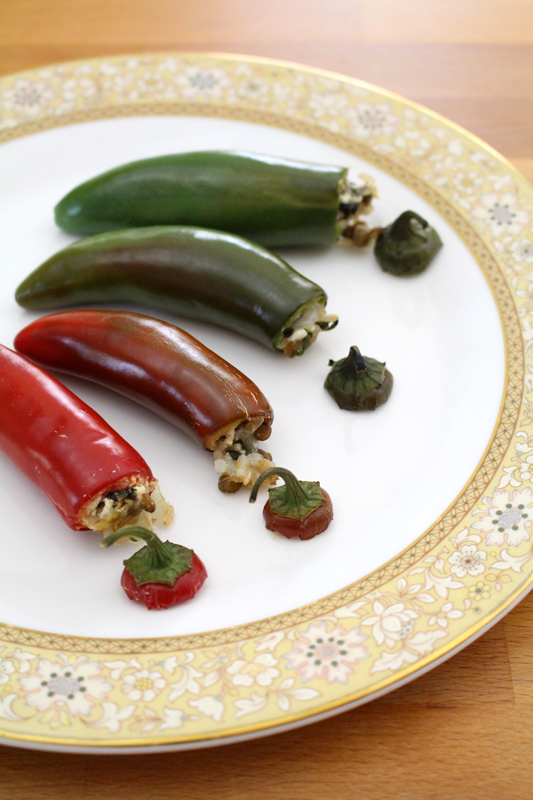
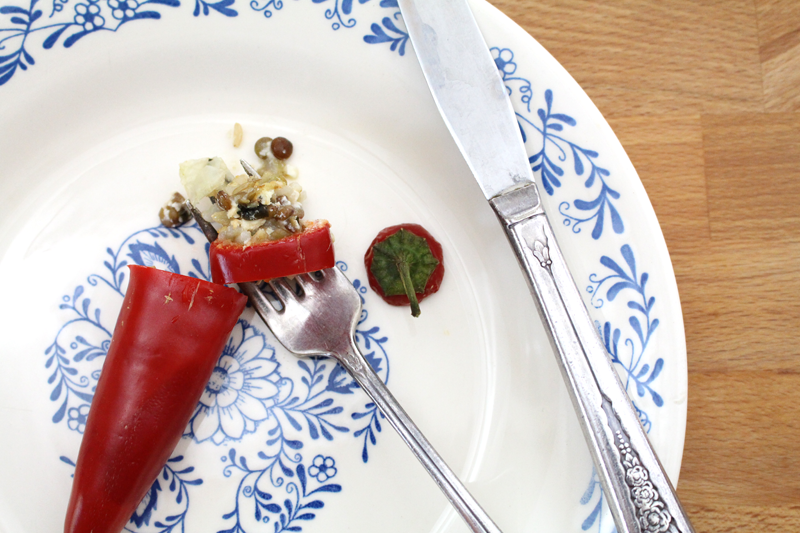
I opted for green lentils, which I’m totally digging right now, and brown rice.  Along with mint and basil for a cool and fresh taste.

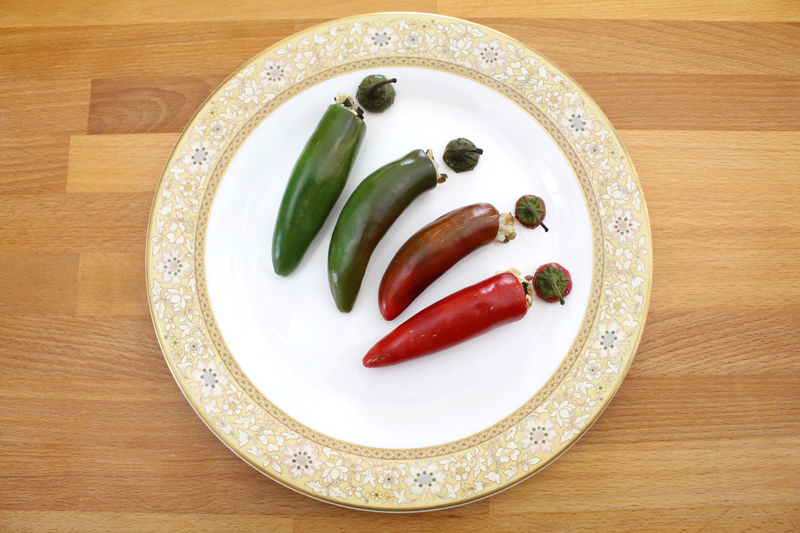
I used jalapeños this time. And to be honest, for me, they were too spicy. But, I used what I had on hand (and then drank a big glass of milk after I ate a whole one and my mouth burned up). Next time, I’d opt for a much milder pepper.

The tricky thing about these is since the pepper is staying almost whole, it’s hard to be sure that all the ribs and seeds are gone. I mean, I did the best I could, but there might have been more heat left in there then if I’d halved it and taken the ribs and seeds out that way.

On the Scoville scale, Chipotle, Fresno peppers, jalapeños, and wax peppers (like the Hungarian wax pepper) are rated at 3,500-10,000 Scoville Heat Units. Milder peppers are: Jalapeños (yes, they appear in two categories), Anaheim peppers, and poblano peppers (or ancho), at 1,000-4,000 SHU. And milder still: banana peppers, peperoncini, and pimentos come in at 100-900. Bell peppers are rated at a 0. The spectrum ranges from a pepper called the Carolina reaper at 2,200,000 SHU to the banana, paprika, Cubanelle, peperoncini, and pimento peppers are 100-900 SHU. (1) That’s a big range.

I use jalapeños all the time, buuuuut I don’t usually (ever) eat a whole one… in one sitting… in a three minute time period. They’re usually diced and added to dips, or Succotash, or Tacos. The heat is dispersed.

Next time I’d probably choose an Anaheim pepper or something even milder. A bell pepper would be nice. Or if you’ve got more tomatoes than you know what to do with, stuff those.

Lesson learned.

StuffedHotPeppers-2

I’m usually ok on my own for these posts. I’ve figured out how to photograph with one hand, while the other works. But today I needed both hands, and I needed a picture of it from above. I did consider trying to hold the camera with my chin and shoulder. I thought better of it and asked Tim, who now does freelance work from home too, for help instead. (Don’t tell him what I was thinking of doing, m’kay? 😉 )

StuffedHotPeppers-3

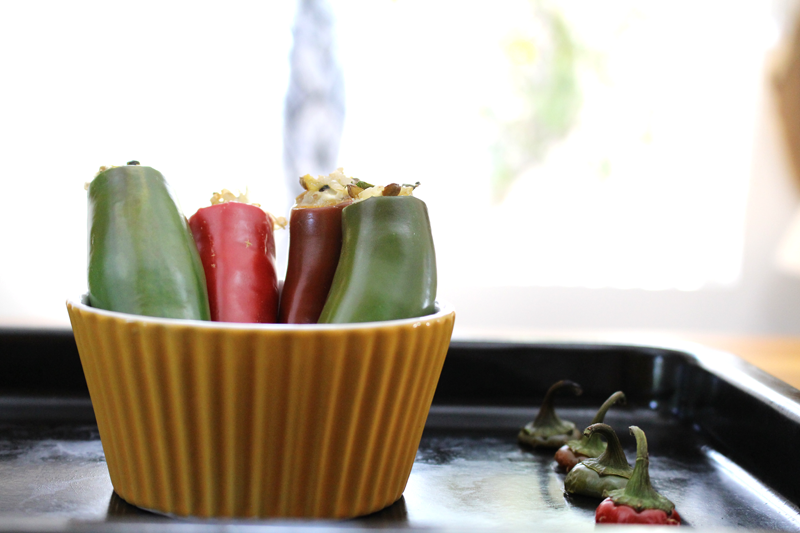
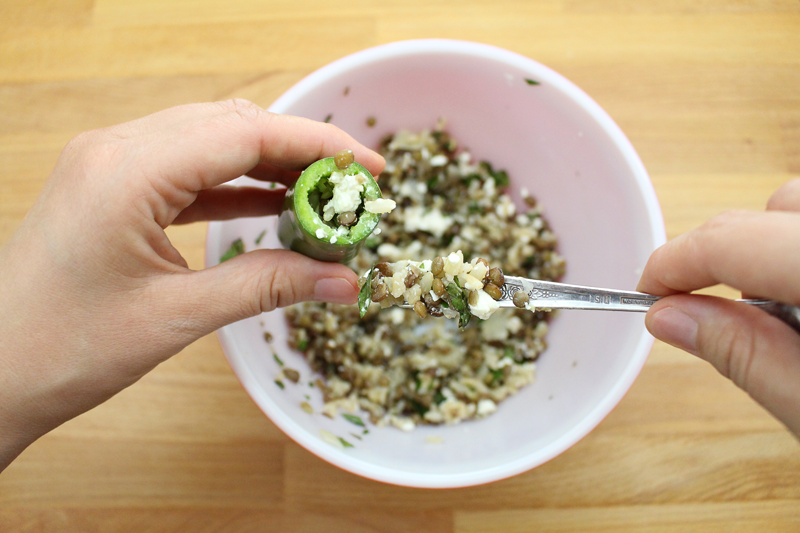
Once I settled on trying to shove the filling in with the handle of a spoon (after a few failed attempts with other utensils), I got the poppers roasting. I opted for the toaster oven, since it’s one bazillion degrees out right now. And my toaster oven opted to crap out on me, resulting in partially roasted pepper poppers. But, they were done enough, they were hot and bubbly, just not quite as soft as I would have liked (hence the 30-60 minute suggestion in the recipe – that way you can have ’em how you want ’em).

StuffedHotPeppers-5

With the right pepper for you, these are a nice little treat. Appetizer, lunch, side at dinner… There was a lot more filling than I ended up needing. But, I chopped up the leftover peppers, with filling, and added them to some green beans and summer squash that were sautéeing in olive oil. The filling got a little crispy (which makes me happy), the chopped up peppers added just a kick of heat, the lentils were there for protein, the rice to get in some grains. Oh and then I topped it with a fried egg. So, I’d make all the filling, if you’re ok with leftovers*. You can pop it in the freezer if you’re not going to eat it in a few days. Winner winner we just made tomorrow’s dinner.

StuffedHotPeppers-6

Happy Eating!

Chile Pepper Poppers

Prep Time: 15 minutes

Cook Time: 1 hour, 30 minutes

Total Time: 1 hour, 45 minutes

Yield: 3-5 (chile peppers) or 2-4 (bell peppers)

Serving Size: 2 chile peppers or 1 bell pepper

Chile Pepper Poppers

Ingredients

  • 1/2 C uncooked green lentils (need about 1/2 C cooked)
  • 1 1/2 C water
  • 1/2 C uncooked brown rice (or quinoa) (need about 1/2 C cooked)
  • 1 C water
  • 1 C onion (or shallot), chopped
  • to taste salt
  • pinch ginger
  • 1 T fresh Thai basil (or any variety basil), chopped
  • 1 T fresh mint, chopped
  • 1-2 T feta or extra firm tofu, crumbled
  • 6-10 large hot peppers* (or 2-4 bell peppers), stem sliced off, ribs and seeds removed using a paring knife (do not use fingernails)

Instructions

  1. Cook lentils with water (about 15-20 minutes, or according to package's instructions) (don't overcook). Drain if there is extra water.
  2. Cook rice (according to package's instructions), after about 15 minutes stir in onions. Continue to cook until rice is done (don't overcook).
  3. Pre-heat the oven to 350F.
  4. Mix lentils and rice with salt through mint. Taste and adjust seasoning if needed. Mix in feta or tofu. Stuff into peppers using the end of a spoon. Stand in a small ramekin (and place on a baking sheet) or lay flat on a baking sheet (some filling may spill out). Roast for about 30-60 minutes, or until peppers have softened slightly.

Notes

Filling may yield more than needed. Leftovers are great reheated in a skillet with some olive oil, veggies, and topped with a fried egg or piece of crispy tofu. *Use peppers as hot as you would like. On the Scoville scale, Chipotle, Fresno peppers, jalapeños, and wax peppers (like Hungarian wax pepper) are rated at 3,500-10,000 Scoville Heat Units. Milder peppers are: Jalapeños, Anaheim peppers, poblano (or ancho), at 1,000-4,000 SHU. And milder still: banana peppers, peperoncini, and pimentos come in at 100-900. Bell peppers are rated at a 0.

http://www.de-ma-cuisine.com/chile-pepper-poppers/

*To cool leftover rice, here’s what I like to do: Let it cool on the counter for a bit, then put it in the fridge, stirring every once in a while, keeping it fluffy (and not too packed into the container so it will cool properly).

(1) https://en.wikipedia.org/wiki/Scoville_scale

Monday

27

July 2015

0

COMMENTS

Salted Chocolate and Roasted Fig Pudding

Written by , Posted in Dessert, Fruit, Gluten Free, Kid-Friendly, Roasting, Snacks, Vegetarian

SaltedChocolateRoastedFigPudding-10

A few years ago I tried to make chocolate sauce for ice cream. As one who rarely makes desserts and who doesn’t bake a lot, the science behind these types of things can baffle me. I ended up with pudding instead of chocolate sauce.

But, it was one of those happy mistakes. Because I ended up with a delicious dessert (which, if you’re wondering, tasted just fine over ice cream).

SaltedChocolateRoastedFigPudding-1

Since figs are way early this year, kinda like a lot of our produce, I figured it was time to recreate that pudding, with a figgy twist.

This is one of those times where it’s important to have read through the recipe and have all ingredients prepped in advance. It’s not complicated and the timing doesn’t have to be exact. But, for example, you don’t want to take the time to melt the chocolate, only to have it cool down too much, or for the milk to boil over, or the figs to burn while you get the rest of the ingredients ready. You want to be able to give each step the attention it deserves.

SaltedChocolateRoastedFigPudding-2

I took some fresh figs and roasted them. It’s my favorite way to enjoy them. They were tossed with some coconut oil before heading in to the oven.

SaltedChocolateRoastedFigPudding-3

While the figs roasted, I melted some chocolate. We aren’t a microwaving house, so I made a double boiler from a medium-sized pot with about an inch of boiling water in the bottom, and a bowl that fit snugly over top and kinda in (without touching the water). This is gentler on the chocolate than cooking it right in the pan over the heat. It just took a few minutes, with a bit of stirring, to go from solid chips to…

SaltedChocolateRoastedFigPudding-4

Melty but lumpy goodness, to…

SaltedChocolateRoastedFigPudding-5

Smooth and creamy melted chocolate.

SaltedChocolateRoastedFigPudding-6

I scraped the flesh from the fig skins. Which sounds like pig skins. Which makes me think of bacon. But we’re not adding bacon. Really. No bacon… Although now I wonder if that would be good.

I digress.

I mashed the figgy goodness and mixed it in with the chocolate. It’s ok if it’s not perfectly smooth. A few chunks of fig are a good surprise when eating this pudding.

P.S. Don’t toss the fig skins. Chop them up and use them to make a fabulous treat: Toast a thinly sliced baguette. Top with cheese (like parmesan, cream cheese, feta, goat cheese, ricotta, or gorgonzola… to name just a few), figs, black pepper, and a drizzle of honey… you could even top it with some bacon if you wanted to.

SaltedChocolateRoastedFigPudding-7

I added the chocolate and fig mixture to a milk and honey mixture that had been warming for a few minutes (with it was a pinch of salt and some cornstarch that had been whisked into a bit of water).

Yes, this is getting good.

The cornstarch acts as a thickener. You’ll see it working as things get hotter and hotter. Gone will be the thin and runny chocolate soup. It will be thick and creamy.

SaltedChocolateRoastedFigPudding-8

I divided the mixture between 8 ramekins. They’re small portions, but it’s a rich dessert, and I think that small portions are best for desserts. I also don’t have much of a sweet tooth. If you want bigger portions, just use larger ramekins, and less of them. Simple math.

SaltedChocolateRoastedFigPudding-9

Those reserved sliced and roasted figs, one went in the center of each ramekin. And then, some flakes of sea salt were sprinkled over it all. This is a situation where a fancier “finishing salt” is great – table salt, not so much, as you want a few medium-sized flakes. For my birthday, Tim got me some Maldon Sea Salt Flakes, which is available at some grocery stores and online. I use them when I want to feel fancy.

If you’re skeptical, I understand. I have been slow to jump on the salted dessert bandwagon. But, after watching an episode of Good Eats, I was convinced to give it a try. The salt brings out the flavor of the chocolate. And it’s not like it’s salty salty, it’s just enhancing the flavor. If you’re unsure, do a little taste test. Take a spoonful of pudding and top it with one or two flakes of salt. Give it a taste. Then try a spoonful of pudding without. Do you notice a difference? I don’t think I’ll be salting my watermelon or apples anytime soon, but chocolate and salt have finally convinced my tastebuds that they’re good friends (Tim, I know, I know, you were right).

SaltedChocolateRoastedFigPudding-11

The last step before setting them in the fridge for an hour or so (to not only cool, but thicken and set) was to add a sprinkle of cinnamon. Once again I’ll ask you to trust me and do this. You can leave off the salt and cinnamon and your dessert will be fine, it will even be good. But, let’s elevate it to great. And then we’ve got a pudding that can be served at a dinner party, as a fancy birthday dessert, or a sweet way to end a holiday dinner.

I may have eaten most of a bowlful before it even got into the fridge. And remember, I don’t have a sweet tooth.

Happy Eating!

Salted Chocolate and Roasted Fig Pudding

Prep Time: 20 minutes

Cook Time: 28 minutes

Total Time: 48 minutes

Yield: 8

Serving Size: 3-4 oz.

Salted Chocolate and Roasted Fig Pudding

Ingredients

  • 8-10 figs, halved
  • 2 figs, sliced in four
  • 1 t coconut oil, melted
  • 6 oz (about 1 C) good quality chocolate (around 46% cacao)
  • 1 T cornstarch
  • 1/4 C cool water
  • pinch salt
  • 3 T honey
  • 2 C milk (any kind, full fat)
  • cinnamon, for topping (optional)
  • flakes of sea salt, for topping (optional)

Instructions

  1. Pre-heat the oven to 375F.
  2. Toss figs with coconut oil. Place cut side down on a baking sheet. Roast for 10 minutes, flip sliced figs (leave halved ones cut side down), and roast for about 5-10 minutes more. Remove from pan and cool. Scrape fig flesh from skin and set aside.
  3. Make a double boiler (or use a real one) by heating a pot with about 1" water. When it boils, turn it down to a simmer and place a glass bowl that just fits over the top and into the pot, but doesn't touch the water. Add chocolate to the bowl and stir occasionally until chocolate is melted. Remove from heat. Add figs and mash into chocolate.
  4. Whisk cornstarch with water.
  5. Let an ice cube melt in the bottom of a clean pot (this keeps the milk from scalding). Add the cornstarch mixture, salt, honey, and milk and warm slowly, over medium heat, stirring occasionally. When it's warm (after about 2-4 minutes), whisk in the chocolate and fig mixture. Slowly bring the mixture to a boil over medium heat, gently whisking or stirring with a wooden spoon almost constantly until it has thickened (about 3-5 minutes).
  6. Remove from heat and pour into 8-4 oz. ramekins. Gingerly set one fig slice on top of the pudding, and sprinkle with cinnamon and a few flakes of sea salt. Cool for about 10 minutes on the counter, then cool completely in the refrigerator (about 1 hour). Serve when they're completely cooled and set.
http://www.de-ma-cuisine.com/salted-chocolate-and-roasted-fig-pudding/

Thursday

25

June 2015

0

COMMENTS

Green Bean Fries

Written by , Posted in Appetizers, Dairy-Free, Dinner, Fruit, Gluten Free, Herbs, Inspired By, Kid-Friendly, Lunch, Quick and Easy, Roasting, Sauces, Sides, Snacks, Vegan, Vegetables, Vegetarian

GreenBeanFries-5

I’m crazy about French fries. With a burger they’re fabulous, topped with gravy and cheese curds they’re comforting, with a hearty dip they’re a meal. Of course they don’t have to be made with potatoes. Parsnips, carrots, and summer squash all work perfectly. And while we’re at it, why not try sweet potatoes, beets, or rutabagas?

GreenBeanFries-1

And when I’m feeling lazy and don’t want to take the time to cut up some veggies for roasting, or when I’ve got so many green beans just waiting to be used, I figure I might as well turn them into fries.

Never mind the fact that roasting green beans is one of my favorite ways to eat them. Ever.

GreenBeanFries-3

So it’s pretty simple. The beans are tossed with olive oil, salt, and pepper and head into a hot oven. High heat and not a lot of time will work well here.

GreenBeanFries-2

While the beans roast, a quick “ketchup” is blended together. Garlic, basil, a few spices, a little this (maple syrup), a little that (dijon mustard)… a minute or two in the mini food processor and we have some sort of tomatoey, herby, ketchup-like dipping sauce.

GreenBeanFries-4

This could be used for any of the above French fry options. If there are leftovers, it’d be great heated up and served over pasta, or used as a pizza sauce. Oh and it’d be fabulous atop a burger.

I have some suggestions in the recipe for three different herb combinations. I was also thinking that if you wanted to go a completely different direction and opt for a creamy dip, crème fraîche would be an awesome option. I might try that next time. (P.S. Crème fraîche is actually pretty easy to make from scratch! Who knew?!)

GreenBeanFries-6

The meals that I make and photograph for these posts usually end up being lunch. So, I fried up some eggs, washed some strawberries, and we were set. Of course Green Bean Fries would be a great compliment to a meal; a wonderful side, But, more often than not of late, I’ve been enjoying veggies as the star.

Happy Eating!

Green Bean Fries

Prep Time: 10 minutes

Cook Time: 17 minutes

Total Time: 27 minutes

Yield: 2-4

Green Bean Fries

Ingredients

  • 1-2 pounds green beans, stems removed
  • 1 t olive oil
  • to taste salt
  • to taste pepper
  • 2 T total (fresh if possible, if dried, crumble and reduce amounts): dill + parsley + basil OR basil + parsley + savory + thyme OR tarragon + parsley + dill + fennel pollen
  • 1 clove garlic, roughly chopped
  • pinch cayenne
  • pinch ginger
  • 1 t maple syrup
  • 1 t dijon
  • 2 T olive oil
  • 1 T chives or shallots (optional)
  • 1 C tomato puree
  • 1 T vinegar
  • to taste salt
  • to taste pepper

Instructions

  1. Pre-heat the oven to 425F.
  2. Toss beans with 1 t olive oil, salt, and pepper. Pour beans onto two baking sheets (so they're not over-crowded). Roast for 10 minutes, flip and rotate their position in the oven, and roast for 6-7 minutes more.
  3. While beans roast, blend herbs through pepper. Taste and adjust seasoning if needed.
  4. Serve green beans dipped in "ketchup".
http://www.de-ma-cuisine.com/green-bean-fries/

Monday

1

June 2015

0

COMMENTS

Stone Fruit Chips

Written by , Posted in Dairy-Free, Fruit, Gluten Free, Kid-Friendly, Roasting, Snacks, Vegan

StoneFruit-Chips-5

I’ve been saying for years how much I love to roast almost every kind of veggie. Last summer I took on tomatoes, drying them, not just roasting (and then promptly making them in to Bruschetta). So I knew that fruit was possible. But until today, I didn’t know the delicious satisfaction of drying stone fruit.

StoneFruit-Chips-1

It started simply enough: thinly sliced fruit on a lined baking sheet. I used a silpat (silicone mat), but parchment paper would work too. I sliced the fruit a quarter of an inch thick. Thicker would make the drying process take longer, thinner would be shorter.

StoneFruit-Chips-2

This is a great prep it and forget it recipe. Except don’t forget it – set the timer.

While I waited, I cleaned up, unpacked this week’s Abundant Harvest Organics box, and made a glaze of sorts for the fruit. You don’t have to brush them with anything. But, I wanted to add some seasonings, so I figured it wouldn’t hurt. I chose coconut oil, a few spices, and some maple syrup.

StoneFruit-Chips-3

A few of the chips were thinner side pieces, so they dried out faster. I had a cooling rack out and as I flipped them every 30 minutes, I took off any that were done, so no one burned.

StoneFruit-Chips-4

I let them cool for a little bit, then got to dipping them in some maple syrup sweetened yogurt. Sweetened silken tofu would also be great, if you’re looking to keep things in the vegan camp.

These make a great snack (I ate them all myself!), but they could also be chopped and added to Chamomile and Honey Pancakes (top or batter) or French Toast, or added to the batter of Whole Wheat Parsnip Cookies. In the cooler seasons, the stone fruit can be substituted with apples, persimmons, and pears.

Happy Eating!

Stone Fruit Chips

Prep Time: 10 minutes

Cook Time: 6 hours

Total Time: 6 hours, 10 minutes

Yield: 2

Stone Fruit Chips

Ingredients

  • 2 C stone fruit, sliced about 1/4" thick
  • 1-2 t coconut, canola, or vegetable oil (melted - coconut)
  • 2-3 t maple syrup
  • pinch of any or all: cinnamon, nutmeg, all spice, ginger
  • tiny pinch salt
  • Greek yogurt or silken tofu
  • maple syrup

Instructions

  1. Pre-heat the oven to 200F.
  2. Lay fruit on a parchment paper or silpat lined baking sheet. Bake for 30 minutes.
  3. Whisk together oil through salt.
  4. Flip fruit then brush with seasoned oil. Return to oven for 30 minutes.
  5. Flip fruit and brush the other side with seasoned oil. Return to oven for 3-5 hours, or until fruit is dried (place some on a cooling rack if it dries out faster than others), flipping every 30 minutes.
  6. Serve on their own or dipped in yogurt/tofu sweetened with maple syrup.

Notes

Most of the cooking time is hands off. Just set the timer and plan to be around for a little more than 6 hours to flip the fruit once in a while.

http://www.de-ma-cuisine.com/stone-fruit-chips/

Thursday

21

May 2015

0

COMMENTS

Roasted Stone Fruit with Bulgur and Fennel

Written by , Posted in Dairy-Free, Dinner, Fruit, Grains, Main Dishes, Nuts, Quick and Easy, Quinoa, Rice, Roasting, Sides, Vegan, Vegetables, Vegetarian

SavoryStoneFruit-6

Complain as I will about summer – the heat, the heat, the heat, I love the fruits and veggies that it brings. I’m silly for squash (more about that next week), crazy for cherries, and wacko for watermelon. Not to mention sweet corn… be still my heart. And oh the stone fruit… Standing over the sink, eating the most perfectly ripe peach, juice dripping down my arms. That’s just heavenly.

Try as I might, stone fruit doesn’t last long in our home. It’s just too easy to grab one, give it a quick scrub, and have a delicious snack. So in order to have any left for this savory take, I had to make it as soon as the box got home.

SavoryStoneFruit-1

This week it was nectarines in our Abundant Harvest Organics box, but apricots, apriums, or peaches would work great too. I sliced them about 1/4″ thick, tossed them with some olive oil, salt, and pepper, and roasted them for a few minutes.

SavoryStoneFruit-2

While the nectarines hung out in the oven, I sautéed some onions and fennel. A few minutes later I added the bulgur wheat and let it get a bit toasty before I added some veggie stock. If you wanted to keep this dish gluten-free, quinoa, brown rice, or barley would be great instead of the bulgur wheat.

SavoryStoneFruit-3

Once the fruit was roasted, flipped once, and roasted for a bit longer, it joined the party in the bulgur pan.

SavoryStoneFruit-4

Added to it was some saffron, cayenne, and ginger.

SavoryStoneFruit-5

Top it with a little lemon juice, some chopped nuts, and you’ve got dinner.

It’s great on its own, but would be fabulous served with some crispy fried tofu, or a roasted chicken, along with a salad of arugula, red onions, sliced stone fruit, and chopped nuts.

Happy Eating!

Roasted Stone Fruit with Bulgur and Fennel

Prep Time: 15 minutes

Cook Time: 15 minutes

Total Time: 30 minutes

Yield: 2-3 as a main dish, 3-4 as a side dish

Roasted Stone Fruit with Bulgur and Fennel

Ingredients

  • 2 C firm stone fruit (apricots, nectarines, apriums, or peaches), sliced 1/4" thick
  • to taste salt
  • to taste pepper
  • 1 t olive oil
  • 1 T olive oil
  • 1 C onion, chopped
  • 1/3 C fennel, chopped
  • to taste salt
  • to taste pepper
  • 1 C bulgur wheat (or quinoa, brown rice, or barley)
  • 2 C vegetable stock (or water)
  • pinch saffron (optional)
  • pinch ginger
  • to taste salt
  • to taste pepper
  • pinch cayenne
  • 1 T plus 2 t lemon juice
  • 1/2 C nuts (almonds or pistachios), roughly chopped

Instructions

  1. Pre-heat the oven to 400F.
  2. Toss stone fruit with salt, pepper, and 1 t olive oil. Place on a baking sheet and roast for about 7 minutes, flip, then about 7-8 minutes more (or until fruit is lightly browned).
  3. While fruit cooks, heat a medium sized sauce pan over medium or medium-low heat. Add 1 T olive oil. When oil is hot, add onion, fennel, salt, and pepper. Cook for 3-5 minutes, stirring occasionally. Add bulgur and cook for 1 minute more. Add stock, turn the heat to high and bring to a boil. Reduce to a simmer and cook for about 7-8 minutes (or until bulgur is cooked).
  4. Add stone fruit through lemon juice to bulgur mixture. Taste and adjust seasoning if needed. Cool for about 10 minutes, then serve topped with nuts.
http://www.de-ma-cuisine.com/roasted-stone-fruit-with-bulgur-and-fennel/