De Ma Cuisine

Guest Posts Archive

Friday

29

June 2012

1

COMMENTS

A Summer Salad from Arlene – Guest Post

Written by , Posted in Guest Posts, Thoughts

I asked my friend, Arlene, to write a post for me. She makes some of the yummiest food  and it’s healthy! (I don’t mean “healthy” like when it’s just labeled “healthy, but it’s really full of things you can’t pronounce. Her food has actual good for you ingredients that have been transformed into something delicious! What a feat!) In addition to being a wonderful cook, she’s so much fun to be around (she has one of the best laughs)! She’s also wise, honest, and trustworthy. I really look up to her. She lives in Texas, where I used to live… I haven’t seen her in almost 6 years… I miss her.

Here’s Arl 😉

Hi, my name is Arlene Doherty.  I am a wife of a wonderful man that I’ve been married to for almost 26 years now years and we have two grown daughters.  My husband, Kelly loves home cooked food and I love to cook it for one main reason – I want to know what I’m eating and feeding my family!  I’m so happy to contribute a little Rachel’s great blog.

Our family met Rachel about 10 years ago when she came to the Bible School we serve at as a student.  She loved us so much 🙂 that she stayed on staff for a number of years before getting married – my husband was honored when asked to officiate their wedding ceremony.  She’s been a wonderful friend to not only me but to our whole family.  Rachel’s wonderful, warm, crazy personality is infectious and we miss her but are so proud of all she’s doing where she is.

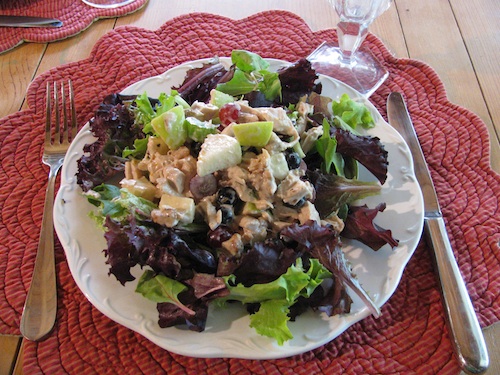
The recipe I want to share has been adapted from a recipe my mom had in her kitchen many years ago and it’s evolved into a salad that can be used many different ways.  This is our youngest daughter’s favorite.  It can be eaten as a wrap or (like in the photo) just over a bed of fresh greens.  Hope you enjoy it as much as we have.

Arlene’s Chicken or Turkey Salad

Last modified on 2012-12-01 02:18:30 GMT. 1 comment. Top.

Arlene’s Chicken or Turkey Salad
Recipe Type: Salad, Main
Author: Arlene Doherty
Prep time: 15 mins
Total time: 15 mins
Serves: 4
Ingredients
  • 2 cups chopped, cooked chicken or turkey.
  • 1/2 cucumber
  • 1 stalk celery chopped
  • 1 apple diced
  • 1/2 c blueberries – they’re in season right now so that’s why I chose them
  • 1/ 2 c. grapes
  • 1/2 c. nuts – I used walnuts, but you could use almonds or pecans just as easily
  • Salad Dressing: 1/2 c mayonaise – either make your own or find one with as few ingredients as possible
  • 1 orange – cut in half and squeeze out all the juice, then use one of the halves to zest
  • 1 Tablespoon honey
  • 1 tsp. balsamic vinegar
  • 1/2 tsp onion powder
  • salt and pepper to taste
Instructions
  1. To the chicken or turkey add: cucumber, celery, apple, blueberries, grapes, nuts
  2. Use any combination of fruits and vegetables you like. I’ve even used chopped cherries when they’re in season. Since it’s peach season as well, you may want to try that as well.
  3. Stir this together.
  4. Mix all ingredients together and pour over the chicken mixture. Stir to coat well. Fill your plate with fresh greens and place about a cup of the chicken on top of the greens. And that’s it!
Notes

For a quick meal, purchase an already roasted rotisserie chicken from the grocery store. What I did was buy a 10 lb. turkey and roasted it with fresh rosemary, fresh lemons (juice squeezed all over the turkey and cut in half a laid in the roaster) salt and pepper. Roast at 325 degrees for about 4 hours. This way you have plenty of turkey for many different meals – after the turkey is off the bones, freeze using quart sized bags in 2 cup quantities.
This recipe is versatile. For instance use large tortillas to make a wrap or make lettuce wraps with it. It can also be place on top of bread to for a sandwich or as I often have done, eat it alone in a bowl! This is a “something for everyone” kind of meal!


Friday

15

June 2012

0

COMMENTS

Elizabeth’s Favorite Carrot Cake – Guest Post

Written by , Posted in Guest Posts, Thoughts

Elizabeth is a good friend of mine. I really appreciate her friendship… and her culinary skills. Anytime I’ve eaten something Elizabeth has prepared it’s been delightful. At last year’s ThanksaChristmas dinner she made these amazing Crostini with Beef and Caper Mayo. I think I ate about 75% of them. Not kidding. She and I have a good time discussing and eating food. So it just made sense to ask her to be a guest on here. I haven’t tried this cake, but it looks amazing. (Side note: Carrot cake is special to Husband and I, as it was our wedding cake. Also because it’s delicious. Anything delicious deserves to be in the “special” category… like this cake.)

Here’s Liz…

I have known Rachel for something like a year and a half. It’s crazy that it’s been that amount of time because it feels like I’ve known her for much longer! We met through our husbands who were friends in college and while over a beer, Rachel and I bonded over our skiing abilities (or to be more accurate, my lack of skills!). Over the past year or so, I’ve had the opportunity to get to know her more and am so thankful for her friendship. She has a wonderful creative energy and I truly admire the how hard she works and how she promotes herself. It is quite a talent and one that I truly respect! So Rachel, thank you for the opportunity to do a guest post for you!

A little bit about me…I live in the LA area and I have been married for almost 2 years. I’m an alright-cook but I get very nervous at the thought of having someone over for dinner where I have to cook a meal. I’ve been known to ask my husband “is this ok to make if we have people over?” “would you be embarrassed if I made this for our friends?”Ask me to make small-bites or appetizers, I’m all yours but ask me to cook for guests…I’m sweating buckets!

Thankfully, one of the few things that I am confident to make is the carrot cake recipe below. For the past 4 years I have made my boyfriend/fiance/now husband’s birthday cake. He loves carrot cake and so each year, this is the one he wants. The first time I made the cake was both the first time I had made a layer cake and the first time I had made a carrot cake. With my nerves in hand, I reached out to my amazing Aunt who provided me with this recipe. Since then, it has been a yearly tradition that my husband anxiously waits for! I love that he likes his birthday cake being homemade. It allows me to get better from year to year and it also means a lot to me that he enjoys it so much. I hope you enjoy it as well!

Liz’s Carrot Cake

Last modified on 2012-06-18 17:26:23 GMT. 0 comments. Top.

Liz’s Carrot Cake
Recipe Type: Dessert
Ingredients
  • 2 cups sifted flour
  • 2 teaspoons baking powder
  • 2 teaspoons pumpkin spice
  • 1/2 teas. salt
  • 2 large eggs
  • 1 1/2 cup sugar
  • 1 cup vegetable oil
  • 1 cup cooked carrot puree **TIP: buy shredded carrots and then steam them to soften**
  • 1 tablespoon vanilla
  • 1 cup golden raisins (optional)
  • 1/2 cup cinnamon applesauce
  • 1 cup finely chopped walnuts (optional)
Instructions
  1. Preheat oven to 350.
  2. Spray pans with cooking spray.
  3. Onto a piece of wax paper, sift the flour, baking powder, pumpkin spice, and salt.
  4. In large bowl, with a electric mixer on high, beat the eggs and granulated sugar until light yellow. Beating constantly, slowly add the oil, taking 4 or 5 minutes to blend well. Beat in the carrot puree and vanilla.
  5. Using a wooden spoon, stir in the flour mixture just until it disappears, then fold in the raisins, applesauce, and walnuts. Spoon the batter into the pan(s) until almost half full.
  6. Bake and cool according to type of cake (see Notes).
  7. Frost with cream cheese frosting.
  8. While the cake cools, make the frosting.
  9. Swirl on the top of the cooled cakes. You can also sprinkle with more nuts for a decoration.
Notes

Cooking Time:
Cupcakes: Bake for 15 minutes or until a toothpick inserted in the center comes out with moist crumbs. Let the cupcakes cool in the pan on racks for 5 minutes before turning out onto the racks to cool completely.
Bundt Cake: 1 hour 10 minutes. Let rest 15 minutes before removing from pan.
Layer Cake: Check at 25 minutes to 35 minutes.


Liz’s Cream Cheese Frosting

Last modified on 2012-06-15 23:40:28 GMT. 0 comments. Top.

Cream Cheese Frosting
Ingredients
  • 12 oz cream cheese at room temperature
  • 6 tablespoons (3/4 stick) butter (not margarine) at room temperature
  • 4 1/2 cups sifted confectioners’ sugar **make to taste**
  • The zest of 1 lemon **again, to taste**
Instructions
  1. In a medium size bowl, with an electric mixer on high, beat the cream cheese and butter until smooth and fluffy. Reduce the speed to low and slowly blend in the confectioners’ sugar and lemon peel. Increase the speed to high and beat until fluffy.
Notes

(measurements based on a 2 layer cake)


(Adapted by Liz’s Aunt from: Life’s Little Temptations cookbook by Beth Allen)

Cooking Notes: This recipe is great as cupcakes both regular size and mini’s. I would recommend altering the frosting amounts to accommodate the change.

Friday

8

June 2012

0

COMMENTS

The Mighty Daikon Radish – Guest Post by Jenn

Written by , Posted in Guest Posts, Thoughts

My friend Jenn, of Babies, Recipes, and Financial Peace, and I connected quickly when we moved to this area. It seemed like we never ran out of things to talk about. Food is always a favorite conversation piece for me. It was and still is easy to talk food with Jenn. We’ve shared many meals and great times. I miss hanging out with her. I asked her to share a recipe that she made for us when Husband and I went over for dinner once. I’ve never made them, but I intend to. They’re awesome!! I’ll let Jenn tell you about them…

Here’s Jenn!

I’m mom to two adorable and hilarious kids: The Toddler is a year-and-a-half and The Baby is 3 months old. I’m also wife to the best man I know, and not only is he easy to cook for, but helps out with the kids or dinner prep when I don’t seem to have enough hands!

I have always loved to eat good food.  I don’t remember cooking much as a kid, but once I moved out in college, I learned pretty quickly that if I didn’t enjoy what I was eating, I’d just eat something else, and it would most likely not be healthy.  Now that I’m married and we have 2 kids on one income, my weekly goal is to make our pennies stretch, but not our pants.  Right now, our food budget is $400 a month.  We can’t always afford as much wine or chocolate as we’d like, but we generally eat filling, heathful, and tasty meals, most of which even The Toddler eats!

We used to get an Abundant Harvest box every other week, until we moved to Minnesota in the fall.  I do love my new state, but California’s year-round local produce is something I dearly miss!  The daikon radishes I used for this recipe last year were definitely more flavorful than the ones my husband picked up from the store the other day.  The end result was still yummy, and even The Toddler gobbled his serving!

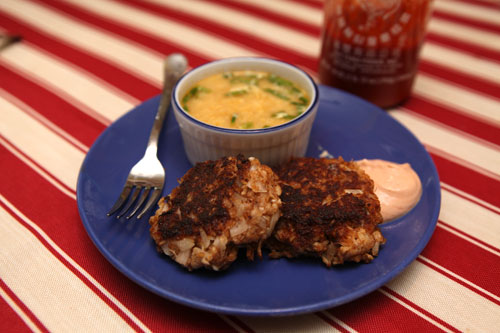
I served the daikon radish cakes with hot & sour soup.  I used the recipe from one of my favorite online resources, Simply Recipes, but since I decided to make it last minute, I didn’t have all the ingredients.  I used only the chicken broth, soy sauce, cornstarch, red wine vinegar, white vinegar, scallions, chili oil, and an egg, and it still tasted great!  And swirling the beaten egg into the hot broth was fun.  Enjoy!

Daikon Radish Cakes

Last modified on 2012-07-18 21:55:07 GMT. 0 comments. Top.

Daikon Radish Cakes
Author: Jenn Swedlund
Prep time: 60 mins
Cook time: 15 mins
Total time: 1 hour 15 mins
Serves: 4
Ingredients
  • 3 cups daikon radishes, grated, salted, & drained
  • 2 eggs
  • one small onion, minced (about 1/2 cup or 1 cup)
  • 4 garlic cloves, minced
  • 1+ cup toasted bread crumbs (I freeze the ends of the bread loaves no one seems to want to eat, and save them for crumbs)
  • 1 tsp black pepper
  • 1 tsp paprika
  • 1 tsp (or more!) garlic chili sauce (like Sriracha)
  • 1/2 cup vegetable oil for frying (approx 1/2 inch in your pan)
Instructions
  1. Place the grated daikon in a colander nested in a large bowl, and sprinkle with salt to help it shed water. Refrigerate for 30 minutes.
  2. Squeeze the liquid from the daikon, either by handful or all in cheesecloth. Discard the juice, and combine the grated daikon with the garlic, onion, egg, bread crumbs, pepper, paprika, and garlic chili sauce. Mix well.
  3. Form into small round patties by squishing the mixture into balls, squeezing out any extra liquid. Gently flatten the balls to form patties (think of making hamburger patties). The patties should stick together well, and shouldn’t crumble. Add more breadcrumbs or egg if necessary to reach the proper consistency.
  4. Heat oil in a large skillet on medium heat, until a piece of the mix dropped into the pan sizzles. Fry the patties until firm and browned, about 3 minutes per side. Drain on paper towels, and serve with sweet & sour sauce, more garlic chili sauce, soy sauce, hoisin sauce, or our favorite: non-fat Greek yogurt + soy sauce + garlic chili sauce!
Notes

Prep time of 60 minutes is really 30 min active + 30 min waiting.


(Credits: If you do a search for “Pan Fried Daikon Radish Cakes” you will find a few websites that have this recipe.  I would directly credit the page I found the recipe on a year ago, but I don’t know which page I used!  I’m hoping it’s enough to say that I didn’t invent this recipe, and would like to thank and credit the original creator.)

Friday

18

May 2012

0

COMMENTS

Sarah’s Yummy Salmon

Written by , Posted in Guest Posts, Thoughts

I have known Sarah for about a year. In that time, we’ve shared many meals and good times together. Often they take place at one of our homes, and the guests get to bring something to go along with the meal. I must say that between the two of us, we’ve come up with some really great dinners! I’m so thankful for my new(ish) friend!!

Here’s Sarah!

Growing up the only cooking I did was when I was babysitting which means I had a Masters in Mac ‘n Cheese and take & bake pizza.  After college I had an apartment with a roommate, but neither of us saw the point in cooking for one (since we cooked separately) so we unfortunately continued to stay proficient in “bachelor pad” type food.  I dabbled every once in awhile on dinner guests, but nothing beyond basic.  Then I met a boy who I vowed I would do anything to get him to keep him around.  I had no idea what that would require.  One Saturday afternoon I invited him over for dinner.  I then proceeded with the question, “What are you hungry for?”  Now – I have since been told Ishould have said, “Would you like OPTION A, OPTION B, or OPTION C for dinner?”  With a completely seriously straight face my handsome boyfriend said, “Chicken Cordon Bleu.”  Oh boy.  I swallowed and then began googling.  This was my official initiation into cooking.  It turned out tasty and my confidence came alive.  Now please do not go blog searching for me and my cooking site because you will be sorely disappointed.  I am no amazing cook.  I only know how to read a recipe and get creative here and there with spices…look out!

I enjoy cooking and have a great appreciation for those who have mastered it.  I may not be the next Julia Child, but I do give myself the occasional challenge such as buying a meat I have never cooked before and finding a recipe including it.  I’m hoping when my kids are grown they will not remember having the same 4 rotating dinner dishes, but a nice array of palate pleasers that cultured them and taught them to appreciate good food.

One of the favorite dinner requests at my house is HONEY SOY SALMON.  It’s quick and super tasty.  My husband loves soy sauce so anything that has a hint of it plus a mound of white rice on the side could cure any bad day in his book.  Give it a try – you will not be disappointed!

(For the hopeless romantic reader – that handsome boyfriend eventually asked me to marry him. :))

Sarah’s Honey Soy Salmon

Last modified on 2012-12-01 02:20:05 GMT. 2 comments. Top.

Honey Soy Salmon
Recipe Type: Main, Fish, Dinner
Author: Sarah Bell
Ingredients
  • 1 Scallion minced
  • 2 Tbsp Soy Sauce
  • 1 Tbsp Rice Vinegar
  • 1 Tbsp Honey
  • 1 lb Salmon
  • 1 tsp Sesame Seeds
Instructions
  1. Wisk scallion, soy sauce, rice vinegar, & honey together.
  2. Place the salmon in a Ziplock along with 3 Tbsp of the liquid mix. Place in the refrigerator for at least 15 minutes to chill.
  3. Preheat broiler & line a small pan with foil and cooking spray.
  4. Place salmon skin side down on foil. Broil for 6-10 minutes.
  5. Drizzle remaining sauce when removed from broiler & garnish with sesame seeds.


Friday

11

May 2012

0

COMMENTS

Mom’s Potato Salad – Guest Post

Written by , Posted in Breakfast, Dinner, Eggs, Gluten Free, Guest Posts, Kid-Friendly, Legacy, Lunch, Potatoes, Potlucks, Salads, Sides, Vegetables

I thought it would be fitting, since it’s my birthday week and it’s almost Mother’s Day, to have my mom write a post for me. The two go hand in hand, since I’m the oldest, so my birth made her a mother.

See that photo? The frame is kinda dirty because it’s usually in the kitchen. I don’t mind. That’s why I didn’t clean it off for its photo shoot. That’s Mom and I at Niagara Falls. There are lots of photos of Mom and I that I love, but this is one of my favorites.

As I’ve gotten older, I’ve realized more and more how much I am like my mom (and my dad too). I think it’s a good thing. I appreciate the traits, values, and talents they’ve passed on to my brothers and I. My mom is a hardworking woman, but she can be so silly too. I love that. I love that I discovered a passion for cooking, as she did. Most of our Skype conversations include at least one discussion about a recipe, or what one of us had/is going to have (different time zones) for dinner. It’s a fun thing to share with her, even from far away.

Thanks, Mom, for years of home cooking, and for instilling in us your love for food! Happy Mother’s Day! I love you!!

Here’s Mom…

Hi, this is Rachel’s Mom, Susan Pries, posting a near-Mother’s day blog. One of my favourite (this is the Canadian spelling) comfort foods is potato salad, my recipe, of course.  When I was in Kindergarten I often went to my Grandmother’s house for lunch after school.  My favourite lunch was an egg salad sandwich. One day my Grandmother told me she was out of hardboiled eggs.  I said that was OK, I really only liked the mayonnaise anyway.  She couldn’t bring herself to making a mayonnaise sandwich, so I got mayonnaise and jam.  Back to the potato salad. I never really liked potatoes a lot; it’s probably the mayonnaise that I like, but even I can’t serve myself a mayonnaise salad, so I add potatoes & hardboiled eggs.  I probably have grown up a bit since those early days, and I do enjoy potatoes quite often now and don’t need nearly the same amount of mayo.  Another thing about my potato salad is that I don’t usually add “crunchies” that is, raw onions or celery.  When our children were much younger they didn’t like to eat vegetables (they’ve grown up too) so I left out the celery & onions (I’m not fond of raw onions in anything, so I was happy to oblige).  So, here’s my recipe for potato salad (not very original) which I have been known to eat for breakfast (just think fried eggs and hash browns).

Happy Eating!

Mom's Potato Salad

Ingredients

  • 5 lb potatoes (or 1 medium potato per person)
  • 6 large eggs
  • Dressing: 1½ -2 cups Miracle Whip (or other Mayonnaise-type product) may use ½ sour cream
  • ¾ tsp regular mustard
  • 2 Tbl white vinegar
  • 2 Tbl white sugar
  • ¾ tsp salt (to taste)
  • dash of paprika
  • onion powder to taste
  • garlic powder to taste
  • 1 Tbl parsley
  • For “crunchy" version, you may add: ¼ cup chopped green or white onions, ½ cup chopped celery.
  • Rachel may wish to add: 5 or more slices of cooked, crumbled bacon

Instructions

  1. Steam potatoes until soft.
  2. Cover eggs with cold salted water; cover; bring to boil; turn off heat and let sit, covered for 15 minutes.
  3. When done cooking, cool potatoes & eggs (separately) under cold water.
  4. Combine dressing ingredients.
  5. Peel & dice the potatoes & eggs and add enough dressing (add a bit more if salad won't be served right away).

Notes

As with most of Rachel's recipes, all amounts are "to taste." You may choose to leave the potatoes with skin-on. (But do peel the eggs). Serve immediately at room temperature or chill and serve within a day or two. This salad is especially good served with homemade hamburgers, on homemade buns, with chips and homemade salsa on the side.

http://www.de-ma-cuisine.com/post-by-mom/

Happy Mother’s Day to all mothers, mother figures, and to all who have (or have had) mothers… And especially to my mom, who is certainly my favorite.