De Ma Cuisine

Guest Posts Archive

Friday

23

March 2012

13

COMMENTS

Natali’s “Sugar Dream” Cookies – Guest Post

Written by , Posted in Guest Posts, Thoughts

Natali is a friend of mine, a fellow blogger, and former co-worker of Tim’s from when we used to live in Central CA. She also loves to cook and eat. I’m going to be a guest over on her blog on Monday, and I thought it would be fun to have Nat over here to share with you.

Here’s Natali.

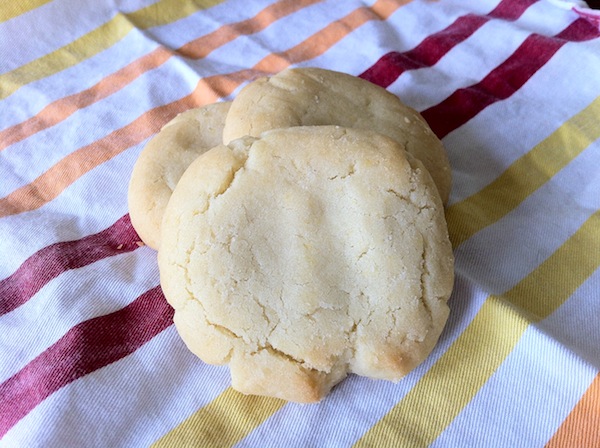
Growing up in Central California, there is one cookie shop that holds my sugar-lovin’ heart and that is Hungry Bear cookies. Hungry Bear makes a sugar cookie (the “Sugar Dream”) that is truly like no other. Buttery, rich, yet delicate — it truly melts in your mouth and preserves a bit of the granular property of the sugar, but is not at all gritty. I have been trying to duplicate this recipe for years, and finally came up with a real winning version of the recipe this past weekend. Now, keep in mind, this cookie is RICH. You may need a glass of milk, and it is not waistline friendly. But, really, it’s soooo worth it!

Natali’s Dream Sugar Cookies

(Recipe adapted by Natali from The Sugar Turntable.)

Directions

  • 2 sticks of butter (1/2 lb.)
  • 3 T cream cheese (full fat please)
  • 1 T milk (I used non-fat)
  • 1.5 t vanilla extract
  • 2 c. + 2 T sugar
  • 1 egg yolk
  • 1 c. vegetable oil
  • 1 t. baking soda
  • 1 t. salt
  • 4 c. flour

Instructions

  1. Cream together the butter, cream cheese, milk, vanilla and sugar until well blended. (About 3 minutes on medium speed)
  2. Add the egg yolk and oil, mixing on low speed.
  3. Once the previous ingredients are incorporated, add the baking soda salt and flour. It is best to mix the baking soda and salt into the flour with a whisk prior to adding to the mixing bowl.
  4. Refrigerate the dough for 2-4 hours.
  5. Pre-heat the oven to 400 degrees F.
  6. Roll the dough into balls and press to flatten slightly on a cookie sheet lined with either parchment paper or a silicone baking sheet. You want the cookies to be a pretty good size, abound 2 inches or a little larger. Space cookies at least an inch apart.
  7. Bake for approximately nine minutes. The cookies should be only slightly golden on the edges. Overcooking this recipe significantly alters the texture of the cookie, so be sure to set a timer and check by eight minutes.
  8. Allow the cookies to cool for 2-3 minutes before moving to a cooling rack to avoid breakage.
  9. Enjoy!

Friday

16

March 2012

1

COMMENTS

Oma’s Moon Cookies, by Jill

Written by , Posted in Baking, Cookies, Dessert, Guest Posts, Legacy, Thoughts

I’m blessed to have two brothers. But, until I got a sister-in-law last year, I had zero sisters. However, my cousin, Jill and I are as close as sisters. She’s one of my best friends. She lives in Colorado with her family, so we make up for the distance with visits, Skype chats, phone calls, emails, and texts. She and I were devastated at the loss of our Oma a couple of months ago. We both inherited a love for cooking from her. Jill, however, must have inherited the baking side of it much more than I. She’s a great baker. I asked if she would share Oma’s recipe for Moon Cookies.

Here’s Jill.

I know what you are thinking, it’s why are these called moon cookies yet they are shaped like stars?  Well honestly it is just because I don’t have a moon shaped cookie cutter.  Every time I make these cookies I am already far too deep in the process to stop, go to the store and get the proper shape, and every year I seem to forget that I don’t have a moon shape so I choose the next best celestial object, a star.  But Oma, whose recipe this is, always made them in moon shapes, hence the name.  Everyone in the Pries family knows what a moon cookie is.

This recipe is special for many reasons, most importantly because it was Oma’s.  And everything from Oma is special.  Secondly, they are insanely delicious.  One of the ways Oma loved her family was through food. She always had lovely treats and amazing meals waiting for us whenever we would visit.  Some of my fondest childhood memories take place in her kitchen, whether it was baking Zwieback and honey cookies, or sitting under the kitchen table first thing in the morning to warm up by the vent, or having Opa help me crush my crunchy buns into my bowl of “Opa” soup.  Of all the many traditions Oma passed down, a love of the kitchen was definitely one of them.  She was always eager to teach us and to pass down these special family recipes.  She had a servant’s heart and loved her family so much through everything she did.  I can only hope that I can make my family feel as loved and as precious as she made us feel.  Oma – I love you and I will keep trying to learn to crochet dish clothes, even though they always end up looking like cat toys!!

And now a special word of caution…..do not eat these cookies while wearing black.  The evidence will be all over you. And that is especially bad if you happened to indulge yourself when you really shouldn’t have or were flat out told not to, like a certain three year old boy who disappeared behind the sofa for a few minutes and then reappeared with lovely white fluff all down his front.

Oma’s Moon Cookies, by Jill

Oma’s Moon Cookies, by Jill

Ingredients

  • 2 Cups flour
  • 1/2 lb unsalted butter
  • 1/2 cup white sugar
  • 1 1/2 cups ground hazelnuts
  • Icing sugar, about 3 cups

Instructions

  1. Mix together flour, butter and sugar. Add the nuts (use your food processor to grind the nuts if you had to buy whole ones). Mix well. Refrigerate for about 3 hours. Roll out the dough about 1/4 " thick (thicker is better because they can be quite fragile).
  2. Bake at 350 for 8 minutes or until golden.
  3. After the cookies bake you can cool them until warm, them give them a bath in the icing sugar. Not just a light dusting. Carefully place the cookie in the bowl of sugar and gently pack it on so there is a nice coating. Store between layers of wax paper in the freezer.

http://www.de-ma-cuisine.com/omas-moon-cookies-by-jill/

Friday

9

March 2012

4

COMMENTS

Pea Tendrils, Please – Guest Post

Written by , Posted in Guest Posts, Thoughts

We got pea tendrils in our Abundant Harvest Box this week. Since I didn’t know what to do with them, I thought others might be in need of some inspiration as well. (Plus, maybe we’ll have them again next week, who knows!?) I had lunch on Thursday with Christy, Joanna, and Christy’s mom, Linda. Christy made Sautéed Pea Tendrils and Eggs. I asked if she would share it with you. She kindly obliged.

Here’s Christy:

When I discovered that we had pea tendrils coming in our Abundant Harvest Organics box this week, I admit I had to go on a quest. Growing up, I remember seeing peas grow in the garden, but I have never known that the leaves on the plants were edible! I suppose I could have settled for just incorporating the graceful, twining stems and leaves in a salad, but I wanted to see if there were some fun ways to highlight this unique ingredient. I found this recipe and it hit the spot. The sautéed pea tendrils are similar to spinach, but with a distinct fresh pea taste and crunchier bite. We thought the fried egg was the perfect accompaniment for a delicious lunch (or breakfast, or dinner :)). Who knew pea tendrils could be so tasty?!?

Sautéed Pea Tendrils and Eggs

Last modified on 2012-12-01 02:24:33 GMT. 0 comments. Top.

Sautéed Pea Tendrils and Eggs
Recipe Type: Main, Lunch, Dinner
Author: The Cilantropist via Christy Durrance
Cook time: 20 mins
Total time: 20 mins
Serves: 4
Ingredients
  • 1 large bunch fresh pea tendrils
  • 2-3 T olive oil
  • 2 cloves garlic
  • Salt
  • 4 eggs
  • Salt and pepper
Instructions
  1. Wash pea tendrils, discarding tough, large stems and tear into bite-sized pieces. Pat or spin dry.
  2. Heat olive oil in a medium skillet over medium heat. Add garlic and sizzle for 30 seconds, coating well with the oil.
  3. Add pea tendrils and salt to taste. Sauté until pea tendrils are wilted, but still bright green, about 2-4 minutes. Remove from pan to serving dishes.
  4. Fry one egg per person in the same pan to desired doneness. Salt and pepper to taste.
  5. Lay egg on top of sautéed pea tendrils. Serve and enjoy!
Notes

We ate this with an Irish Soda Bread, smothered with butter and homemade jam.

Friday

2

March 2012

0

COMMENTS

Katy Shares Her Omelete Expertis – Guest Post

Written by , Posted in Guest Posts, Thoughts

Happy Friday!! My friend, Katy, is back to share another delicious recipe with you. I hope you make these this weekend!!

Here’s Katy:

There is no such thing as too little or too much for an omelet! Omelets are one of those things that can just be breakfast in the morning or a gourmet dinner, that’s what I love about them. They taste great with cheese, salt, and pepper and they taste delicious with herbs, potatoes, peppers, bacon, and of course cheese. This is a recipe for a VERY good omelet, when you have time! Remember, if you don’t have time, the original is always great!

Katy’s Omelets

Last modified on 2012-12-01 02:24:45 GMT. 1 comment. Top.

Katy’s Omelets
Recipe Type: Breakfast, Eggs
Author: Katy Durrance
Serves: 1
How about an omelet for breakfast in the morning or for a gourmet dinner?!
Ingredients
  • 2 eggs
  • a pinch of salt
  • a pinch of pepper
  • herbs (rosemary, time, chives, parsley, etc.) put as much as you please! 🙂
  • potatoes cooked with salt, pepper, and garlic
  • bacon, cooked and chopped
  • grated cheese (preferably monetary jack)
Instructions
  1. Heat a small pan to medium to medium high heat.
  2. Beat the eggs, salt, and pepper in a small bowl.
  3. Spread butter on the pan and immediately add the egg mixture. Here’s the secret, add the cheese and herbs when the egg is mostly raw, this helps all the flavors to seep into the egg and make it tastier.
  4. Once the egg starts lifting a bit from the pan add the bacon and potatoes. Then, with the spatula, fold the egg in half. Keep it there for a few seconds then slide it onto a plate. Garnish with a few leftover herbs. Bon Appetite!


Friday

24

February 2012

0

COMMENTS

Food Safety Part 2

Written by , Posted in Guest Posts, Thoughts

Another installment from my brother Josh, the soon-to-be health inspector!

There are a few types of food thermometers that are commonly used in a household kitchen. The first is the basic “stick” thermometer. This is called a bi-metal thermometer, and records temperature through 1 of 2 metal ribbons inside shrinking due to heat, and the other expanding, which results in the dial at the top moving. These thermometers need to be calibrated (adjusted) often. If you are using one of these, keep in mind that the area on the thermometer that reads the temperature is the area from the pointed end until 1.5 inches up – so make sure to have the whole sensor in the food, or the temperature will be read wrong!

The second common thermometer is called an “oven-cord” thermometer. This one has a little box, and then a cord that you insert into the food, and it can go in to the oven. This is my favourite household thermometer. It is relatively cheap (~$20) and more accurate than the stick type.

When measuring temperatures of food, make sure to insert the thermometer into the thickest part of the food, and avoid touching the thermometer to the bottom or sides of the pan when recording.

Since I know that all of you reading this are so very enthralled by all of this food safety, I’ll give something a little bit more interesting to think about. A common misconception in the kitchen is the idea that colour (color) is an indication of how cooked a food is. This is not the case! One of my professors did a study to show how hamburgers that were cooked to the proper temperature still showed a red colour in the meat, and other hamburgers that were cooked until there was no more red, did not achieve the proper cooking temperatures and woud have been unsafe to consume. The colour of meat can be influenced by the pH (acidity) of the meat, or even how old the meat is (older meats tend to be a bit more brown).