De Ma Cuisine

Dairy-Free Archive

Monday

3

August 2015

0

COMMENTS

Eggplant and Summer Squash Tacos

Written by , Posted in Cheese, Dairy-Free, Dinner, Gluten Free, Lunch, Main Dishes, One Dish Dinners, Quick and Easy, Vegan, Vegetables, Vegetarian

EggplantTacos-5

This is one of those meals that’s made with ingredients that I didn’t used to think I liked. Eggplant and squash are things I’m excited about when summer arrives. That didn’t use to be the case.

I remember making Eggplant Parmesan before I knew about some of the nuances of eggplant. I ended up with an undercooked, rubbery, not at all yummy dish. We might have had cereal that night after we choked down as much as we could. I think I will try it again sometime soon. See how it turns out. ‘Cause I’ve learned a few things, so maybe it’ll be a success.

EggplantTacos-1

One of the things that I do now is salt the sliced eggplant and let it rest for a while to draw out the bitterness.

EggplantTacos-2

I’ve also learned that eggplant will soak up a lot of the oil, so it’s ok to cook it in a dry pan for a while, then add the oil later. I used both of these tips today. Cooking the eggplant in a dry pan to start lets them crisp up without getting all oil laden and soggy.

EggplantTacos-3

I started making my own tortillas recently. I’ve been using a recipe from Brown Eggs & Jam Jars for flour tortillas. I’ve yet to try corn tortillas, but I think they’d be fun to make too. Use whatever kind taste best to you. And if you’re feeling adventurous, make them from scratch (because there’s not much that compares to a still warm homemade tortilla wrapped around the taco filling)!

EggplantTacos-4

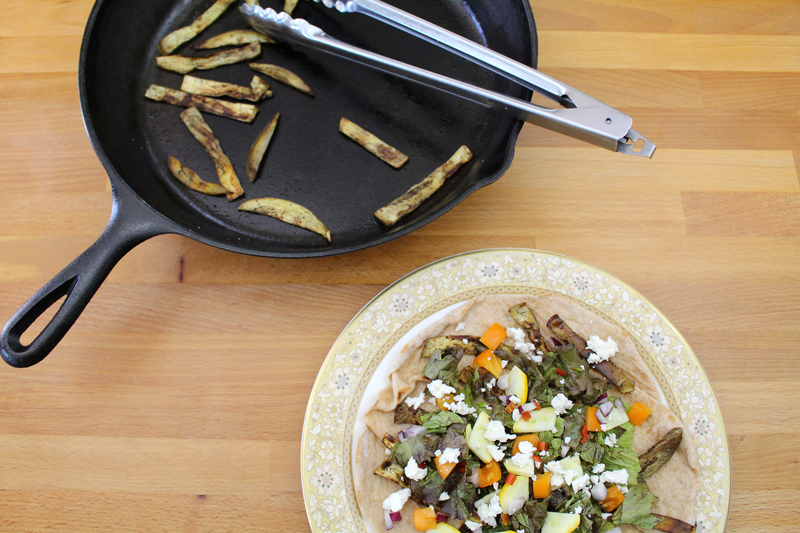
This was a quick and easy meal. The prep time was short, most of it getting done while the eggplant sat with the salt. The eggplant cooking took just a few minutes. I love meals like this!

EggplantTacos-7

Normally we have salsa and yogurt on tacos. But, I forgot to buy or make any. And I’m kinda glad about that. I had some feta in the fridge from another dish, so I used that instead. What a good idea! As I’ve said before, I love to use what I have on hand. Our grocery budget is small and I try to cook pretty frugally. And, happily, we might end up with dishes like this where expensive extras aren’t really needed.

EggplantTacos-6

You can make these tacos to suit your tastes. If you’re looking for a vegan dish, just replace the feta with some crumbled tofu, or omit the cheese altogether. If you want to add meat, chicken, pork, or beef would be great. If you want to add more protein, but keep it vegetarian or vegan, lentils would be excellent. And, if you think it sounds great just the way it is, go for it! Either way, it’s full of fabulous summer veggies: eggplant, tomato, and summer squash, a winning combination no matter how you slice ’em.

Happy Eating!

Eggplant and Summer Squash Tacos

Prep Time: 20 minutes

Cook Time: 5 minutes

Total Time: 25 minutes

Yield: 2

Eggplant and Summer Squash Tacos

Ingredients

  • 1 medium-sized eggplant, peeled and sliced about 1/4" thick
  • salt
  • 2 t olive oil
  • salt
  • 1/4 t chili powder
  • 2 tortillas (flour or corn)
  • 1-2 C lettuce, shredded
  • 1/2 C summer squash, thinly sliced and chopped
  • 1/4 C bell pepper (optional), chopped
  • 2 T red onion, diced
  • 1 tomato, chopped
  • 1/2 hot pepper, ribs and seeds removed, minced
  • 1/4 C feta cheese (or extra firm tofu), crumbled
  • pinch salt
  • white vinegar

Instructions

  1. Sprinkle eggplant with salt and let stand for about 15 minutes. Rinse and pat dry. Slice into strips. Heat a dry skillet. Remove from heat and add eggplant (being careful not to overcrowd the pan). Cook over medium heat for about 1 minute on the first side. Flip and cook for 1-2 minutes more. Ad oil, salt, and chili powder. Cook for 1 minute, flip and cook for about 1 minute more, or until eggplant is crispy.
  2. Warm tortillas if desired. Top with eggplant and lettuce through feta (or tofu). Sprinkle with salt and splash with vinegar.
http://www.de-ma-cuisine.com/eggplant-and-summer-squash-tacos/

Monday

13

July 2015

0

COMMENTS

Watermelon and Mint Gazpacho

Written by , Posted in Breakfast, Brunch, Dairy-Free, Dessert, Drinks, Fruit, Gluten Free, Herbs, Kid-Friendly, Quick and Easy, Snacks, Soups, Vegan, Vegetarian

WatermelonMintGazpacho-6

When I get a watermelon that’s as perfectly ripe and sweet as the one that came in our Abundant Harvest Organics box today, I have a really hard time not eating the entire thing in one sitting. I like to slice the melon in half and just eat with a spoon. If I can stop myself, I like to save the center for last, because it’s the best.

But, if you can resist, here’s a fun way to eat watermelon… in soup!

WatermelonMintGazpacho-1

It’s a cold soup though, don’t worry. It’s called a Gazpacho. Traditional gazpachos often consist of raw veggies and have a tomato base. But, there are many variations, including this simple watermelon one.

Since everything will be blended up, you don’t have to be too careful about how the watermelon is cut. I figured large chunks would work just fine. The seeds of a watermelon are edible (and some say they’re even good for you), but I don’t like to eat them. They ruin the texture for me. I don’t even like chunks in my ice cream. Tim says that’s weird, but I’m fine with my choices. If you want to leave the seeds in and blend them up, that’s fine with me.

WatermelonMintGazpacho-2

Watermelon pairs well with things like orange juice, maple syrup, and balsamic vinegar, so I added a little bit of each.

WatermelonMintGazpacho-3

It also tastes great with some refreshing mint. I added about 15 smallish leaves. You could add way more or way less, depending on how minty you want it. Basil would be another great addition (along with or in place of the mint). If you don’t want to add the herbs that’s fine. But, they add a cool, fresh burst of flavor.

WatermelonMintGazpacho-5

If the melon is already chilled, you can consume immediately. If not, pop it into the fridge for an hour or so before serving. You could serve it as a gazpacho, just on its own. You could add a dollop of yogurt or whipped cream. You could freeze it in an ice cube tray and use it in place of ice or frozen fruit in smoothies or summer drinks, or just pour it into a glass and drink it.

If you have cantaloup or honeydew melon on hand, they’d be a great addition, or could be used in place of the watermelon.

WatermelonMintGazpacho-4

I don’t really like change, especially when it comes to my favorites. That’s why I prefer a traditional Thanksgiving dinner, I love to re-watch Gilmore Girls, and I think watermelon is best served super freezing cold, halved and eaten with a spoon. But, with change comes learning new things and growth, so I’m ok with it (ahem, in moderation). I will bravely taste a new dish at Thanksgiving, try watching a new show, and I will, for the first time ever, branch out and do something different with watermelon. And I will enjoy it.

Happy Eating!

Watermelon and Mint Gazpacho

Prep Time: 10 minutes

Total Time: 10 minutes

Yield: 2-4

Watermelon and Mint Gazpacho

Ingredients

  • 2 1/2 - 3 C watermelon (or cantaloupe or honeydew or mixture of all 3), seeds removed, cut into large chunks
  • 2 t balsamic vinegar
  • 1-2 t maple syrup
  • 1/4 to 1/2 C orange juice
  • 10 to 12 large or 15-20 small mint leaves

Instructions

  1. Blend all ingredients until smooth.
  2. Then either: Chill and serve as a gazpacho.
  3. Freeze in an ice cube tray for summer drinks and smoothies (use in place of ice cubes or frozen fruit).
  4. Make into a sorbet in an ice cream canister (freeze according to manufacturer's directions).
http://www.de-ma-cuisine.com/watermelon-and-mint-gazpacho/

Monday

6

July 2015

0

COMMENTS

Spicy Summer Squash and Tomato Soup

Written by , Posted in Dairy-Free, Dinner, Fruit, Gluten Free, Herbs, Lunch, Quick and Easy, Sides, Soups, Vegan, Vegetables, Vegetarian

SummerSquashSoup-4

Summer isn’t usually the time of year that people are busting out the soup recipes. I realize that. But, it is the time of year for squash and tomatoes, so let’s make an exception.

Tomato Soup is one of my favorite comfort foods. I have memories of being at camp as a kid on a rainy summer day, eating grilled cheese and tomato soup in the dining hall. (That’s one of the few good memories I have of camp… I wasn’t much of a camper.) It wasn’t just camp, or even just during childhood. This has always been one of my favorite meals. It brings with it a wave of nostalgia, but it’s also a quick and easy meal that packs in fruits, veggies, grains, and protein (if you add the grilled cheese).

SummerSquashSoup-1

I started it off with some summer squash and salt. Simple and easy. I added some hot peppers (I used half a jalapeño and a whole Hungarian hot pepper, both without their ribs and seeds) and garlic. Everyone cooks away for a little while.

SummerSquashSoup-2

If you have tons of tomatoes on hand, this would be a great time to use them. You’d want to cook for longer, but, it’d be great. I don’t yet have an abundance of tomatoes. My garden holds the promise of things to come with plenty of green tomatoes. But, they’re not ready quite yet. The tomatoes that we’ve gotten in our Abundant Harvest Organics box are precious and I like to use them raw, on sandwiches, to top potato salad, or as a simple side. So this time I’ve used canned tomatoes. I think both ways would be great. You could also roast the tomatoes like I did on the show a few years ago. Lots of options here.

SummerSquashSoup-3

Since basil and tomatoes are pretty much best friends, I added a ton. Doesn’t matter what color – purple, green, lemon basil… just as long as it’s fresh.

SummerSquashSoup-5

You could leave the soup chunky if you wish. But, I like my tomatoey soups to be smooth, so I blended it up. I learned the hard way that if you’re not using an immersion (or hand) blender (so a regular blender) that it’s imperative that you take the lid’s plug out and cover the hole with a clean tea towel. If you leave the plug in, it will most likely (at least in my experience) fall in and get blended up. This will mean not just ruined soup (sad), but a big mess (annoying), and soup splattering all over you (ouch). Learn from me, friends. Take out the plug. 😉

SummerSquashSoup-6

If you’re planning to enjoy the whole pot of soup the day of, you’re golden. If you end up with leftovers or just want to make it ahead of time and pop it in the freezer, you need to cool it down quickly before it goes into the fridge. So, here’s a trick: To cool the soup down quickly, add only 2 C stock when cooking. Then after it’s cooked, add 1 C frozen stock or ice and stir in to cool down. When it’s cooled down, put it in the fridge to cool completely before freezing.

SummerSquashSoup-7

I like to store things in the freezer in smaller containers so that I’m not defrosting a large container for just one or two portions. Each container gets a label with the name, date, and number of people it will serve. To defrost, pop it into the fridge overnight. Or, just add it frozen to a soup pot with a bit of water or stock in the bottom and reheat.

Happy Eating!

Spicy Summer Squash and Tomato Soup

Prep Time: 10 minutes

Cook Time: 19 minutes

Total Time: 29 minutes

Yield: 4

Spicy Summer Squash and Tomato Soup

Ingredients

  • 1 T olive oil
  • 2 C summer squash, roughly chopped
  • to taste salt
  • 1/2 to 1 1/2 hot peppers (depending on what type), ribs and seeds removed, chopped
  • 3 cloves garlic, chopped
  • to taste salt
  • to taste pepper
  • pinch ginger
  • 2 C crushed tomatoes (or tomato puree)
  • 3 C stock or water
  • 1 T rice vinegar
  • 1 T maple syrup
  • 1/2 C fresh basil, chopped

Instructions

  1. Heat a soup pot over medium-low. Add oil. Add squash and salt. Cook for 5 minutes, stirring occasionally. Add hot pepper and cook for 2 minutes. add garlic and cook for 1 minute more. Add tomatoes through maple syrup. Bring to a boil, then reduce to a simmer and cook for about 10 minutes, or until veggies are tender.
  2. Remove from heat and add basil. Blend with a hand blender (or in batches in a regular blender, with the lid's plug removed and the hole covered with a clean tea towel) for 1 minute. Taste and adjust seasoning if needed.
http://www.de-ma-cuisine.com/spicy-summer-squash-and-tomato-soup/

Monday

29

June 2015

0

COMMENTS

Succotash

Written by , Posted in Beans, Brunch, Dairy-Free, Dinner, Fruit, Gluten Free, Herbs, Legumes, Lunch, Main Dishes, Quick and Easy, Sides, Vegan, Vegetables, Vegetarian

Succotash-5

If you watched Looney Tunes as a kid, you probably remember Sylvester’s, “Sufferin’ succotash!” When I think about this dish, it’s his voice that usually says the name.

Over and over and over and… over.

Succotash-1

But, ain’t no sufferin’ here. Tim, who is not a huge fan of squash, loved this. He asked for more and there wasn’t any. So I made it again the other day.

Succotash-2

This isn’t a perfectly traditional succotash because I didn’t have any lima beans or edamame. I used green beans instead. They were great. I’ve read that you could also add beans, like black beans. I think that would be terrific. I didn’t have bell peppers, but wanted to add some hot pepper. Fabulous! If I had eggplant, I probably would have thrown some in. Peas? Sure! It’s one of those dishes that lends well to not just summer, but what I had in the kitchen.

Succotash-3

The smell of basil always makes me think of summer. It pairs so well with everything in this dish. I couldn’t leave it out. I’ve noticed that I like the taste of basil better in the summer. It’s been about 8 years of us eating seasonally and I can see it in the things I start to crave as the weather changes.

Succotash-4

I found this to be a perfectly satisfying main dish. So did Tim. We had it once with a fried egg on the side, another time with a slice of cornbread. The thought of both is making my mouth water.

Succotash-6

Here’s to long summer days, hot weather (only because my tomatoes like it), and simple dinners like these, eaten outside with loved ones.

Happy Eating!

Succotash

Prep Time: 10 minutes

Cook Time: 10 minutes

Total Time: 20 minutes

Yield: 3-4

Succotash

Ingredients

  • 1 T olive oil
  • 2 C green beans, cut into 1" pieces
  • 2 C corn (about 3 cobs) (frozen corn could be used)
  • 2 C summer squash, chopped
  • (could also add: eggplant, bell pepper, peas, black beans, lima beans, edamame, or fava beans)
  • 1-2 T hot pepper (optional), ribs and seeds removed (if you want), diced
  • to taste salt
  • to taste pepper
  • 1 C (heaping) tomato, chopped
  • 1 T garlic (about 2 cloves), diced
  • 1 t vinegar (white, red wine, rice)
  • 2 T basil, chopped, for topping

Instructions

  1. Heat skillet over medium-low. Add oil. Add green beans through pepper. Cook for 5 minutes stirring occasionally. Add tomato and cook for 3 minutes, stirring occasionally. Add garlic and cook for 1-2 minutes, stirring often. Taste and adjust seasoning if needed. Remove from heat and add vinegar.
  2. Serve topped with fresh basil.
http://www.de-ma-cuisine.com/succotash/

Thursday

25

June 2015

0

COMMENTS

Green Bean Fries

Written by , Posted in Appetizers, Dairy-Free, Dinner, Fruit, Gluten Free, Herbs, Inspired By, Kid-Friendly, Lunch, Quick and Easy, Roasting, Sauces, Sides, Snacks, Vegan, Vegetables, Vegetarian

GreenBeanFries-5

I’m crazy about French fries. With a burger they’re fabulous, topped with gravy and cheese curds they’re comforting, with a hearty dip they’re a meal. Of course they don’t have to be made with potatoes. Parsnips, carrots, and summer squash all work perfectly. And while we’re at it, why not try sweet potatoes, beets, or rutabagas?

GreenBeanFries-1

And when I’m feeling lazy and don’t want to take the time to cut up some veggies for roasting, or when I’ve got so many green beans just waiting to be used, I figure I might as well turn them into fries.

Never mind the fact that roasting green beans is one of my favorite ways to eat them. Ever.

GreenBeanFries-3

So it’s pretty simple. The beans are tossed with olive oil, salt, and pepper and head into a hot oven. High heat and not a lot of time will work well here.

GreenBeanFries-2

While the beans roast, a quick “ketchup” is blended together. Garlic, basil, a few spices, a little this (maple syrup), a little that (dijon mustard)… a minute or two in the mini food processor and we have some sort of tomatoey, herby, ketchup-like dipping sauce.

GreenBeanFries-4

This could be used for any of the above French fry options. If there are leftovers, it’d be great heated up and served over pasta, or used as a pizza sauce. Oh and it’d be fabulous atop a burger.

I have some suggestions in the recipe for three different herb combinations. I was also thinking that if you wanted to go a completely different direction and opt for a creamy dip, crème fraîche would be an awesome option. I might try that next time. (P.S. Crème fraîche is actually pretty easy to make from scratch! Who knew?!)

GreenBeanFries-6

The meals that I make and photograph for these posts usually end up being lunch. So, I fried up some eggs, washed some strawberries, and we were set. Of course Green Bean Fries would be a great compliment to a meal; a wonderful side, But, more often than not of late, I’ve been enjoying veggies as the star.

Happy Eating!

Green Bean Fries

Prep Time: 10 minutes

Cook Time: 17 minutes

Total Time: 27 minutes

Yield: 2-4

Green Bean Fries

Ingredients

  • 1-2 pounds green beans, stems removed
  • 1 t olive oil
  • to taste salt
  • to taste pepper
  • 2 T total (fresh if possible, if dried, crumble and reduce amounts): dill + parsley + basil OR basil + parsley + savory + thyme OR tarragon + parsley + dill + fennel pollen
  • 1 clove garlic, roughly chopped
  • pinch cayenne
  • pinch ginger
  • 1 t maple syrup
  • 1 t dijon
  • 2 T olive oil
  • 1 T chives or shallots (optional)
  • 1 C tomato puree
  • 1 T vinegar
  • to taste salt
  • to taste pepper

Instructions

  1. Pre-heat the oven to 425F.
  2. Toss beans with 1 t olive oil, salt, and pepper. Pour beans onto two baking sheets (so they're not over-crowded). Roast for 10 minutes, flip and rotate their position in the oven, and roast for 6-7 minutes more.
  3. While beans roast, blend herbs through pepper. Taste and adjust seasoning if needed.
  4. Serve green beans dipped in "ketchup".
http://www.de-ma-cuisine.com/green-bean-fries/