De Ma Cuisine

Baking Archive

Monday

27

October 2014

0

COMMENTS

Chicken Pot Pie

Written by , Posted in Baking, Dinner, Herbs, Leftovers, Lunch, Main Dishes, Meat, One Dish Dinners, Potatoes, Poultry, Vegetables

ChickenPotPie-12

Today is one of those fall days where it actually feels like fall. I’m wearing jeans and a sweater and am totally comfortable.

I’m also going through the photos that I took of the Chicken Pot Pie that I made the other week and drooling. We ate the leftovers for dinner last night, otherwise I’d probably be heating them up for lunch right now.

So that’s a little bit about my life.

Fall weather and Chicken Pot Pie make me happy.

So do things like my dog’s whiskers, the way the sky can turn such brilliant shades of orange and pink after the sun’s gone down, and a good Skype conversation with my dad.

ChickenPotPie-13

I have to tell you, this particular Chicken Pot Pie recipe is one of my favorites. After tasting the sauce I yelled, “Oh my gosh!”, to no one but myself. So, I just had to share it with you.

ChickenPotPie-1

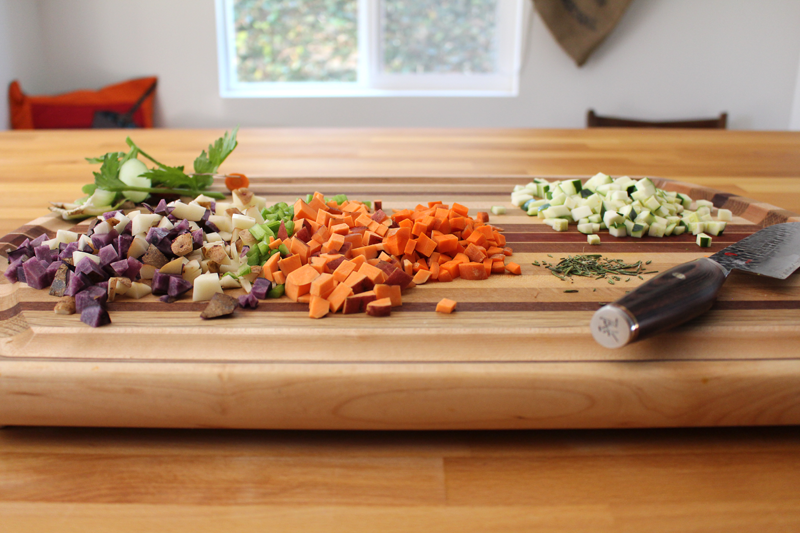
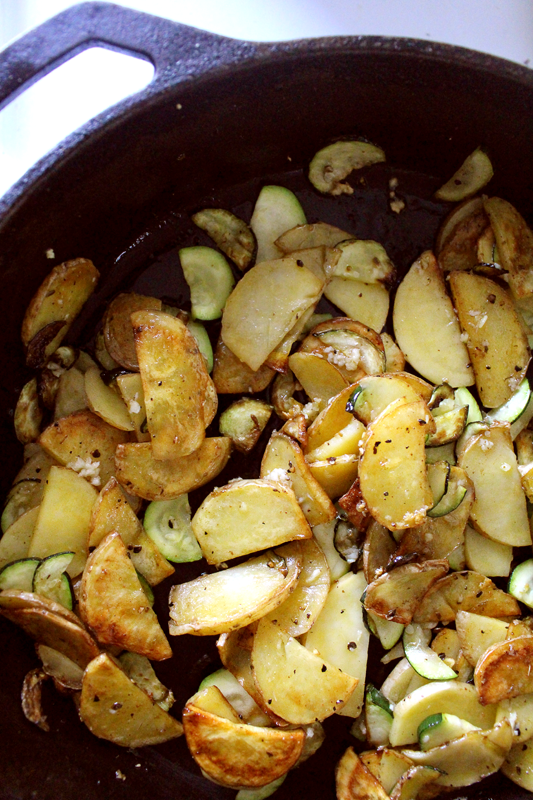
It’s a simple pie with humble ingredients. I make this often enough, and use what I have on hand. So it can range from things like carrots, potatoes, and celery, to parsnips, squash, and peas. It feels like the kind of meal that’s been made for years and years and years, by people who at the end of the day, just want something nourishing and delicious to fill their bellies.

This meal fits that exactly.

ChickenPotPie-2

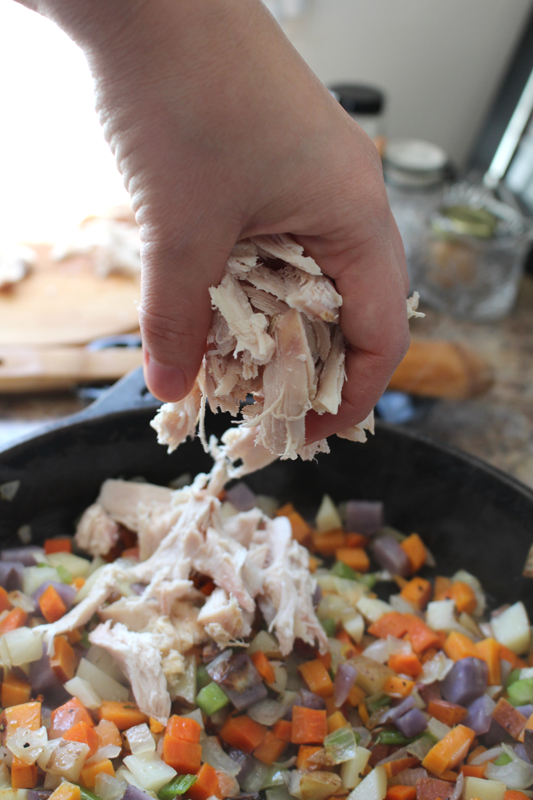
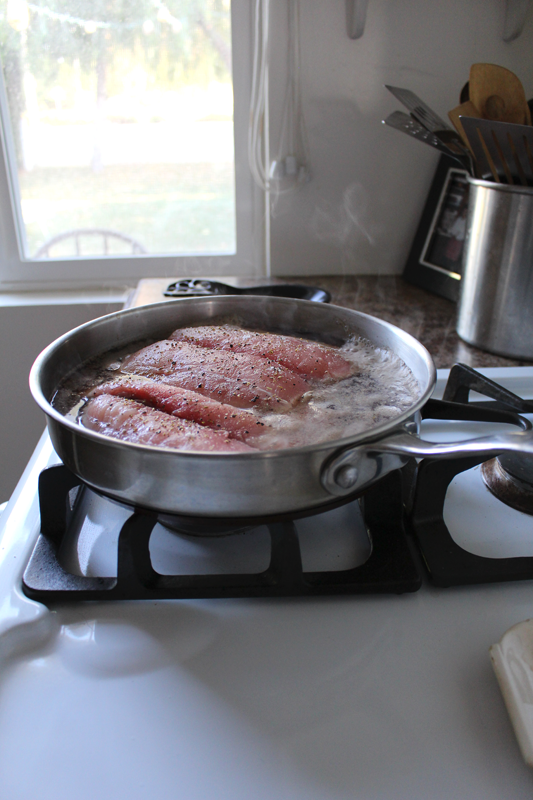
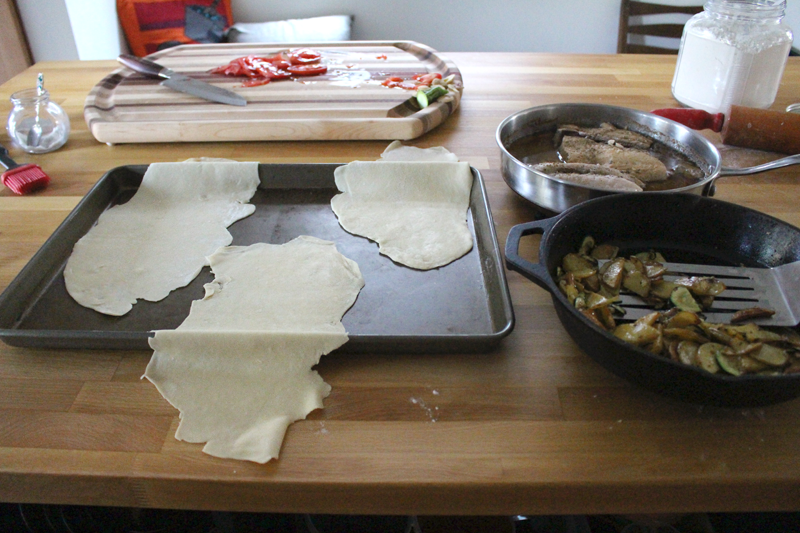
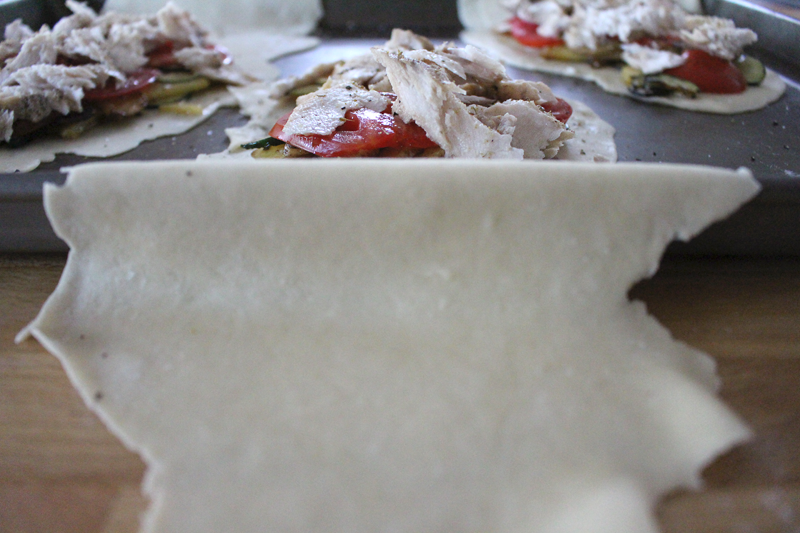
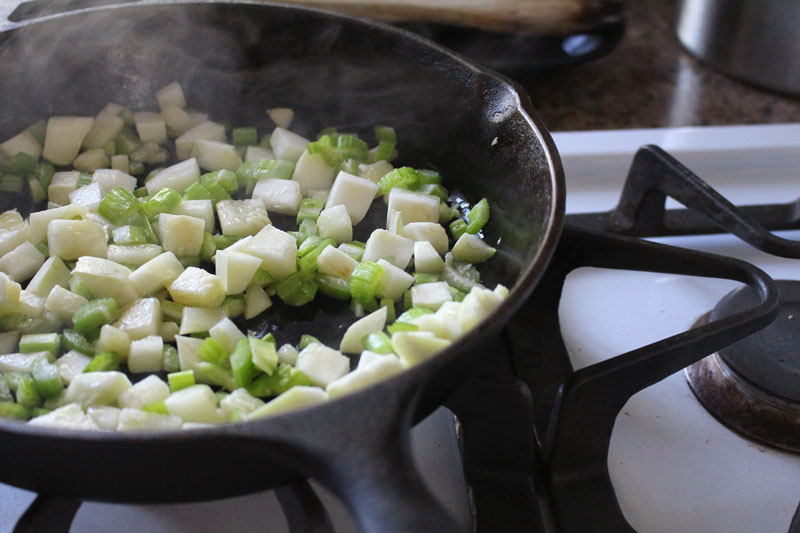
A couple of weeks ago I roasted some chicken. The leftovers and pan drippings were frozen. Saved just for this meal. The bones went into the freezer, for the next time I need to make stock. I defrosted the chicken in the fridge overnight and then shredded it and dropped it into the cooked veggies. 

ChickenPotPie-3

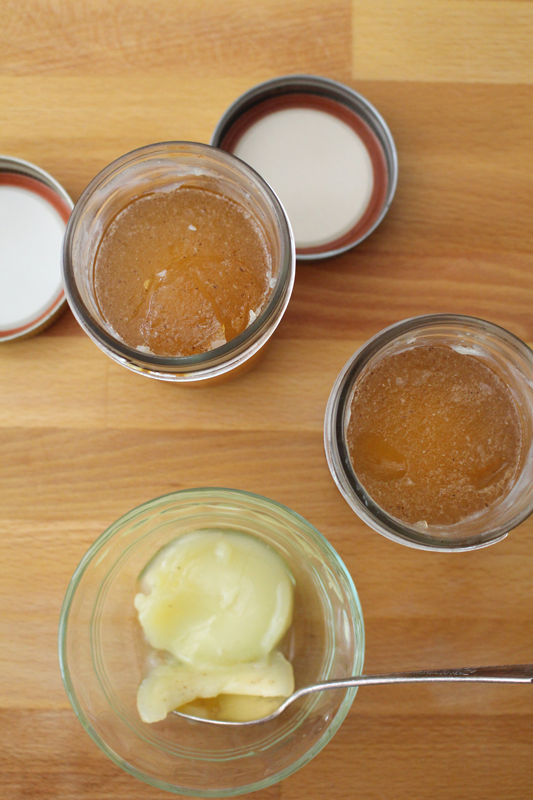
I usually use chicken stock for this dish. But, this time I had pan drippings. You can tell the difference by the jiggliness of it. The pan drippings jiggle, while stock is more liquid. The fat will rise to the top of both. I like to scrape it off (and give it to the dog as a treat).

ChickenPotPie-4

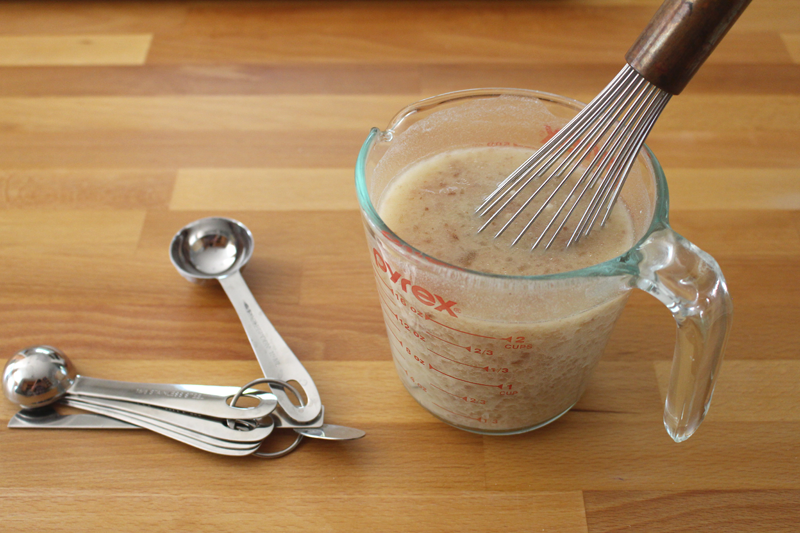
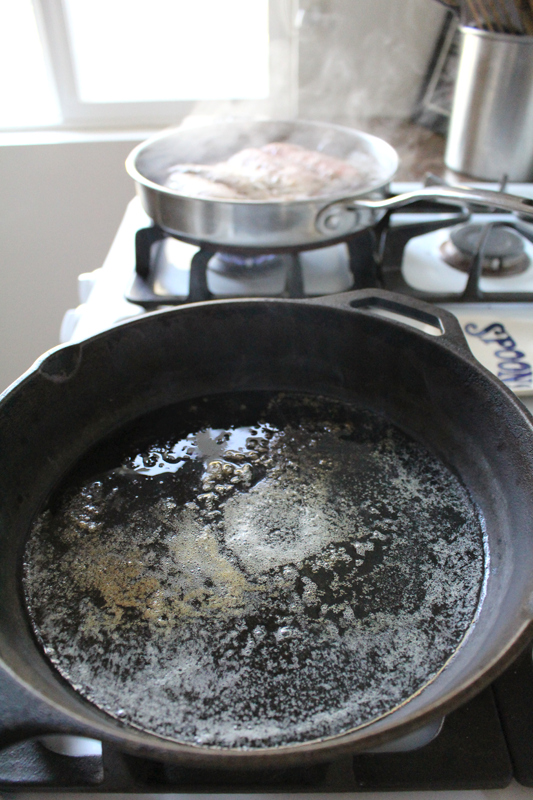
For this type of dish, I find it a little bit easier to just whisk the thickening agent (flour or cornstarch) together with some of the liquids, and add it to the pan. It thickens nicely once it boils. A traditional roux can be made instead (you know, where you heat some fat, then add an equal amount of flour and cook for about 30-60 seconds, then whisk in the stock and let it thicken), if you prefer.

ChickenPotPie-5

ChickenPotPie-6

ChickenPotPie-8

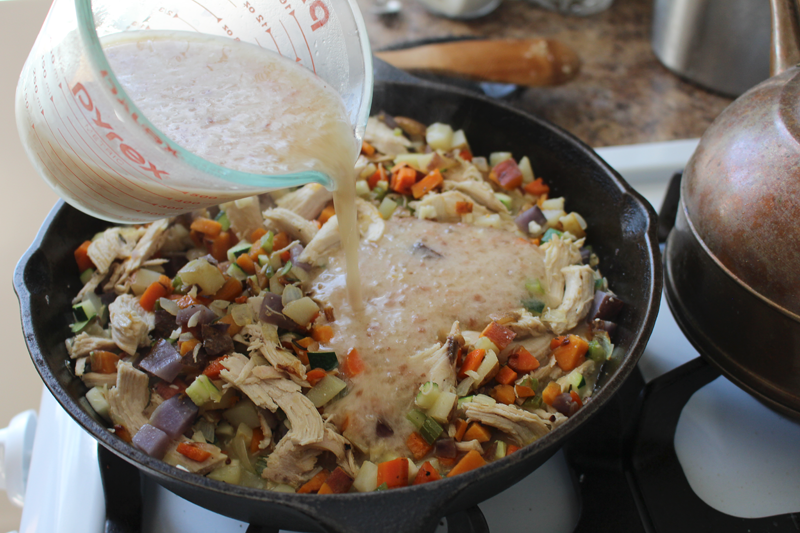
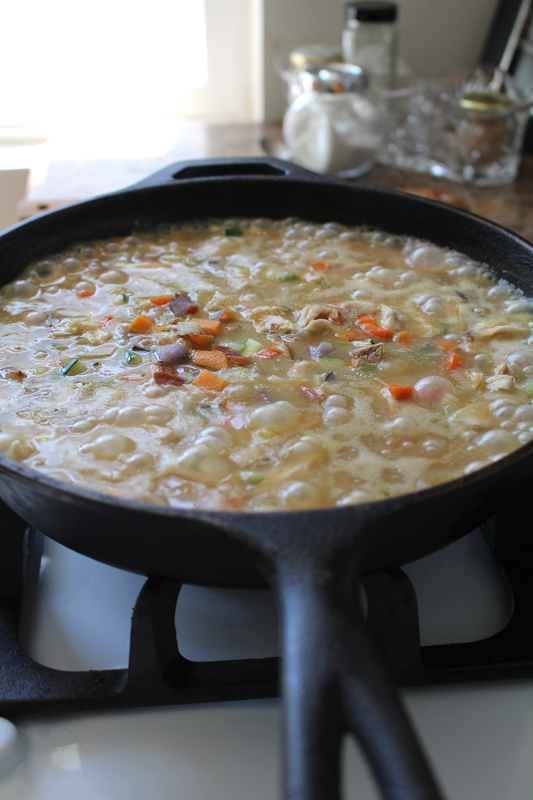
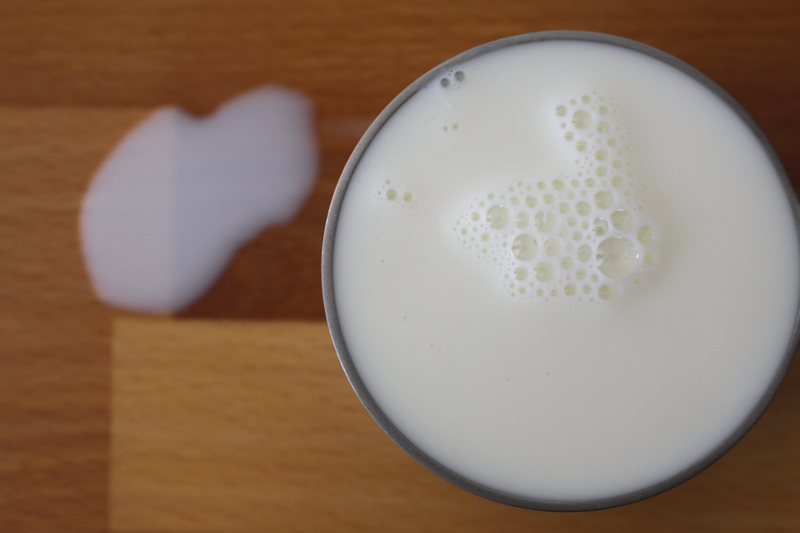
After it boils and thickens, the milk is added. I don’t like it when the sauce breaks, so I like to leave the milk out until the end. Then heat it ever so gently, just until steam rises.

ChickenPotPie-9

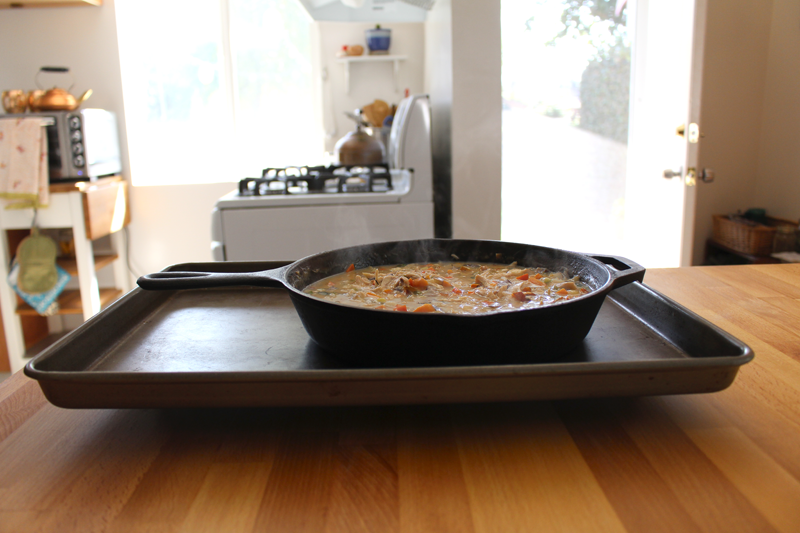
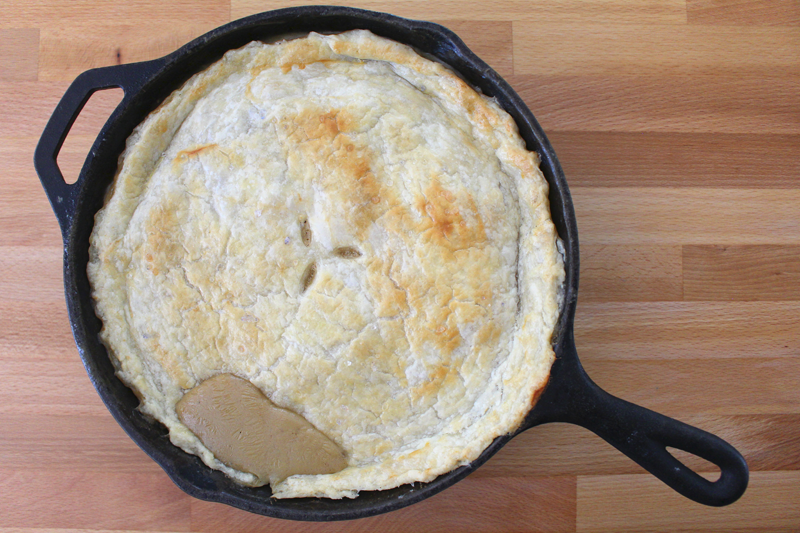
Once the seasoning is checked, the skillet is set on a baking sheet (in case of overflow – I’d rather clean that than the inside of the oven).

ChickenPotPie-7

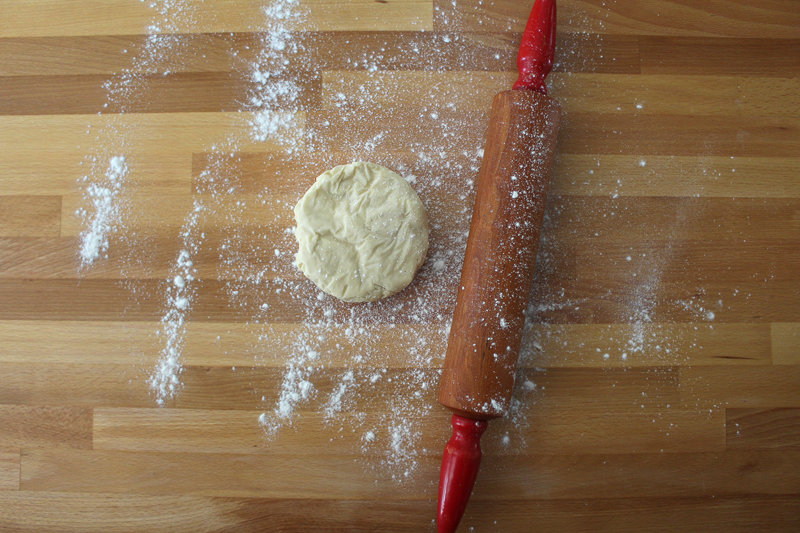
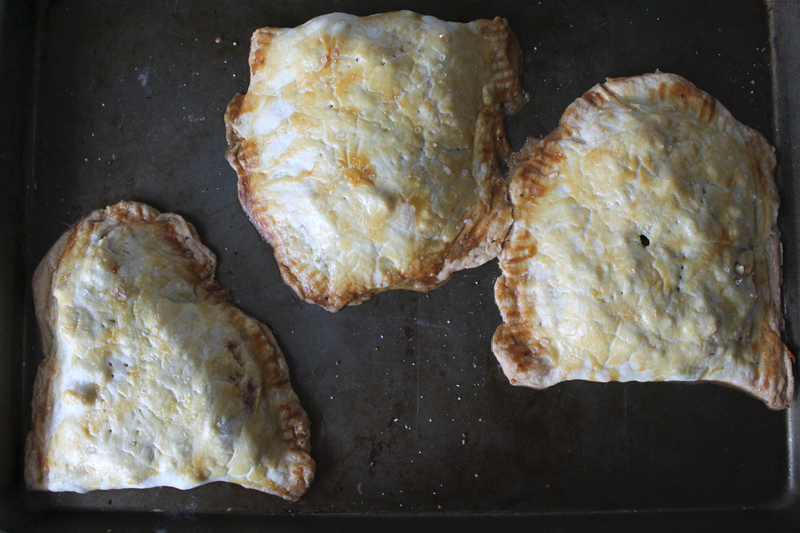
Pie crust is rolled out. I used Alana’s recipe (from her cookbook).  I tried to work quickly, but since the skillet and filling were both so hot, it got a little soft. It didn’t seem to matter in the end though.

ChickenPotPie-10

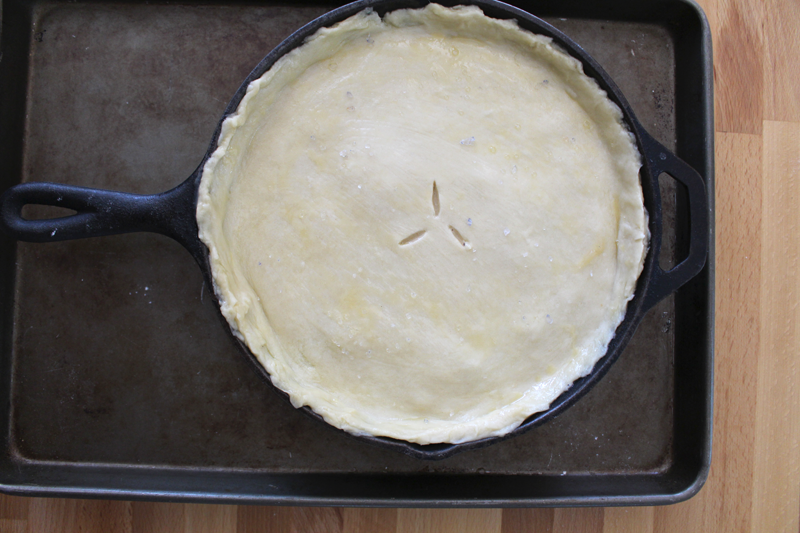
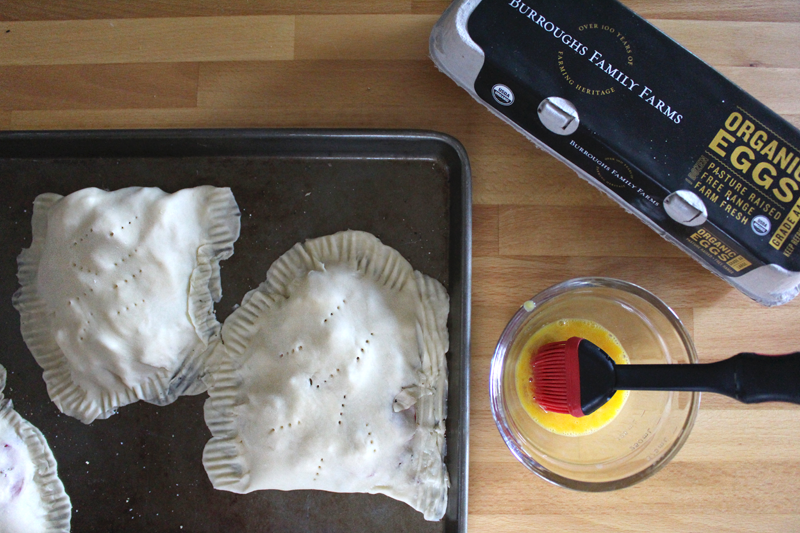
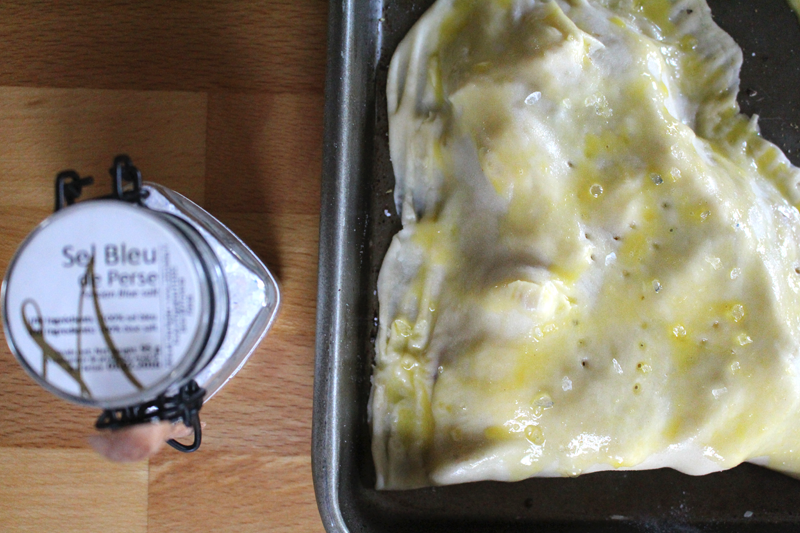
The crust is brushed with egg and sprinkled with some of the sea salt that we brought back from Paris. Just because it feels fancy and I like the crunch.

ChickenPotPie-11

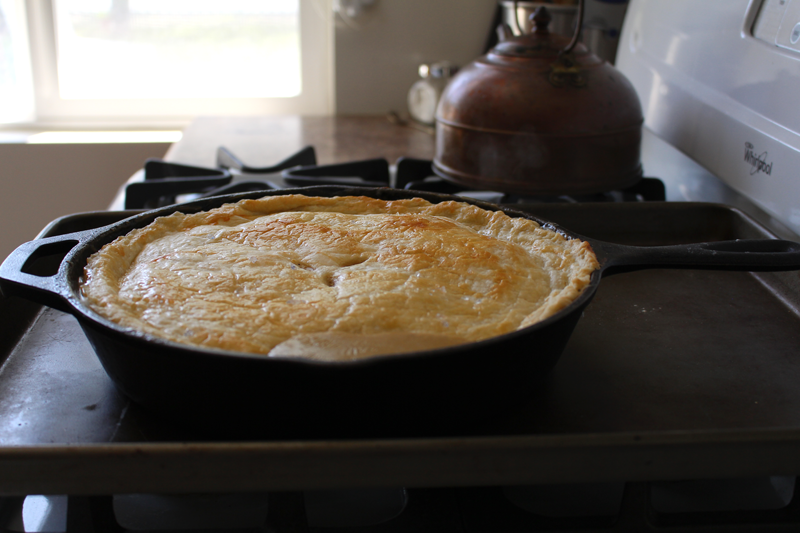
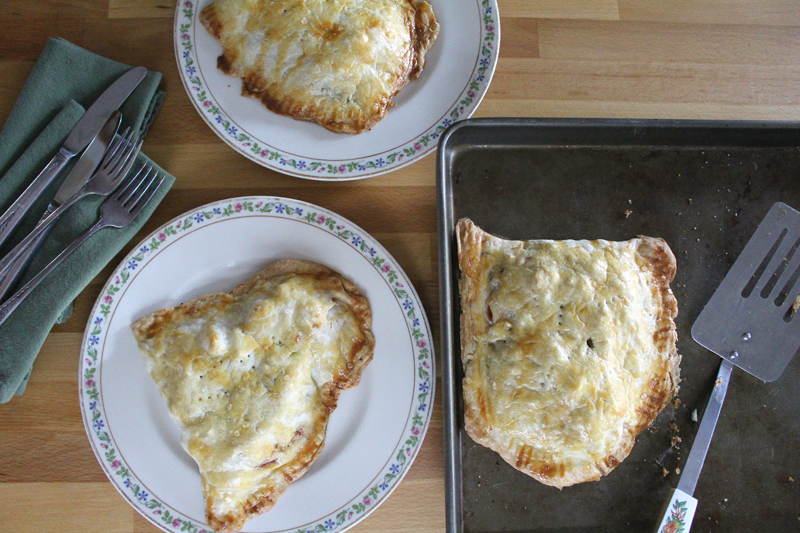
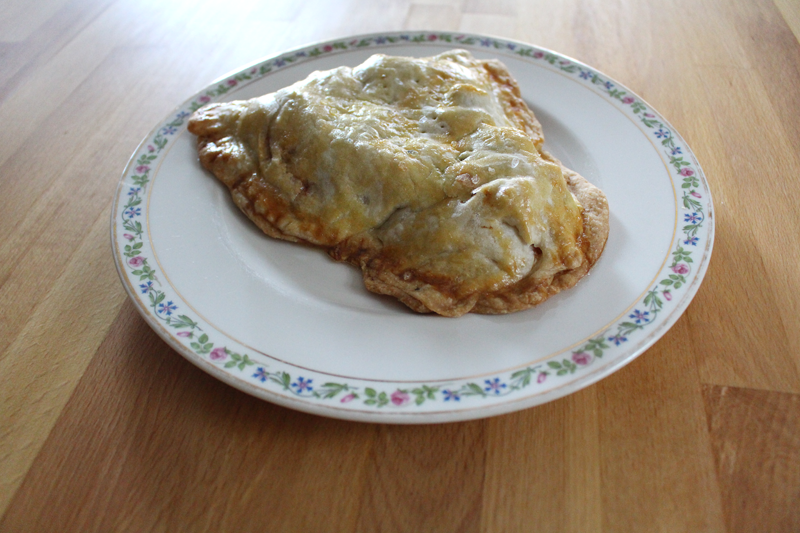
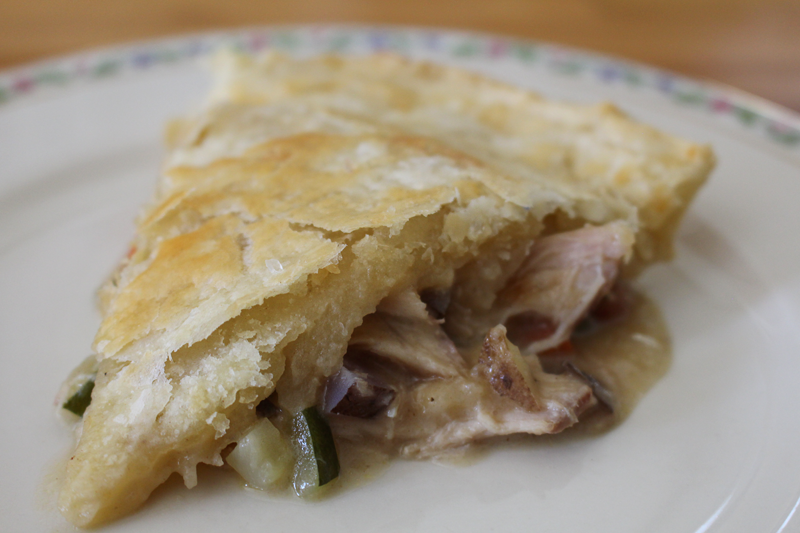
And then it bakes and bakes and suddenly it’s done and the air smells like so much goodness that I almost can’t contain myself. I want to devour the entire pie before it’s cooled and before my friend arrives for lunch.

But, I don’t. I restrain myself. I eat a normal sized portion and don’t even yell about how good it is in the middle of our conversation (although she did interrupt us to ask about the pie crust). I like when things get interrupted because something is just too good to keep quiet about.
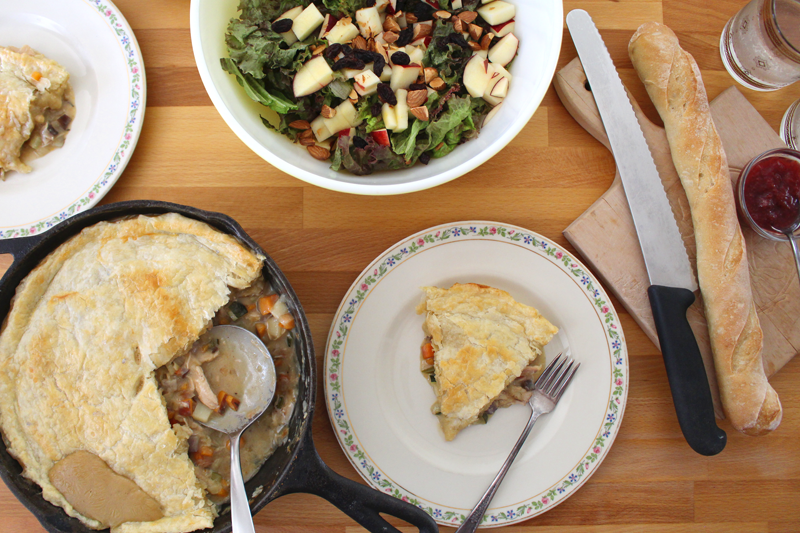
ChickenPotPie-14

Happy Eating!

Chicken Pot Pie

Prep Time: 15 minutes

Cook Time: 50 minutes

Total Time: 1 hour, 5 minutes

Yield: 4

Chicken Pot Pie

Ingredients

  • 2 T olive oil
  • 1 carrot (or parsnip), chopped
  • 2 small potatoes (or combination of 1-1 1/2 C potato, radish, turnip, or rutabaga), chopped
  • 1 small sweet potato (or 1 C peeled acorn or butternut squash), chopped
  • 1 small onion (or 2 shallots), chopped
  • 2 stalks celery (or 1 fennel bulb), chopped
  • to taste salt
  • to taste pepper
  • 1 t fresh rosemary (or thyme), chopped
  • 1 small summer squash, (or 1/2 C cauliflower or peas), chopped
  • 1-2 C chicken, cooked and shredded
  • 2-3 cloves garlic, chopped
  • 1 1/2 C chicken (or vegetable) stock or chicken pan drippings
  • 2 T all purpose flour (or 1 T cornstarch)
  • 1/2 C cold water
  • 1/2 C milk
  • 1 pie crust
  • 1 egg, beaten
  • coarse sea salt
  • lemon wedges, for serving

Instructions

  1. Pre-heat oven to 375F.
  2. Heat an oven proof skillet. Add oil. When oil is hot, add carrot through rosemary. Cook covered, over medium-low heat, stirring occasionally, for 10 minutes. Add summer squash and chicken and cook for about 3-5 minutes more, or until veggies are tender. Add garlic and cook for 1 minute more.
  3. Whisk stock or pan drippings with flour and water. Add to the skillet, turn the heat to high, and bring it to a boil. Let it thicken for about 2-3 minutes. Whisk in the milk, turn heat to medium-low, and cook for 1-2 minutes, or until steam rises, but do not boil. Remove from heat, taste and adjust seasoning if needed. Set on a baking sheet.
  4. Roll out pie crust. Top the filling with the crust (careful, the skillet is hot!). Make a few air vents with a sharp knife. Brush with the egg and sprinkle with the coarse sea salt. Bake for 22-30 minutes, or until crust is browned and flaky.
http://www.de-ma-cuisine.com/chicken-pot-pie-2/

Monday

6

October 2014

0

COMMENTS

Grape Toasts

Written by , Posted in Appetizers, Baking, Bread, Cheese, Fruit, Kid-Friendly, Lunch, Quick and Easy, Sandwiches, Sides, Snacks, Toasting, Vegetables, Vegetarian

GrapeToasts-4
One of my all time favorite snacks is crackers and cheese with grapes. When I used to teach aerobics many years ago, I’d come home starving, and would eat like it had been a really long time since I’d last eaten (when in fact it had probably just been a few hours).

Back then, I wasn’t eating seasonally. I didn’t realize that grapes were a late summer/early fall fruit. I didn’t know, guys. I mean, the grocery stores have almost everything available year round. I didn’t really question where things were coming from or if it was beneficial to be eating things that were coming from so far away. I didn’t realize that they were often so flavorless because they were picked green and transported to us, so we could have oranges in June and peaches in December.

That’s just the way it was.

No longer.

At least, not for us, if we can help it.

I love that we’re eating with the seasons. Some say it’s better for your health, some say it doesn’t matter. Whatever. I’m not going to argue with them. Potential health benefits aside, I love that by buying things that are in season, we’re supporting our local/California farmers. We’re also doing the environment a favor by not buying foods that are shipped from ridiculously far away, whenever possible. We’re just two of us here in our little home, but we’re trying to do our part.

This means we wait all year for things like grapes.

It’s worth it.

GrapeToasts-11

These sweet fall treats are sliced in half, seeds removed.

GrapeToasts-10

A baguette is sliced about 1/2″ thick.

I would always prefer homemade. But, I don’t have any right now. They’re a bit of a process, so I don’t make them as often as I wish I would. Every time I do I decide that I’m never going to buy a baguette again (unless we’re back in Paris, obviously). Then we run out and the cycle starts over.

I digress.

GrapeToasts-8

Bari’s olive oil is second to none. This goodness gets drizzled on the baguette.

GrapeToasts-9

So many good things come from a sentence that begins with, “cheese is grated”. Cheddar or monterey jack would be great. Gruyère would be awesome. Havarti would be divine. Use whatever cheese is your favorite, even if it’s not one of my suggestions.

GrapeToasts-7

GrapeToasts-6

A generous plomp of the cheese is placed on the grapes. And then it’s sprinkled with a bit of cayenne.

GrapeToasts-5

I’ve used the broiler at our new house now twice. I’m a little bit scared of it. No one knows why. I think it’s that it gets so very hot and can burn things when they’re forgotten about for just a minute. Thankfully, the stove has one of those broiler drawers that pulls out, so I don’t have to lay on the floor to check on the foods. Makes it much less scary.

GrapeToasts-1

I love the little crispy cheese crumbles that get stuck to the pan. I don’t usually share those.

GrapeToasts-3

Last step is to drizzle each toast with a bit of honey.

GrapeToasts-2

A little sweet, savory, kick of spicy treat. Perfect for right now.

Happy Eating!

Grape Toasts
Recipe Type: Appetizer, Snack, Fruit, Cheese
Author: Rachel Oberg – De Ma Cuisine
Prep time: 5 mins
Cook time: 3 mins
Total time: 8 mins
Serves: 2
Ingredients
  • 6 slices baguette, about 1/2″ thick
  • 1 t olive oil
  • 9-12 grapes, halved lengthwise and seeded
  • to taste salt
  • 1/4 C cheddar or monterey jack cheese
  • pinch cayenne
  • 1 t honey
Instructions
  1. Drizzle bread with oil. Top with grapes, a sprinkle of salt, cheese, and a sprinkle of cayenne.
  2. Broil for about 2-3 minutes, or until cheese is melted.
  3. Serve drizzled with honey.
3.2.1311

Monday

22

September 2014

0

COMMENTS

Fish Wellingtons

Written by , Posted in Baking, Dinner, Eggs, Fennel Pollen, Fish, Fruit, Lunch, Main Dishes, Meat, Potatoes, Vegetables

FishWellingtons-12

My friend Christy came over for lunch the other day. She’s one of my favorite people to eat with and I often think of her when I’m cooking, since our tastes are so similar. She asked where the inspiration for this dish came from. I can’t honestly remember. It may be the heat (still up close to 100 degrees F, which is obviously wrong for September), or just a leaky memory. Wherever the idea came from, it was good.

Fish-Wellingtons-1

It went well with the Creamy Cucumber and Tomato Salad that I’d made (more on that another week), the Roasted Eggplant Soup that she’d brought, and the Lemon-Basil Spritzers that we were drinking to beat the heat. I mean, mostly, we were just happy to be hanging out. But, it’s always even better when there’s yummy food to compliment a wonderful friendship.

FishWellingtons-5

It all started with what I call Fish Wellingtons. And they all started with a good pie crust. I use Alana Chernila’s recipe. (Page 149 of her cookbook, Homemade Pantry.) It’s the best pie crust I’ve ever made. I gave Christy this cookbook as a birthday gift during lunch. I’m not sure who was happier that she has it now, her or me.

I’d made the crust the day before and frozen it. It’s also great made the day of.

Frozen pie crust is a great stress/tension reliever. Have you ever had the opportunity to smack a partially frozen pie crust with a rolling pin? As effective as a punching bag, and, you can eat it later.

FishWellingtons-2

I’ve used two kinds of fish for this dish. Swordfish and Halibut. Use what you like and what you’d think will go well with the rest of the ingredients. I liked both of these, and would use either again (especially if they’re on sale, which is why I used Halibut this time, Swordfish last time).

FishWellingtons-3

Sometimes I like to stand by the stove and listen to the food cook. I often forget to slow down and listen. There’s so much beauty to be found in simple things like liquid bubbling in a pan. Things like this refresh me.

FishWellingtons-4

You don’t have to use butter. But, I love the deep flavor that it adds. If you’d prefer, olive oil would be great too.

You also don’t have to brown the butter, if that makes you nervous. But, you’ll be missing out on the even deeper, richer flavor that browning it brings.

Your choice.

Seriously.

FishWellingtons-6

The potatoes and zucchini are thinly sliced and crisped up in a skillet. When they’re done, garlic is added, mostly to make you swoon from the insanely awesome smell.

FishWellingtons-7

Crusts are smacked and rolled out. They’re topped with all the goodies you’ve been smelling (and sampling – the potato filling might not all fit – don’t be afraid to stand at the island and eat the leftovers – saves a container from having to be washed at a later date).

FishWellingtons-8

Fish is broken apart and added. You probably won’t need it all – leftovers can be frozen and saved for Chowders or refrigerated for sandwiches and salads.

FishWellingtons-9

The crust is folded over, crimped shut with a fork, poked a bit, then brushed with a beaten egg (save the rest of the egg to add to scrambled eggs or an omelette).

FishWellingtons-10

Then, the best part (according to Tim): sprinkle each one with some coarse sea salt (preferably some that you brought back from Paris when you were there almost a year ago…). It adds a great crunch.

FishWellingtons-11

I’m wishing that I’d made six instead of three. I think I could eat this everyday for like ever… But, then I say that about most things.

FishWellingtons-13

Happy Eating!

Fish Wellingtons
Recipe Type: Main, Dinner, Fish, Baking
Author: Rachel Oberg – De Ma Cuisine
Prep time:
Cook time:
Total time:
Serves: 3
Crispy potatoes and squash, fresh tomatoes and braised fish are wrapped up in a delicious pie crust to make a variation on Fish Wellington.
Ingredients
  • 2 C vegetable stock (or white wine)
  • 1 fillet fish (Swordfish or Halibut), skin removed
  • pinch salt
  • pinch pepper
  • pinch fennel pollen
  • 2 T butter
  • 4 small potatoes, halved and thinly sliced
  • to taste salt
  • to taste pepper
  • pinch fennel pollen
  • 1 small zucchini, thinly sliced and chopped
  • 1 clove garlic, minced
  • 1 pie crust, divided equally into 3 pieces
  • 1 tomato, sliced
  • 1 egg, beaten
  • coarse sea salt
Instructions
  1. Pre-heat the oven to 375F.
  2. Heat stock and when it’s boiling, add the fish with a pinch of salt, pepper, and fennel pollen. Braise for about 10-20 minutes (depending on the thickness of the fish).
  3. Heat a skillet. Add butter. When it starts to brown, add potatoes, salt, pepper, and fennel pollen. Cook for about 7 minutes over medium-low heat, stirring occasionally. Add zucchini and cook for about 6 minutes more, with a dash more salt, pepper, and fennel pollen. Add garlic and cook for 1 minute more. Taste and adjust seasoning if needed.
  4. Roll out pie crusts. Place on a baking sheet. Divide potato mixture between the three crusts and spoon onto one side. Top with tomato slices and the fish. Sprinkle with a bit more salt, pepper, and fennel pollen.
  5. Fold the non-topped side of the crust over the fish and veggies. Press edges down and crimp to seal with a fork. Pierce the top a few times with the fork. Brush with the beaten egg and sprinkle with sea salt. Bake for 25-30 minutes on a rack place in the top third of the oven.


Monday

18

August 2014

0

COMMENTS

Beef and Bean Enchiladas

Written by , Posted in Baking, Beans, Beef, Cheese, Dinner, Fruit, Gluten Free, Kid-Friendly, Legumes, Lunch, Main Dishes, Meat, Potlucks, Vegetables

BeefBeanEnchiladas-11

Enchiladas are one of my go-to meals when I want to bring dinner to friends. It’s pretty quick and easy to make, it’s hearty, and it can be pretty healthy.

They’re also one of Tim’s favorites.

I try to have some in the freezer at all times.

BeefBeanEnchiladas-2

I mean, take a look at all of the veggies I’ve piled in here. I had celery on hand, but normally I’d use bell peppers (note: if you’re using celery, make sure it’s really cooked down and soft). I also have been putting summer squash in everything, so why not these too?!

BeefBeanEnchiladas-1

Also corn. In everything. I am addicted.

This winter when we had a million spaghetti squash I cooked a bunch of ’em and froze the flesh. I’ve been slowly using it. If you don’t have any cooked spaghetti squash you could just add more beans and summer squash.

Tim doesn’t mind when I sneak spaghetti squash into things like this. But, he did note that he got a pretty squashy bite, so stir it in pretty well if that might bother someone in your family. 😉

BeefBeanEnchiladas-4

I like to cook up the filling first. That way they take less time in the oven. Plus then I can make sure that all the veggies are soft. No one wants a crunchy this or that, unless it’s supposed to be there.

BeefBeanEnchiladas-5

Tim built me a beautiful, huge kitchen island when we moved. So I have tons of space to lay out all the tortillas I could ever need.

I’m thankful for this workspace.

The sauce gets divided evenly between the tortillas.

BeefBeanEnchiladas-6

The ends get folded in and then it’s rolled up. My whole wheat tortillas cracked a bit. No big deal.

BeefBeanEnchiladas-3

I like a bit of sauce in the bottom of the pan. If you like it extra saucy, add more! I used what I had in the freezer, so normally I’d make it a bit juicier than this looks (the recipe is adapted to be saucier).

BeefBeanEnchiladas-7

Rolled up and ready for cheeeeeeeeese.

BeefBeanEnchiladas-8

You could add way more cheese if you’d like, but I didn’t want to go overboard. Moderation, right?!

BeefBeanEnchiladas-10

After these came out of the oven, I put half of them into freezer safe containers so they will be ready for lunches. The rest we devoured.

BeefBeanEnchiladas-9

If you’re gonna bring these to some friends, send along a container of Greek yogurt (or sour cream), salsa, corn chips, and guacamole (if you’re feeling extra generous). Make them a simple green salad with some chopped fresh tomatoes and a container of homemade Ranch dressing (whisk together a bit of yogurt, mayo, fresh herbs, garlic, salt, and pepper). And for dessert, how about some Fruit Crisp that can be added to the leftover Greek yogurt for breakfast the next morning?

If you’re serving it tonight for your family, serve it exactly the same way.

Happy Eating!

Beef and Bean Enchiladas
Recipe Type: Main, Easy, Beans, Beef, Vegetables, Dinner, Main Dishes
Author: Rachel Oberg – De Ma Cuisine
Prep time:
Cook time:
Total time:
Serves: 4-6
Perfect for a hearty dinner tonight, or to make to take to a friend in need.
Ingredients
  • 1 t olive oil
  • 1/4 to 1/2 C bell peppers (or celery), chopped
  • 1/2 to 1 C summer squash, chopped
  • pinch salt
  • 1-2 C Chili (I used Beef Chili), or 1 lb. ground beef
  • 8-15 oz. kidney beans
  • 1 1/2 C cooked spaghetti squash (or add more beans and summer squash)
  • 1/4 C salsa
  • 1 C corn
  • 1/2 t chili powder (or more if using ground beef)
  • pinch ginger
  • to taste salt
  • to taste pepper
  • 1/2 to 1 C tomato sauce (add an extra 1/4 C if using ground beef)
  • to taste salt
  • to taste pepper
  • 8-10 tortillas
  • 1 C cheese, grated (Monterey/Pepper Jack or Cheddar)
  • Greek yogurt, for topping
  • 1-2 fresh tomatoes, chopped, for topping
  • jalapeño, chopped, for topping (optional – if you like it extra spicy)
Instructions
  1. Pre-heat oven to 350F.
  2. Heat a skillet, add olive oil. When oil is hot, add bell peppers/celery, summer squash, and a pinch of salt. Cook for about 5 minutes, or until veggies are tender, over medium heat, stirring occasionally. (Note: if using raw ground beef, cook first, then add veggies when beef is almost done. Add the extra 1/4 C tomato sauce with the beans in the next step.)
  3. Mix together chili, beans, spaghetti squash, salsa, corn, chili powder, ginger, salt, and pepper. Add to skillet. Bring to a boil, reduce to a simmer, and cook for about 5 minutes. Taste and adjust seasoning if needed.
  4. Mix tomato sauce with salt and pepper. Pour into the bottom of a greased 9×13 baking dish.
  5. Divide the beef and bean filling between the tortillas. Fold ends in and roll up. Place seam side down in tomato sauced pan. Top with salsa and cheese. Bake for 20 minutes, uncovered, or until cheese is melted.
  6. Serve topped with yogurt and fresh tomatoes (and jalapeño if desired).
Notes
Gluten-free if you use corn tortillas.

Monday

4

August 2014

1

COMMENTS

Summer Pizza

Written by , Posted in Baking, Cheese, Dinner, Fruit, Herbs, Lunch, Main Dishes, Pizza, Quick and Easy, Vegetables, Vegetarian

SummerPizza-8Eeets thyme fur peeeetsa.

Sorry. Kinda. It’s been one of those days. Sometimes stress is released in the form of weirdness.

And managed by eating pizza.

SummerPizza-2

Cutting veggies is therapeutic too. I have lots of cutting boards, and two are designated for onions and garlic. My beautiful new cutting board is not one of them. I never want anything sweet to accidentally taste like raw onions. Nope. Yuck. So I have two cutting boards with an X on the back that are special and a little bit stinky. 

SummerPizza-1

We had a similar pizza to this the other week. Ahem, I did. Tim doesn’t agree that squash belongs on a pizza. He will eat it in pretty much anything else though, so it’s cool. He made his own personal pizza and I made mine. Mine had lots of veggies. His didn’t. They both tasted good.

SummerPizza-3

I used Alana’s recipe for the pizza crust (from her cookbook). You can use hers, or whatever you would normally use. I like my crust thin and crispy. If you like it thicker and chewier, adjust the recipe accordingly.

Because of my taste for crispness, I like to par-bake the crust a bit before topping it.

Par-bake means to partially bake it (as par-cook means to partially cook).

I topped it with a bit of olive oil and some herbs, because I wanted two layers of herby flavor. (Helpful tip: If you need some bread to go accompany a dish and you don’t have a baguette on hand, you could just all the way bake the crust and eat it like a sort of focaccia bread.)

SummerPizza-4

Then it’s topped with some tomato sauce (it’s also great with olive oil if you don’t like sauce), and more herbs.

SummerPizza-5

Lots of different veggies, like kale, zucchini, corn, and tomato (tomato is a fruit, but in this case let’s pretend it’s a veggie since it’s acting like one), but not so many that it weighs down the pizza. It’s still a light summer meal.

SummerPizza-6

I opted for some parmesan and an aged cheddar. Because it’s what I have in the fridge.

I’d planned to use feta, but it’s smelled baaaaad. There’s stinky cheese and then there’s steeeeenky cheese.

SummerPizza-7

It’s topped with a bit of basil (from my garden – all the basil that I got as an add-on from AHO last week is gone gone gone). And as soon as the last photo was taken I ate as much as I could, as quickly as possible because I was starving! And then I ate it again today before I typed up this post.

Happy Eating!

Summer Pizza
Recipe Type: Main, Dinner, Pizza
Author: Rachel Oberg – De Ma Cuisine
Prep time:
Cook time:
Total time:
Serves: 4
Summer squash, corn, and tomatoes all top this light summer pizza.
Ingredients
  • 2 t olive oil, divided
  • 1 pizza crust
  • 2 t dried Italian herbs (mixture of basil, rosemary, oregano, thyme, and parsley), divided
  • to taste salt
  • to taste pepper
  • 1/4 C tomato sauce (optional – could also just use olive oil)
  • 12-15 slices zucchini/summer squash
  • 8-10 tomato slices
  • 2 T raw corn (frozen is fine)
  • 1/4 C kale (spinach, chard, collard greens), cut in a chiffonade (small ribbons)
  • 2 T green onions, chopped
  • 1/2 C cheese (parmesan and cheddar), grated
  • to taste salt
  • to taste pepper
  • fresh basil, for topping
Instructions
  1. Pre-heat oven to 450F.
  2. Grease pizza pan with 1 t olive oil. Press out crust onto pan so it’s fairly thin. Top crust with remaining olive oil, and sprinkle with 1 t Italian herbs, salt, and pepper. Bake for about 5 minutes (optional – you can bake it all at once too).
  3. Top par-baked crust with sauce, remaining Italian herbs, veggies, cheese, salt, and pepper. Bake an additional 7 minutes (or until crust is to desired crispness and cheese is melted – it will be longer for thicker crusts).
  4. Serve topped with fresh basil.