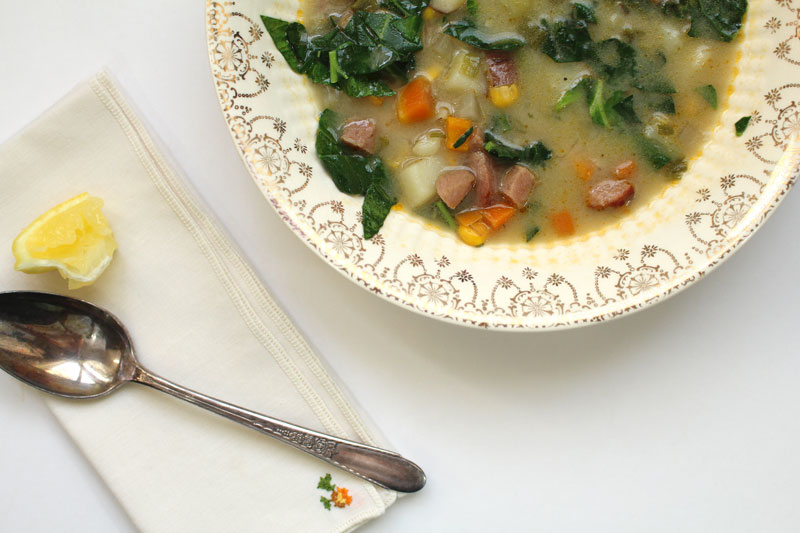
We got some amazing ham the other day from Llano Seco. Since Tim loves ham, I try to remember to have it appear on the menu every once in a while.
Because we are just two, even a mini ham yields leftovers. They are great for sandwiches, of course. But, a couple of months ago I made them into soup. I didn’t take any pictures, so I had to make it again last week.
Oh darn.
Might be ones of my favorite soups. Even the leftovers were gone within a day or two.
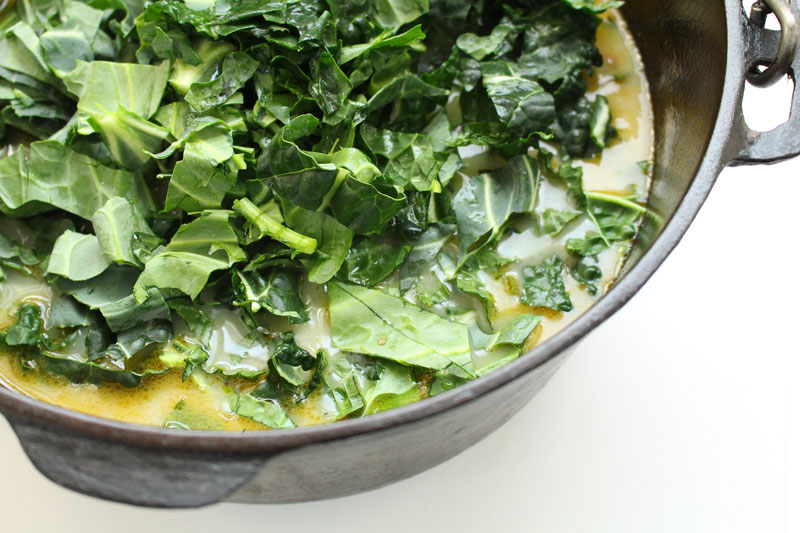
There’s all sorts of goodness happening in this soup. Potatoes, carrots, radishes, green garlic and spring onions. The stock is vegetable, made from the previous week’s older veggies that were on their way out.
Homemade goodness.
I love a creamy soup, so I added some almond milk. The milk was first whisked with a bit of flour and water to act as a thickener. I think this soup would be delightful without the milk and if it wasn’t thickened. But, I definitely like it best the way it is.
If you don’t like almond milk, you can use coconut milk, cow’s milk, goats milk, rice milk… you get the picture. Whatever milk you prefer to drink will work just fine. If you want a richer soup, cream would do the trick. Make it to your family’s tastes.
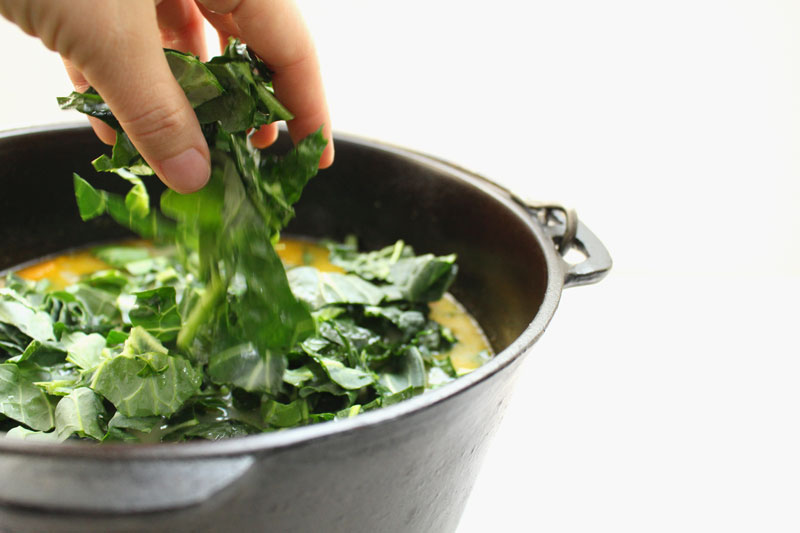
Any greens will do, but this time I chose kale and collards. I’ve made this before with mizuna (which tastes like a mild mustard green), and spinach would be perfect too.
I almost always like a squeeze of lemon on everything. It just brightens things up. This soup is no different.
Happy Eating!
Ham and Greens Chowder
Recipe Type: Soup, Main, Vegetables, Ham, Pork, Greens, Stove Top
Author: Rachel Oberg – De Ma Cuisine
Prep time: 10 mins
Cook time: 40 mins
Total time: 50 mins
Serves: 4-6
Ingredients
2 T olive oil
2 C potatoes, chopped
1 C daikon radish (or any kind of radish), chopped
1 1/2 C carrot, chopped
to taste salt
to taste pepper
3 stalks green garlic (or 3 cloves garlic), chopped
1 C spring onions (or regular onion), chopped
7 1/2 C vegetable stock (frozen is fine)
1/2 C corn
1 t sriracha (or other brand) hot sauce
1 C ham, chopped
1 T all purpose flour
1/2 C cold water
1 C milk (almond, coconut, cow’s…)
4 C greens (I used 12 kale leaves and 4 collards), chopped
lemon wedges, for serving
Instructions
Heat soup pot. Add oil. When oil is hot add potatoes through pepper. Cook covered on medium-low heat for 10 minutes, stirring occasionally.
Add garlic, onion, and if stock is frozen, add it now (if not, add it after the garlic and onions cook for 1-2 minutes). Cook covered, over high heat, for 10 minutes, stirring occasionally.
Add corn, sriracha, and ham. Bring to a boil, then reduce to a simmer and cook for 20-25 minutes, or until veggies are tender.
Whisk together flour, water, and milk. Add to soup. Let it simmer, but do not boil. Add greens and cook 2-5 minutes longer.
Can I tell you something that I might not admit to my 12-year old self? I really like vegetables. I’m totally crazy about lots of other foods that she would enjoy too (hello bacon), but you know how people say that the more you eat healthy things the more you crave them? It’s actually been true for me.
We started subscribing to Abundant Harvest Organics in December of 2007. We’ve been on this journey for a while now. I’ve learned a lot. There are so many vegetables that I’d never heard of 7 years ago. Thankfully, now I know what a rutabaga is, that beets are enjoyable, and most recently, how to cook some really good greens.
I’ve always been a “use what I have”, practical, efficient cooker. Don’t have an ingredient? I’ll substitute for it. If I don’t think a step is needed, I eliminate it. But, sometimes there are steps that I didn’t know were a good idea, like blanching when cooking things like collard greens. I’d never done it, because I didn’t know I should.
Blanching is when you partially cook a food in boiling water then submerge it in an ice bath to stop the cooking.
I learned my lesson today.
I’ve never really been bothered too much by the bitterness in greens. I think because I’ve got the basics down: add fat and salt (not like a waaaay too much amount, a good amount, to make them taste great). Sometimes I add sugar and spice. These are things that I read about doing to reduce bitterness in greens. Cool. Checkmark. Done did.
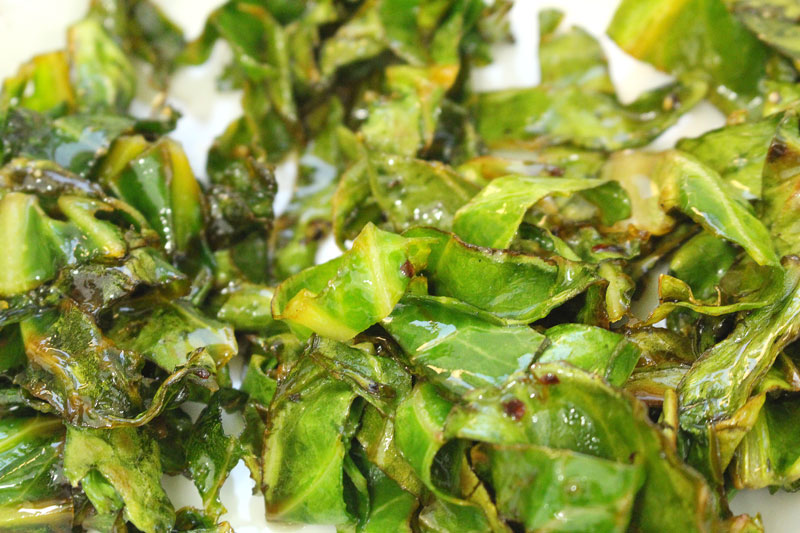
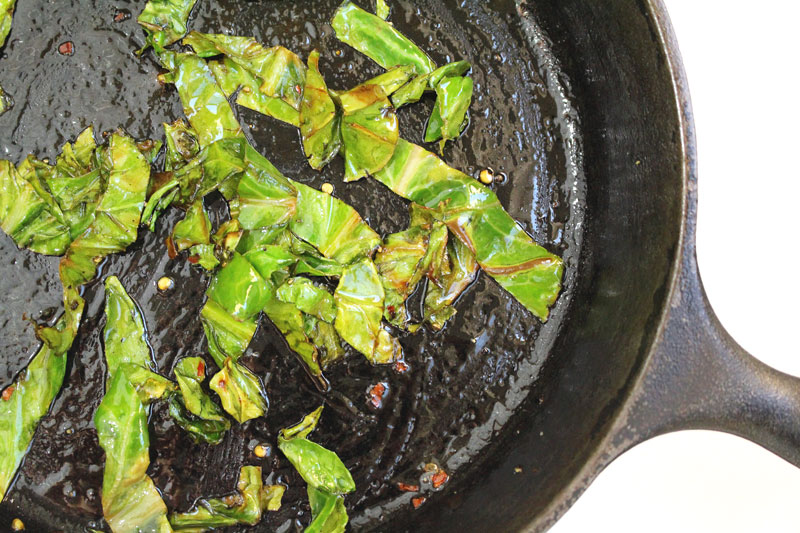
But but but wait. I needed to see if I was missing out on something. So I did a little test: collard greens three ways.
Here’s what happened.
One bunch of collard greens was divided up into three groups (each had 3-4 medium sized leaves – a small test, but it worked out just fine).
Group 1
Washed with water, stems removed, sliced into ribbons.
Skillet heated, 1/2 t butter added, let it melt a bit, added honey, then added the greens. Added salt, pepper, red pepper flakes and cooked over medium-low for 2 minutes. 1 t lemon juice is added and they cook for 1-2 minutes more. They’re removed from the heat and 1/2 t olive oil is added, along with a splash of lemon juice.
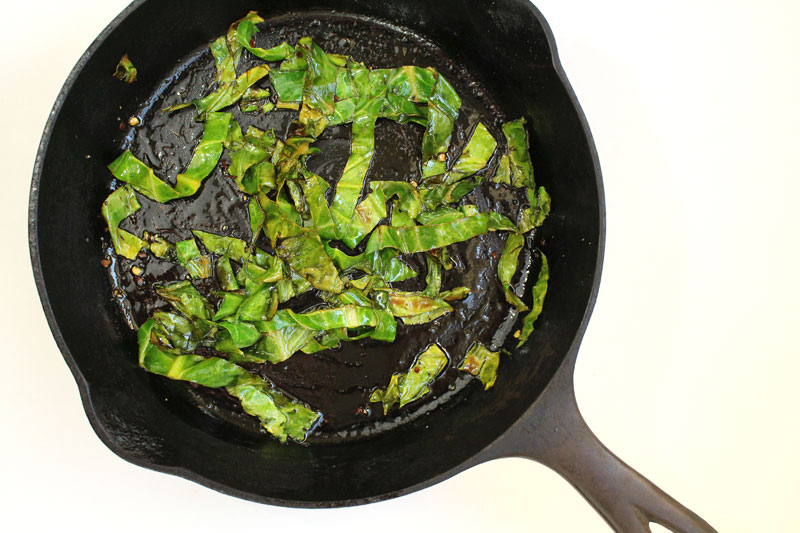
Group 2
Soaked in water and 1-2 t baking soda for a minute, then rinsed three times.
Skillet heated, 1/2 t butter added, let it melt a bit, added honey, then added the greens. Added salt, pepper, red pepper flakes and cooked over medium-low for 2 minutes. 1 t lemon juice is added and they cook for 1-2 minutes more. They’re removed from the heat and 1/2 t olive oil is added, along with a splash of lemon juice.
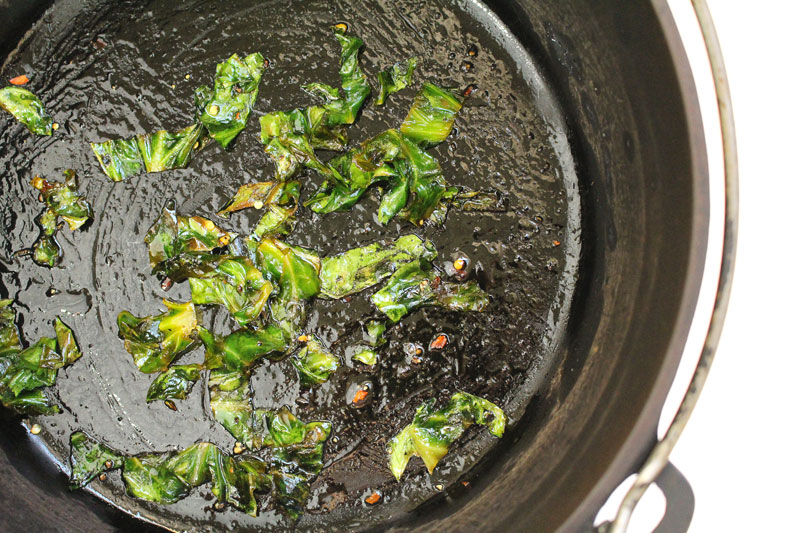
Group 3
Washed with water.
Stems removed.
Blanched: Salted water came to a boil, leaves were added, they cooked for about 2 minutes, then took a bath in some ice water for a few.
Sliced into ribbons.
Skillet heated, 1/2 t butter added, let it melt a bit, added honey, then added the greens. Added salt, pepper, red pepper flakes and cooked over medium-low for 2 minutes. 1 t lemon juice is added and they cook for 1-2 minutes more. They’re removed from the heat and 1/2 t olive oil is added, along with a splash of lemon juice.
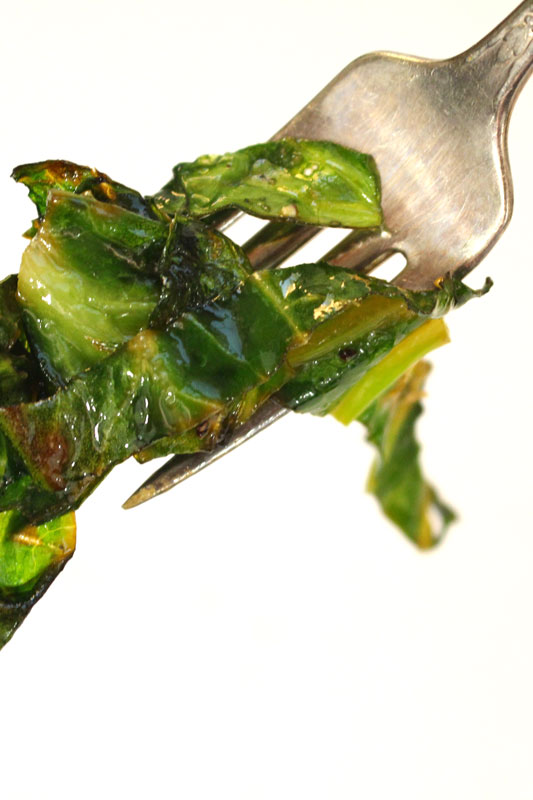
Group three was way for sure 100% the winner. I guess I’m gonna blanch from now on.
They were tender, they kept their color, and most importantly, they were the least bitter.
I stood at the stove and ate the entire pan.
I used the leftover greens from groups 1 and 2 and tossed them with some leftover Mac and Cheese, topped it with crushed up homemade croutons and a bit of Parmesan cheese, and baked it until it was hot. Made for an easy, delicious dinner. Groups 1 and 2 weren’t bad. I’d even say they’re good. But, when you compare good with great, you gotta go with great (hello life lesson).
I don’t know if the baking soda soak really did much for group two. They may have been a little more tender and a little less bitter than group 1. Just a little. I probably wouldn’t bother with this step again. But, it was fun to try.
In general, to reduce the bitterness of leafy greens like turnip greens, collards, mustard greens, kale, spinach, chard, broccoli rabe, and beet greens, there are a few tricks:
Cooking the greens (sautéeing, simmering, braising, blanching) mellows them out (some ways more than others, some better when combined, like I learned today). Tougher greens, like the collards that I used today, will do better when blanched, than say a daintier baby spinach.
Adding salt “takes the edge off”. (1)
Adding fat softens the bitterness and adds flavor. (1) (3)
Adding spice masks the bitterness.
You can add lemon juice or salt to help reduce bitterness. (3)
Add baking soda to water when washing then rinse three times. (2)
Some recipes that I like (or would like to try) with these greens:
Recipe Type: Vegetables, Vegetarian, Sautéed, Side Dishes, Dinner, Greens, Quick and Easy, Blanching
Author: Rachel Oberg – De Ma Cuisine
Prep time:
Cook time:
Total time:
Serves: 2-3
Ingredients
16 collard green leaves, washed, stems removed
water (for boiling)
salt (for boiling)
2 t butter
2-4 t honey
to taste salt
to taste pepper
to taste red pepper flakes
3-4 t lemon juice
2 t olive oil
lemon juice, for topping
Instructions
Bring salted water to a boil. Add leaves and cook for about 2 minutes. Remove from water and place in a bowl of ice water for a few minutes.
Slice into ribbons.
Heat skillet and add butter, let it melt a bit, add honey, then add the greens. Add salt, pepper, red pepper flakes and cook over medium-low heat for 2 minutes, stirring often.
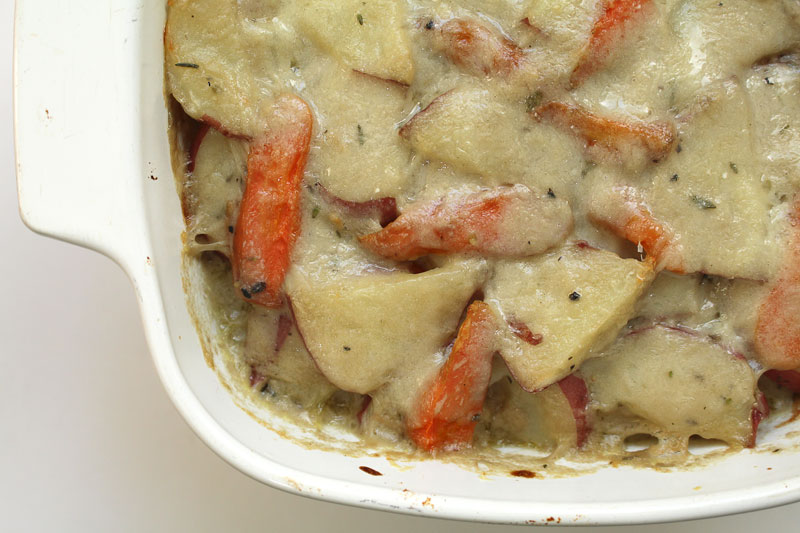
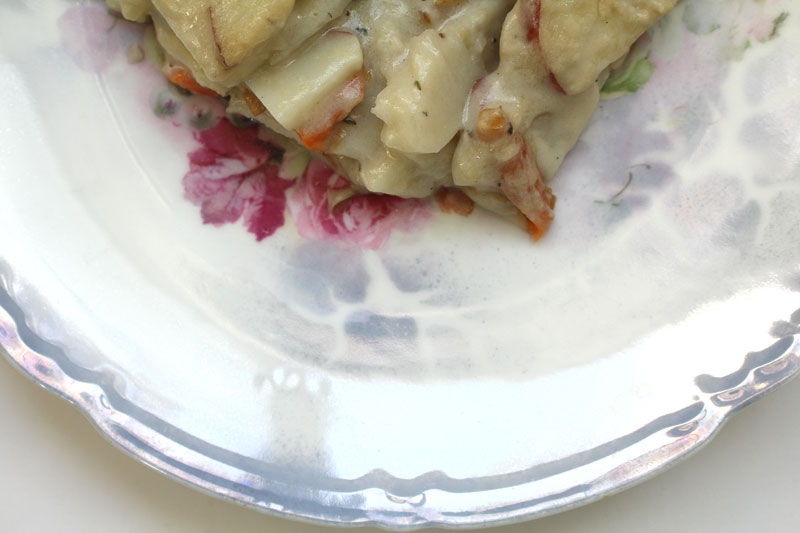
Um, but what about thinly slicing them and adding them to a potato gratin?
Sound fun?
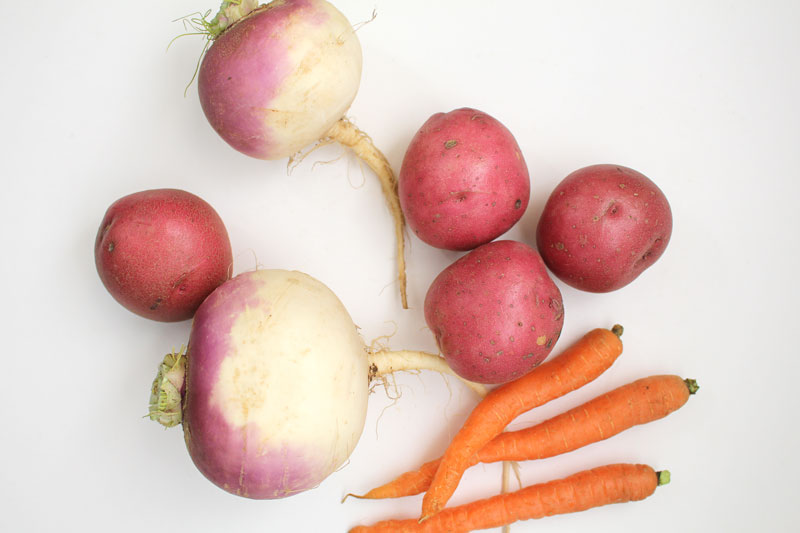
I don’t usually peel my veggies. I don’t feel like I need to (unless they’re too tough, then it’s cool). There are lots of nutrients found in their skin, so I like to keep it on. (If you can’t stand the peel, there are still plenty of nutrients on the inside, so it’s definitely better to peel and eat than to not peel and not eat at all.)
I love honey and thyme. They’re one of my favorite duos right now.
Thyme, honey, and a creamy Parmesan cheese sauce will compliment the turnips well. And the turnips will compliment the carrots, who will compliment the potatoes, who will… ok enough.
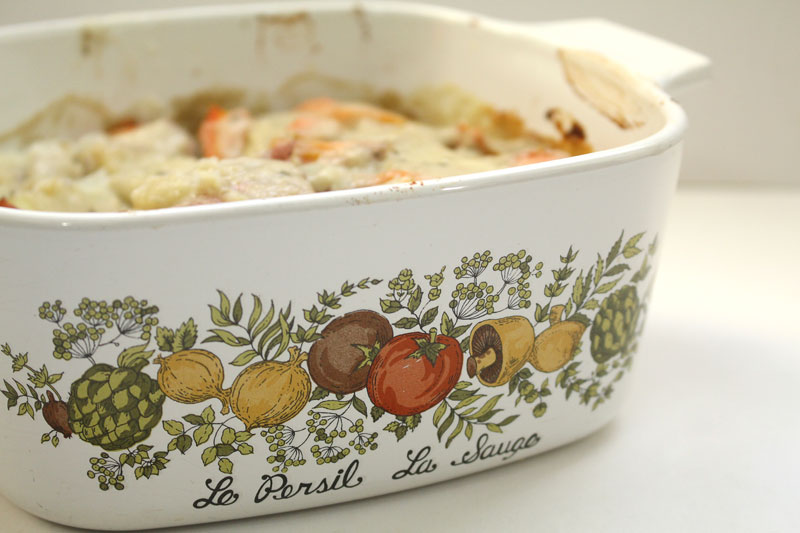
My mom had a set of baking dishes like this when I was growing up (she probably still has them). So when I saw this one at a yard sale I had to have it. I like having things in the kitchen that remind me of family.
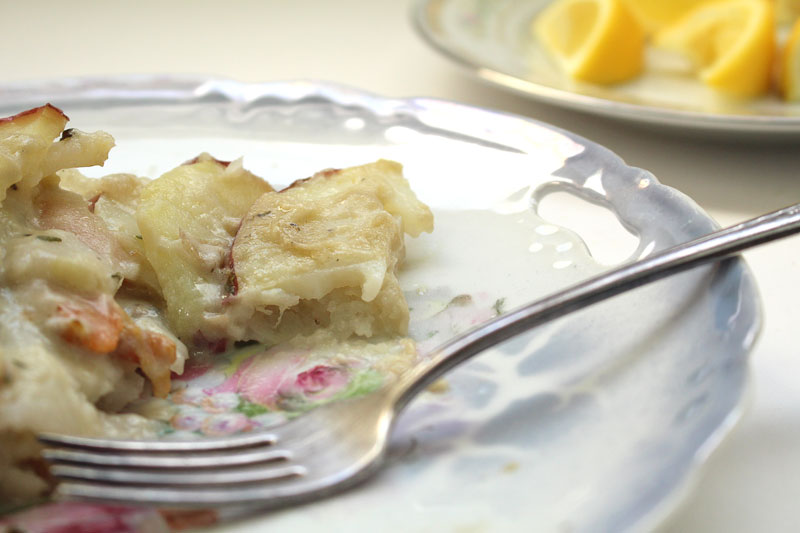
The thick cheesy sauce is spread between the layers of veggies. As it bakes, the veggies will finish cooking, and everything will meld into one tasty dish.
I wonder if I have any left in the fridge. It sounds really good right now.
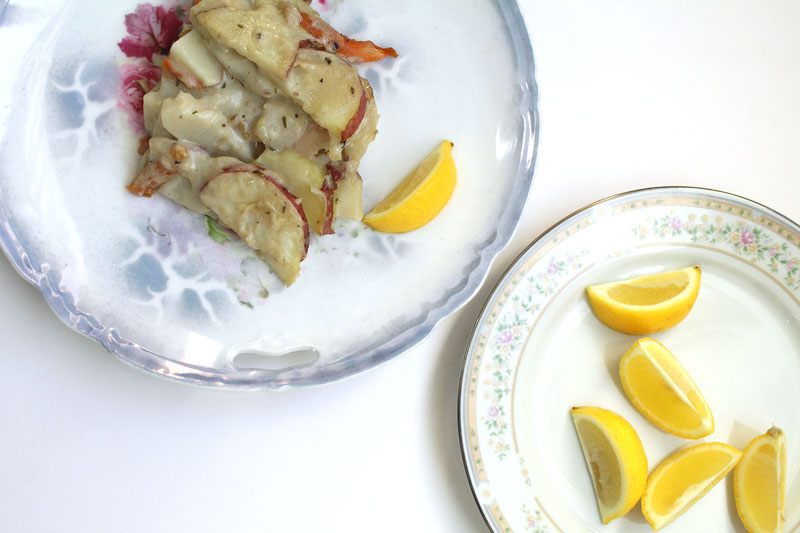
Lemons totally brighten things up. I mean, not just their great color, but their wonderfully fresh citrusy flavor. It seemed like a good idea to squeeze a lemon slice over top before enjoying.
It was.
Last thing to note: if you have picky eaters who “think” they don’t like turnips… Tim said he didn’t know there were turnips in this dish, sooooooo yeah… 😉
1 1/2 C milk (almond, cows, a mixture, or any other kind that you enjoy)
1 T honey
to taste salt
to taste pepper
1/2 t dried thyme
3/4 C Parmesan cheese, grated (1/4 C reserved)
lemon wedges, for serving
Instructions
Pre-heat the oven to 350F.
Place the veggies in a steamer basket in a pot of boiling water. Cover and steam for 20-25 minutes, or until they are par-cooked. Let cool slightly, then thinly slice.
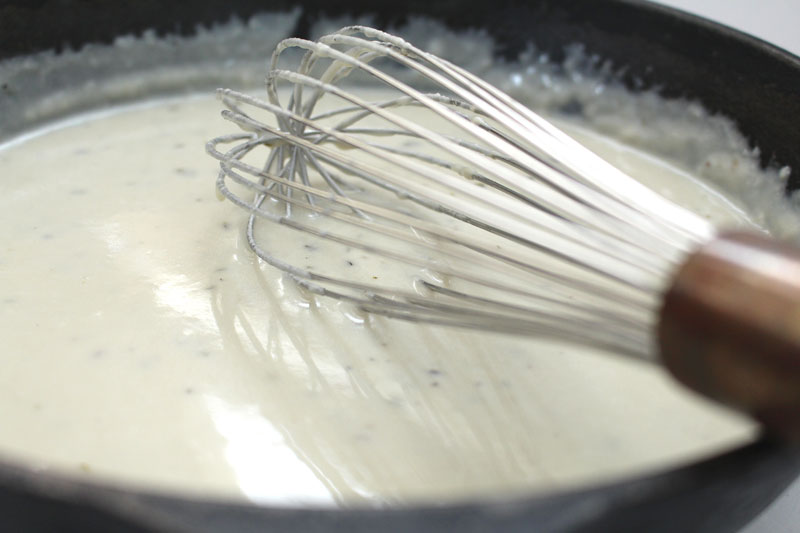
Heat a medium sized pot or skillet over medium or medium-low heat. When it’s hot, add oil, then whisk in flour. Let it bubble for about 30 seconds. A bit at a time, whisk in milk, letting it thicken a bit between each addition. Stir in honey, salt, pepper, and thyme. Bring to a simmer and let it thicken for a few minutes.
Remove from heat and stir in cheese. Taste and adjust seasoning if needed.
Place a layer of veggies into a greased 8×8 ovenproof dish. Spoon a bit of the cheese sauce over the layer. Repeat until all veggies and sauce are gone. Top with the reserved cheese.
Bake uncovered for about 30-35 minutes. Let stand for 10 minutes before serving.
Alexandra Joy is a busy new mom. She has a four month old daughter named Clover (hello cutest name ever!) and is the owner of Pink & Honey Event Styling. Yet she still makes the time to love on friends like me and tell people about my work. So I thought, what better dish for a tired mama than a quick flatbread?!
You need some cheese, mushrooms, and prosciutto.
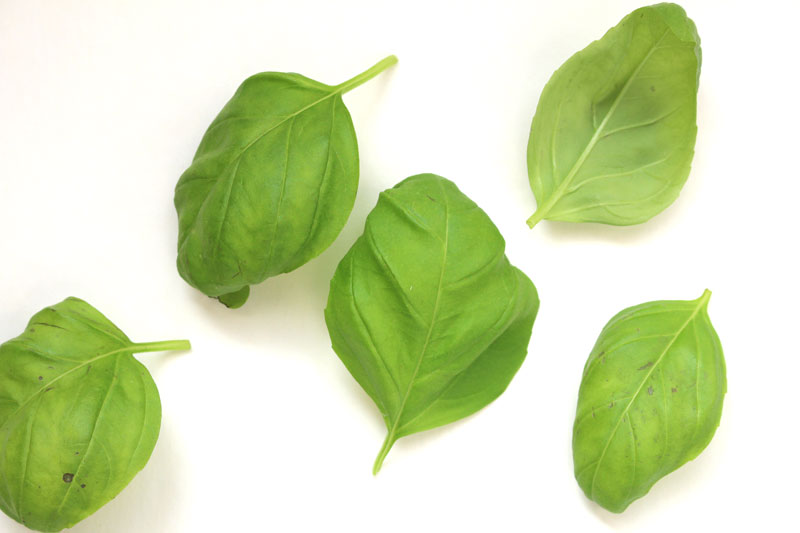
Lemon, basil, and walnuts are a must. They transform this flatbread from “pretty great” to “putthisonthemenueveryweekforrealforrealforreal”.
It all goes onto a thin pizza crust that’s topped with some olive oil and salt. A tired mom could do that, right? (Seriously, I’m asking. I have no idea.)
This can be an appetizer (hello Oscar party!), a snack (what I’ve been eating all day), or a light dinner (falling asleep at the table is totally allowed).
I made it this morning. I’d already eaten breakfast (ok, like two hours before, but still…) and I couldn’t stop eating. I only had two slices, but I’m confident that I could have devoured two or three more the entire thing. Seriously good food.
The only problem is that I don’t want to share… I guess it’s a good thing that AJ lives about 1,150 miles away (actually, I’d rather she lived closer – I’d share).
I’m thankful for great friends and good food.
Happy Eating!
Mushroom and Prosciutto Flatbread
Recipe Type: Pizza, Flatbread, Oven, Appetizer, Dinner, Party Food
Author: Rachel Oberg – De Ma Cuisine
Prep time:
Cook time:
Total time:
Serves: 2-4
Ingredients
1 pizza crust
olive oil
to taste salt
to taste pepper (optional)
3/4 C mushrooms, thinly sliced
1/3 C (3 slices) prosciutto, chopped
1/2 C gruyere cheese, grated
1/2 C Parmesan cheese, grated
1/4 C walnuts, chopped
fresh basil, chiffonade (or sliced into ribbons), for serving
lemon wedges, for serving
Instructions
Pre-heat oven according to pizza crust recipe (I cooked it at 450F).
Thinly roll crust on a greased baking sheet. Drizzle with olive oil and sprinkle with salt and pepper. Top with cheese (reserving 1/4 C), mushrooms, prosciutto, walnuts, and remaining cheese.
Bake for about 10 minutes, or until crust is to desired crispiness and cheese is melted.
Serve topped with basil and a squeeze of lemon.
3.2.1275
I used Alana’s crust from her The Homemade Pantry cookbook (p.172) and it was just perfect. I made it the night before and (as instructed) let it rise for about 15 hours. Fabulous!
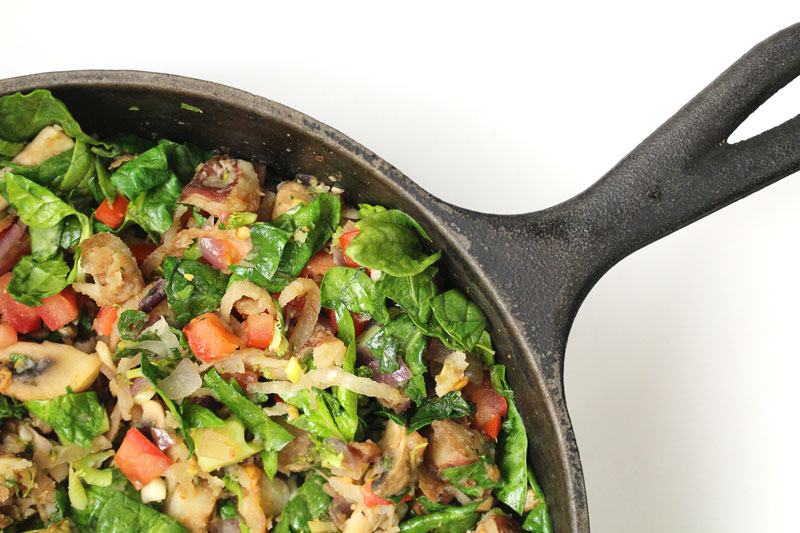
When I have a lot of produce to use up, I usually make soup. But, another great way to get those veggies into a dish: FRITTATA!!
I like to change things up sometimes, and have breakfast-y foods for dinner. Last night we had this super frittata with some roasted brussels sprouts and cauliflower, that were drizzled with honey… mmm mmmmm… let’s not get distracted here, we’re all about the frittata right now… ooh, but you could add brussels and cauliflower to it too!
Back to what I was saying. Ahem… I like breakfast for dinner. It’s fun. It’s different. It’s easy.
Easy go-to’s are pancakes, french toast, bacon and eggs. You know, the usual. Sometimes I forget about the simple frittata.
It’s not an omelet, because there’s no flipping. It’s not a quiche, because there’s no crust. What it is: simple deliciousness.
Veggies are sautéed. I chose seasonal produce, so used broccoli, black spanish radish, spinach, onion, garlic, and potato. I also used some not in season tomato, and some mushrooms. You could use whatever veggies you think would taste good together and with eggs.
Make it a mix and match kinda dish.
Just broccoli and spinach would be great, if you want to simplify. Once the spring veggies are here, asparagus could be substituted for broccoli. Kale, chard, collards, or mustard greens could be used instead of the spinach. Any kind of radish would be great.
Let’s get creative!
My favorite eggs around are from Burroughs Family Farms. Thick brown shells and golden yolks. Best best best.
Almond milk is added. You can use whatever kind of milk you prefer. And if you don’t want to use milk, water will work just fine too.
Basil is cut into thin ribbons, or a chiffonade. If you don’t want to do this, chop chop chop it up.
This frittata is full of veggies that are held together by some eggy goodness. It’s perfect for breakfast, lunch, or dinner. Leftovers can be halved and eaten on toast with some cheese, or frozen for another week.
If you hate leftovers, invite some friends over and share a meal. You could serve the Winter Frittata with some crostini topped with Parmesan cheese and honey, some slices of ripe melon, and some crispy bacon (if you’re so inclined).
Happy Eating!
Winter Frittata
Recipe Type: Breakfast, Lunch, Dinner, Main Dishes, One Dish Dinners, Gluten-Free, Dairy-Free, Vegetarian, Vegetables, Quick and Easy
Author: Rachel Oberg – De Ma Cuisine
Serves: 6-8
Ingredients
1-2 T olive oil
1/2 onion, chopped
1 C broccoli, roughly chopped
1/4 to 1/2 C radish, grated
6 mushrooms, roughly chopped
1-2 C potatoes, cooked* and cubed (I used leftovers)
fresh basil, chiffonade-style or chopped, for topping
Instructions
Pre-heat oven to 375F.
Heat an ovenproof skillet. When it’s hot, add oil. (*If using raw potatoes cook for about 15 to 20 minutes, covered, stirring occasionally, until they are fork tender, then proceed with next steps.) When oil is hot add onion through mushrooms and cook over medium-low heat for 5 minutes, stirring occasionally.
Add potatoes through thyme and cook for 5 minutes, stirring occasionally.
Add vinegar, tomato, and greens and cook, stirring often, for about 2 minutes. Taste and adjust seasoning if needed.
Whisk eggs and milk together with a pinch of salt and pepper. Pour eggs into skillet and stir. Cook for a minute or two, stir again, and cook for about 5 minutes more, or until eggs are beginning to set.
Transfer skillet to oven and cook for 15-20 minutes, or until eggs are set and have come to an internal temperature of 160F.