De Ma Cuisine

Snacks Archive

Monday

31

March 2014

0

COMMENTS

Crostini with Sausage and Braised Greens

Written by , Posted in Appetizers, Braising, Bread, Dairy-Free, Dinner, Lunch, Meat, Pork, Sandwiches, Sausage, Sides, Snacks, Toasting, Vegetables

CrostiniWithSausageAndBraisedGreens6

I may have a new favorite way to eat greens.

For a second, forget about what I know you must be anticipating as amazingness in the crostini. Ok. Done? Just for a moment… Because we need to talk about greens.

Not too long ago I talked about bitter greens and offered a few suggestions for their unbittering. I mentioned, but didn’t go into detail about braising. But, now that I’ve tried it, I may never go back to any other way of cooking greens. (Ok, that maaaaay be a bit dramatic…)

Braised greens are simply amazing.

Seriously.

CrostiniWithSausageAndBraisedGreens1

Llano Seco sent me a ham hock. I just had to try braising the greens with it. Oooooh boy! What a fun treat. If you can find one, I’d totally recommend it. It will be worth it. If you can’t, vegetarian is wonderful as well. I’ve made braised greens both ways. I’ve enjoyed them all immensely.

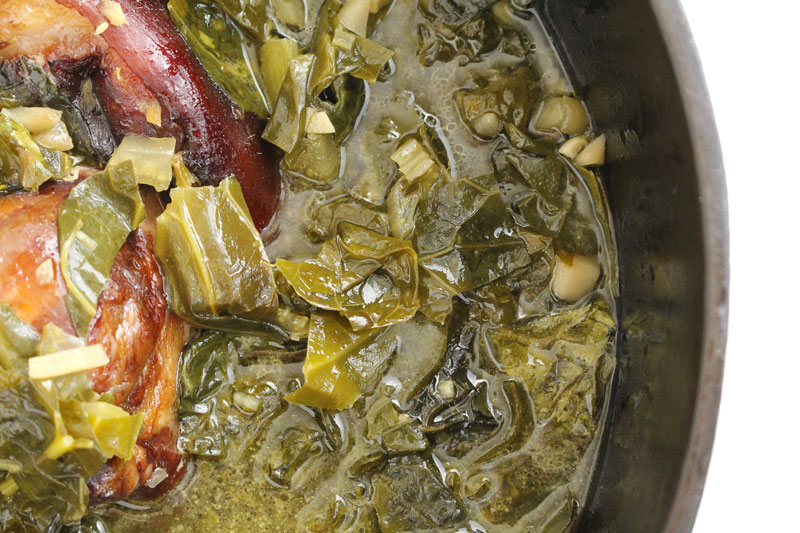
The greens braised for about two hours. I’ve tried them after shorter amounts of time and they’re great too. So if you don’t have a lot of time, don’t worry about it. But, if you’ve got a few hours to spare, try it. (And by a few hours I mean a tiny bit of time to get the ingredients into a pot, then just one eyeball on the pot every so often.) The result is tender, flavorful, AWESOME greens.

They’re not only perfect to top our little crostini, but this big batch can be frozen and later added to soups, rice dishes, or used to top some Paris Potatoes.

CrostiniWithSausageAndBraisedGreens5

Now we can talk about the crostini.

Sorry. Wait. I need to interrupt myself again to tell you that I made these, then I stood beside the photography table and devoured them. I just couldn’t stop.

Interruption over.

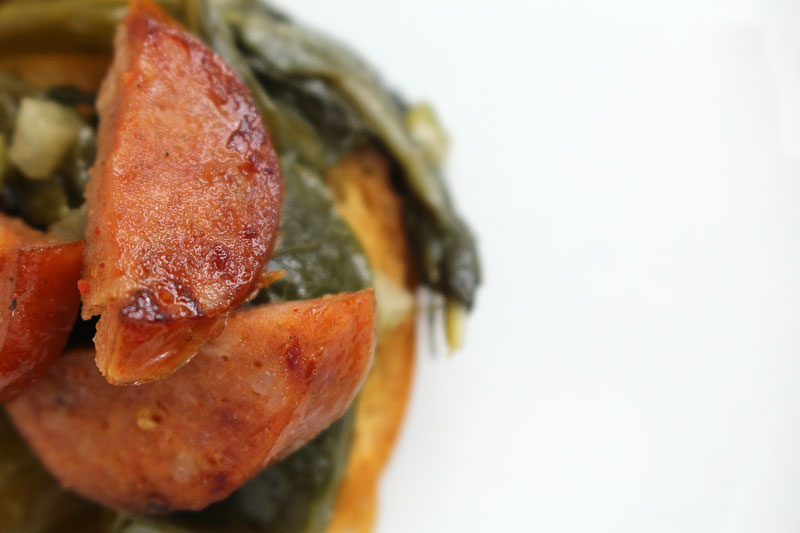
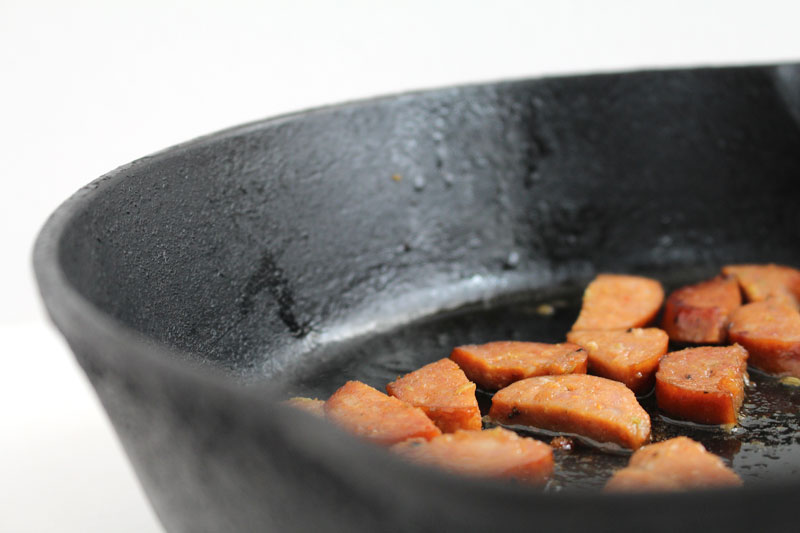
So there was a ham hock in the greens. Then there’s some Llano Seco Italian Sausage that’s chopped up and heated in a few tablespoons of the braising liquid. You could really just end there with the greens and sausage. Pile it all on some rice or potatoes and call it dinner.

But, I didn’t do that.

CrostiniWithSausageAndBraisedGreens2

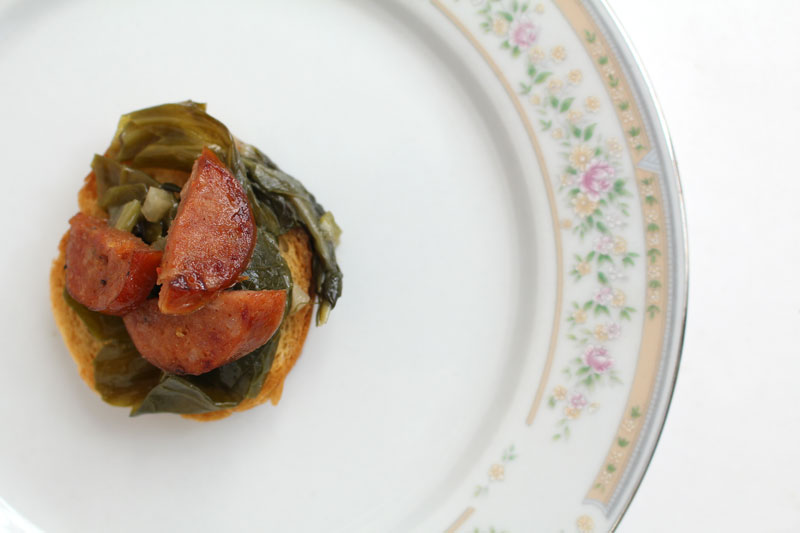
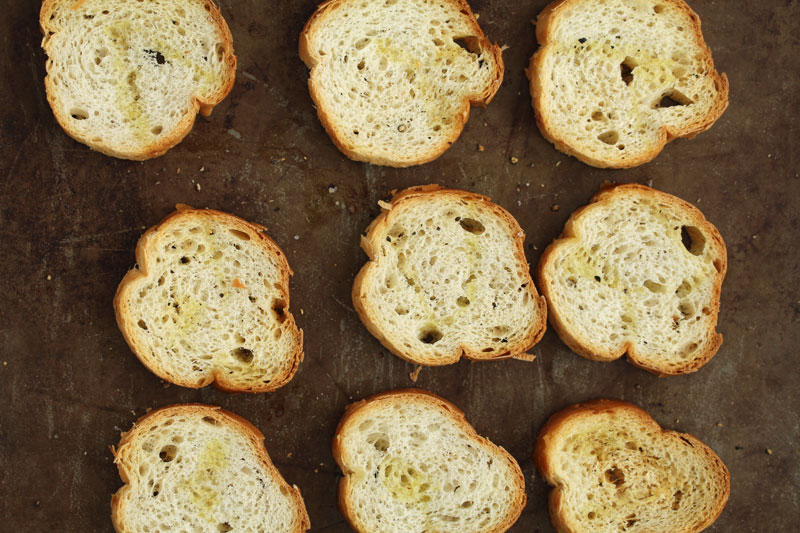
I wanted some little toasts. So I sliced up a baguette, drizzled it with olive oil, and sprinkled with salt and pepper. They toasted up in the oven for a few minutes.

CrostiniWithSausageAndBraisedGreens3

They were topped with some of the greens, and a few pieces of sausage. And then… a squeeze of lemon. One of my favorite ways to finish a dish.

CrostiniWithSausageAndBraisedGreens4

If you can, share with friends. They will be glad you did.

CrostiniWithSausageAndBraisedGreens7

Happy Eating!

Crostini with Sausage and Braised Greens
Recipe Type: Side, Snack, Sandwich, Toast, Meat, Sausage, Greens, Vegetables, Pork, Braising
Author: Rachel Oberg – De Ma Cuisine
Serves: 4-5
Ingredients
  • Braised Greens: 2 T olive oil
  • 2 C celery, chopped
  • 1 radish, diced
  • 2 cloves garlic, diced
  • 7 C vegetable stock
  • 1 ham hock
  • 8-9 C greens (mixture of any: chard, kale, collards, spinach…), roughly chopped
  • salt
  • pepper
  • 2 T white vinegar
  • Crostini: 10-20 slices of baguette
  • olive oil
  • salt
  • pepper
  • 1 clove garlic (optional)
  • 3-4 T braising liquid
  • 2-3 Italian sausages, halved and chopped
  • lemon wedges, for serving
Instructions
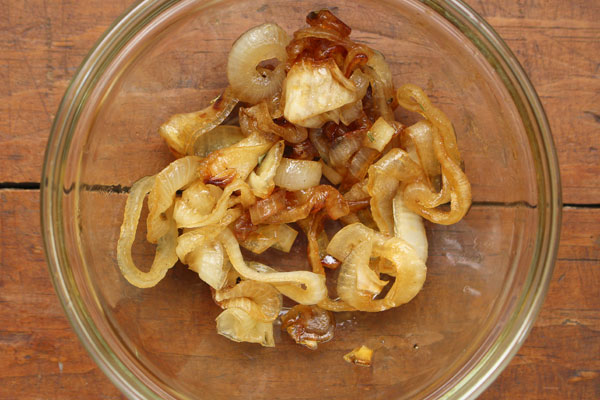
  1. Heat a soup pot. Add oil. Add celery, radish, garlic, salt, and pepper, and cook over medium-low heat for 5-10 minutes, stirring occasionally.
  2. Add ham hock and cook for 2 minutes. Add greens and vinegar and cook for 2 minutes more.
  3. Add stock and bring to a boil. Reduce to a simmer and cook for 1-2 hours, stirring every once in a while.
  4. Pre-heat oven to 350F.
  5. Drizzle baguette slices with olive oil, and sprinkle with salt and pepper. Bake for 5-10 minutes, or until crispy. Rub with a clove of garlic if desired.
  6. Add 3-4 T of the braising liquid to a skillet and add the sausage. Cook for about 5 minutes, or until heated through.
  7. Top each slice of toasted baguette with some greens (try to avoid too much braising liquid so they don’t get soggy), a few pieces of sausage, and a squeeze of lemon.
  8. Serve immediately.
3.2.1269


Wednesday

26

February 2014

1

COMMENTS

Mushroom and Prosciutto Flatbread – for AJ

Written by , Posted in Appetizers, Baking, Brunch, Cheese, Dinner, Fruit, Herbs, Lunch, Meat, Pizza, Pork, Quick and Easy, Sides, Snacks, Vegetables

MushroomProsciuttoFlatbread-4Alexandra Joy is a busy new mom. She has a four month old daughter named Clover (hello cutest name ever!) and is the owner of Pink & Honey Event Styling. Yet she still makes the time to love on friends like me and tell people about my work. So I thought, what better dish for a tired mama than a quick flatbread?!

You need some cheese, mushrooms, and prosciutto.

MushroomProsciuttoFlatbread-1

MushroomProsciuttoFlatbread-2

Lemon, basil, and walnuts are a must. They transform this flatbread from “pretty great” to “putthisonthemenueveryweekforrealforrealforreal”.

It all goes onto a thin pizza crust that’s topped with some olive oil and salt. A tired mom could do that, right? (Seriously, I’m asking. I have no idea.)

MushroomProsciuttoFlatbread-3

This can be an appetizer (hello Oscar party!), a snack (what I’ve been eating all day), or a light dinner (falling asleep at the table is totally allowed).

I made it this morning. I’d already eaten breakfast (ok, like two hours before, but still…) and I couldn’t stop eating. I only had two slices, but I’m confident that I could have devoured two or three more the entire thing. Seriously good food.

The only problem is that I don’t want to share… I guess it’s a good thing that AJ lives about 1,150 miles away (actually, I’d rather she lived closer – I’d share).

MushroomProsciuttoFlatbread-5

I’m thankful for great friends and good food.

Happy Eating!

Mushroom and Prosciutto Flatbread
Recipe Type: Pizza, Flatbread, Oven, Appetizer, Dinner, Party Food
Author: Rachel Oberg – De Ma Cuisine
Prep time:
Cook time:
Total time:
Serves: 2-4
Ingredients
  • 1 pizza crust
  • olive oil
  • to taste salt
  • to taste pepper (optional)
  • 3/4 C mushrooms, thinly sliced
  • 1/3 C (3 slices) prosciutto, chopped
  • 1/2 C gruyere cheese, grated
  • 1/2 C Parmesan cheese, grated
  • 1/4 C walnuts, chopped
  • fresh basil, chiffonade (or sliced into ribbons), for serving
  • lemon wedges, for serving
Instructions
  1. Pre-heat oven according to pizza crust recipe (I cooked it at 450F).
  2. Thinly roll crust on a greased baking sheet. Drizzle with olive oil and sprinkle with salt and pepper. Top with cheese (reserving 1/4 C), mushrooms, prosciutto, walnuts, and remaining cheese.
  3. Bake for about 10 minutes, or until crust is to desired crispiness and cheese is melted.
  4. Serve topped with basil and a squeeze of lemon.

I used Alana’s crust from her The Homemade Pantry cookbook (p.172) and it was just perfect. I made it the night before and (as instructed) let it rise for about 15 hours. Fabulous!

Monday

6

January 2014

2

COMMENTS

So That Was Christmas – Baguette Pizzas

Written by , Posted in Appetizers, Cheese, Dinner, Herbs, Kid-Friendly, Lunch, Main Dishes, Meat, Pizza, Quick and Easy, Snacks, Thoughts, Vegetables

Christmas2013-12

Looking through our photos, I’ve concluded that our holiday consisted mostly of family, friends, and food. There were some gifts thrown in there, a movie or two (ok, more than two), and a few games here and there. But mostly, we were with family and friends for two weeks. Can’t get much better than that.

We put about 1,200 miles on our car. We spent Christmas morning here together, just Tim, the dog, and I. It was nice. Then we packed up and headed out.

Our first stop was the farm Tim grew up on, and his family. Lots of good family time sharing about our adventures this year, eating, gifting… being together.

Christmas2013-1

Partway through the visit my youngest brother, Josh, and his girlfriend, Karensa, arrived. We took them to see the Giant Sequoias and had some great family dinners before heading home for a few days.

Christmas2013-2

(Photo credit Shannon Oberg – I think??! Or did Josh take this one?)

I think I’ve lost count of how many french fries I ate. I’m ok with this. We needed to introduce Karensa to In-n-Out, a road trip staple. Done.

Christmas2013-3

There was also a need for Quenelle.

More than once.

Tim’s birthday is on the 24th, so before we started our Christmas Eve celebrations we had lunch at Quenelle. We had ice cream. For lunch. It was delicious.

The next week we had to go back with Josh and Karensa.

Christmas2013-14

Having guests in town is a fun excuse to visit some of our favorite places. Umami Burger is a fun treat. I can’t order anything but the Truffle Burger and Truffle Fries. I’m sure there are other things that are good, buuuut I don’t want to branch out. I like my favorites.

Christmas2013-6

Guests are also an excuse to play tourist in our town (this is Tim giving a tour of the WB lot – I think he’s showing J&K the spot where Spiderman hangs upside down and kisses Mary Jane… he might also just be pointing at a wall).

Christmas2013-7

We had our third Christmas morning with J&K while Skyping with my parents so they could watch us open our gifts. It’s not the same when we’re not with the whole family, but we will take what we can get. One of my favorite gifts of all was this magnet of our super cute niece. It makes me want to cry every time I see it because I miss her so much, but I love having her little face on my fridge.

Christmas2013-4

My other favorite gift: a new knife. I’ve been wanting this knife for a year. I yelled when I opened it, I was so excited. It cuts through potatoes like they are room temperature butter.

I love it. I love it. I love it.

Christmas2013-13

After a few days at home we went to the coast to visit with our aunt and uncle. To say that the sun setting over the ocean is majestic is an understatement. I don’t think I could ever get tired of this view.

Christmas2013-11

Christmas2013-10

Christmas2013-8

While at the coast we stopped by the Honeymoon Cafe. We’ve been going there since our honeymoon (I know, how cute), and go back anytime we’re in the area. If the food wasn’t so scrumptious it would be easier to skip it. But, there’s the sentimental and delicious factors that keep bringing us back.

Christmas2013-9

For our last dinner together, which happened to be at the coast, Josh, Karensa, and I made Baguette Pizzas. I totally love pizza with real crust, but these were super yummy. See all that cheese that dripped on to the pan and browned?! That’s the best part!

Christmas2013-16

Happy New Year, friends! Here’s to a great one, filled with family, friends, and lots of good food!

Happy Eating!

Baguette Pizzas
Recipe Type: Main, Dinner, Pizza, Cheese, Vegetables
Author: Rachel Oberg – De Ma Cuisine, with Josh, Karensa, and Tim
Prep time:
Cook time:
Total time:
Serves: 6
Ingredients
  • 1-2 T olive oil
  • 1 bell pepper, sliced
  • 1 onion, sliced
  • salt, to taste
  • 6 baguettes, sliced in half lengthwise and widthwise (in the middle)
  • 1 head garlic, diced
  • 2 C tomato sauce
  • 1 zucchini, thinly sliced
  • 1/2 head broccoli, chopped in small pieces
  • pepperoni (optional)
  • additional veggies like: mushrooms, olives, and tomatoes; sliced
  • 1 brick mozzarella cheese, grated
  • basil, chopped
Instructions
  1. Pre-heat oven to 375F.
  2. Heat a medium-sized skillet over medium or medium-low heat. Add olive oil. When oil is hot add bell pepper, onion, and salt. Cook, stirring occasionally, until veggies are tender, about 5-8 minutes.
  3. Place baguettes cut-side up on a baking sheet. Bake for 5-7 minutes, or until slightly toasty.
  4. Add garlic to skillet and cook 1-2 minutes. Remove from heat.
  5. Let everyone top their own pizza, starting with tomato sauce, sautéed veggies, pepperoni (optional), raw veggies, cheese, and basil.
  6. Place back onto a baking sheet and bake until cheese is melted, about 5-10 minutes.


Monday

16

December 2013

2

COMMENTS

Sliders with Caramelized Onions and Gorgonzola – In the Kitchen with Rachel O – Video

Written by , Posted in Appetizers, Beef, Cheese, Dinner, In the Kitchen with Rachel O, Main Dishes, Meat, Sides, Snacks, Vegetables

Sliders3

What can I really say about Sliders? I mean, how many ways can I say delicious? I love a good burger. I really love a good slider… because then I get to eat more than one!! (Plus, they’re little and cute.)

Sliders5

I think it’s fun to get creative with food. There is absolutely nothing wrong with a pickle, mustard, and onion burger. You know, the usual. But, let’s try something else.

You know how delectable caramelized onions are on a crostini with melty gorgonzola? You do know this, right? If not, stop reading and make a quick snack. You’ve got to try these flavors together. Ok, now that you’re back, let’s discuss the sweet caramelized onions and how well they pair with tangy gorgonzola. Is your mind blown? I know. I’ve been there. (Another mind blowing option: gorgonzola, roasted figs, baguette, and honey. Do this. Go there. You gotta!)

If you are not the biggest fan of gorgonzola, Tim can sympathize. I made his without. But with mustard and pickles. That’s cool. Cool cool cool. We don’t have to have the exact same taste in food.

Sliders4

Sliders2

Caramelized onions are one of my favorite things. Does it ever just flabbergast you that this vegetable, so pungent, so intense, could ever be mellowed out? I’m amazed at what a little heat and some honey can do. I’m glad that we don’t just have to eat bland, flavorless, boring food. That’d be so lame. I’m totally not into that. I want big, bold flavors. I want surprising new tastes (um, I don’t mean like trying Bertie Bott’s Every Flavour Beans, where you expect lemon and get rotten egg). I crave the experience of enjoying food.

For all this, we have Sliders topped with caramelized onions and gorgonzola. C’est très très bon.

Sliders

Happy Eating!

Sliders with Caramelized Onions and Gorgonzola
Recipe Type: Main Dish, Appetizer, Dinner, Meat, Beef, Cheese, Vegetables
Cuisine: American
Author: Rachel Oberg – De Ma Cuisine
Prep time:
Cook time:
Total time:
Serves: 2-3
Cute little sliders with big taste.
Ingredients
  • 1 onion, sliced
  • 1 T honey
  • pinch dried thyme
  • 1/2 lb. ground beef
  • 1 T red wine vinegar
  • 1/4 t salt
  • pinch pepper
  • 1/4 t thyme
  • 1 T olive oil
  • Gorgonzola cheese, sliced
  • 6 mini burger buns, halved
Instructions
  1. Add onion, pinch thyme, and honey to a dry skillet. Cook over low heat for 25-30 minutes, or until onions are caramelized.
  2. Combine beef, vinegar, salt, pepper, and thyme in a bowl. Mix with hands (do not over mix). Shape into 6 small patties. Press thumb into center to create a small indent.
  3. Heat skillet. Add oil. When hot, add patties, and cook over medium heat for about 3-5 minutes. Flip, and cook covered, for 3-5 minutes more, or until a meat thermometer registers 160F.
  4. Remove from heat. Top with gorgonzola and cover. Let stand for a few minutes.
  5. Serve on a bun topped with caramelized onions.

Monday

18

November 2013

4

COMMENTS

Christy’s Homemade Granola Bars

Written by , Posted in Baking, Breakfast, Fruit, Grains, Guest Posts, Kid-Friendly, Quick and Easy, Snacks, Vegetarian

My friend, Christy, is an inspiration to me. She’s a great cook. A really great cook. She makes healthy foods taste great! She’s a homemade savvy, down to earth, super awesome friend.

She and her husband, Rick, are instilling great eating habits in their four kids. They don’t do much in the way of processed foods. I applaud and admire this. They don’t tell their kids they can’t have anything processed, or occasional treats. But, the majority of their food is made by Christy.

I admire this!

Christy gladly shared her favorite recipe for Granola Bars. They are a staple in their home. I’m going to make them as soon as I finish typing this post, to eat the rest of this week, and to take with us to Paris (I’m writing this way in advance… no working for me while we’re away!!).

Happy Eating!

Christy’s Homemade Granola Bars
 
Author: Christy Durrance (adapted from Kitchen Stewardship)
Cook time:
Total time:
Ingredients
  • ½ c. (1 stick) unsalted butter, softened
  • ½ c. peanut butter (or other nut butter)
  • 1 c. honey
  • 1 t. vanilla
  • 4 ½ cups old-fashioned oats
  • 1 c. oat flour (or whole wheat flour)
  • 1 t. baking soda
  • ¼ c. wheat germ, optional
  • ¼ c. flax seed meal, optional
  • 2 cups total of any combination of the following extra goodies (or anything else that sounds good to your family in a granola bar): Chopped nuts (walnuts, almonds, pecans, etc.)
  • Seeds (sunflower, sesame, pumpkin, etc.)
  • Chocolate chips
  • Chopped, dried fruit (cranberries, raisins, cherries, apricots, etc.)
  • Unsweetened coconut flakes
  • Cocoa powder (up to ¼ cup)
Instructions
  1. Place butter through vanilla in bowl of stand mixer. Using a mixer with paddle attachment, beat on medium speed until smooth.
  2. Add old-fashioned oats, flour, baking soda, wheat germ (optional), and flax seed meal (optional), and continue to beat with mixer until oats are broken up into smaller bits.
  3. At this point, add 2 cups total of any combination of the extra goodies.
  4. Press firmly into a 9×13 pan. Bake at 325 degrees F for 15-18 minutes until lightly golden. Let cool completely before cutting into bars (I often cover and put in the fridge for a few hours which makes cutting a bit easier). Best stored in the refrigerator or freezer, though they travel just fine.