De Ma Cuisine

De Ma Cuisine Archive

Monday

27

April 2015

0

COMMENTS

Nopales and Tomato Relish

Written by , Posted in Appetizers, Condiments, Dairy-Free, Fruit, Gluten Free, Quick and Easy, Sauces, Snacks, Vegan, Vegetables, Vegetarian

NoplaesTomatoRelish-1

After eight years of subscribing to Abundant Harvest Organics, one might expect that I’d know all the fruits and veggies. There wouldn’t be any that I still needed to try… right?! Wrong.
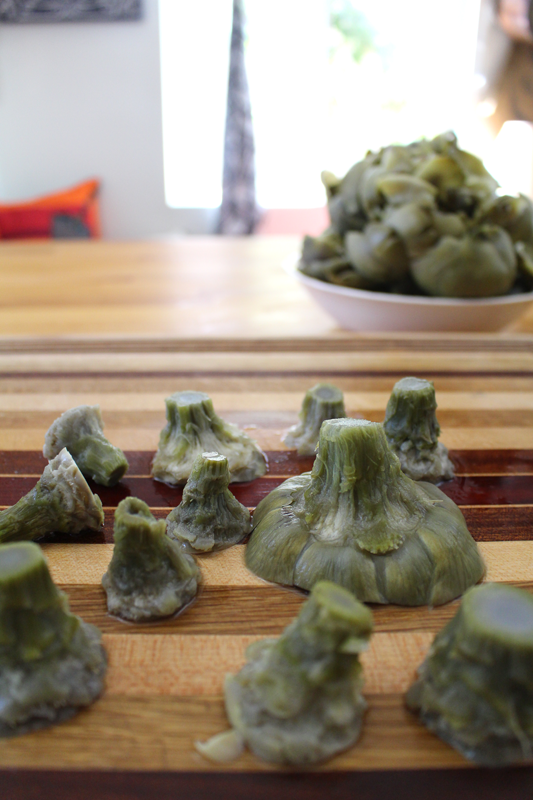
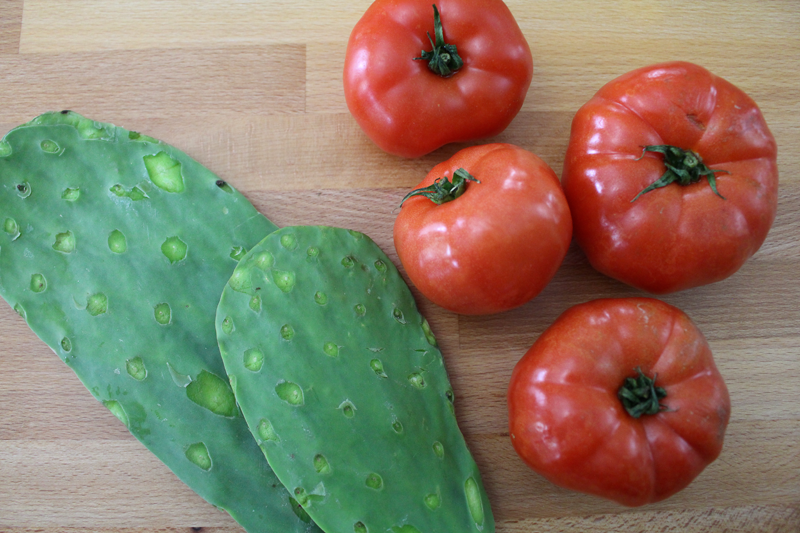
Nopales.

The nopal is the pad or leaf of the cactus. It has a bit of an aloe vera or okra like feel to it. You could eat it raw, with tomatoes, in a salad. But, I wanted to do a little something more.

NoplaesTomatoRelish-2

I’ve heard of people making tomato jam. That intrigues me. There are relishes, chutneys, confit, fruit butters, conserves… I wanted to try something fun like this with the nopales. We got tomatoes in our box this week – the first of the season for us. I love when tomatoes are in full swing. There’s nothing quite like a ripe tomato still warm from the sun. These tomatoes weren’t warm. Nor was it sunny. But, they were the perfect compliment to the nopales.

NoplaesTomatoRelish-3

This is a super simple recipe. It’s a little like a salsa as there are tomatoes, onions, garlic, and a bit of heat. But, I also added a bit of sweetness. It really could be almost any of those aforementioned condiments, but I think it’s most like a relish.

NoplaesTomatoRelish-4

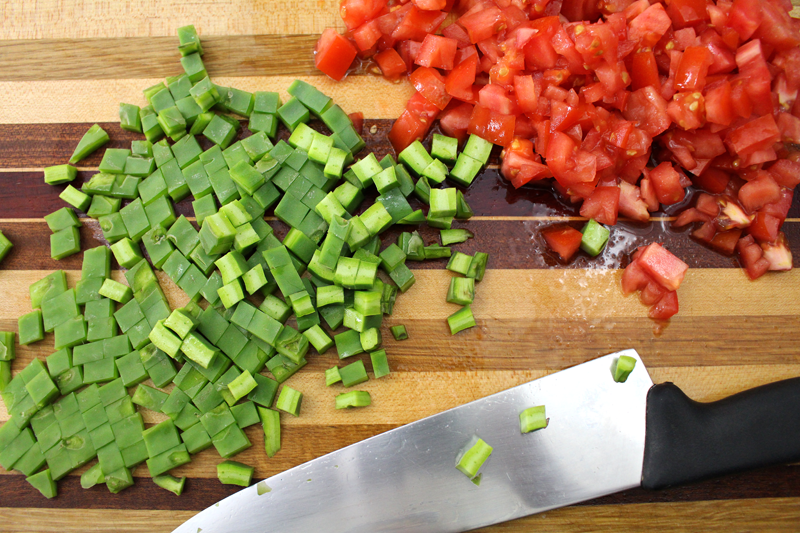
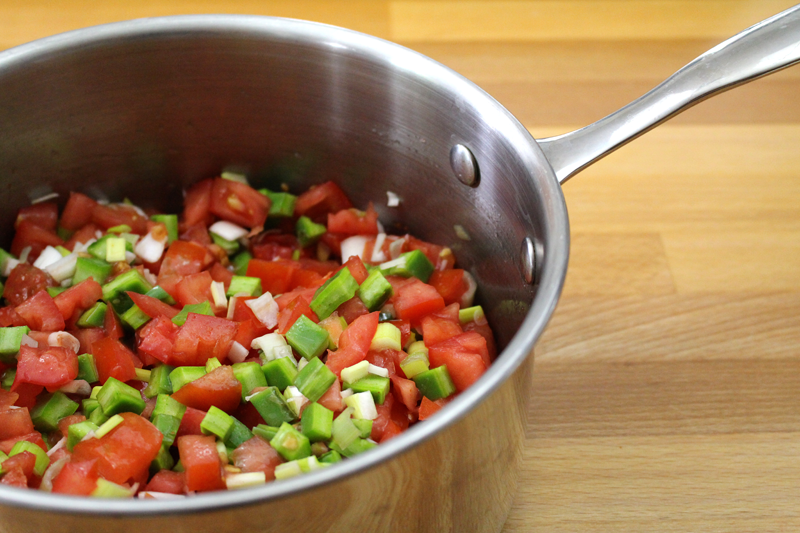
I brought it to a quick boil, then let it simmer and reduce down for about 15 minutes. After just a quick chop for the tomatoes and nopales, spring onions and fresh garlic, all you really have to do is give it the occasional stir and mash it a few times. Easy.

NoplaesTomatoRelish-5

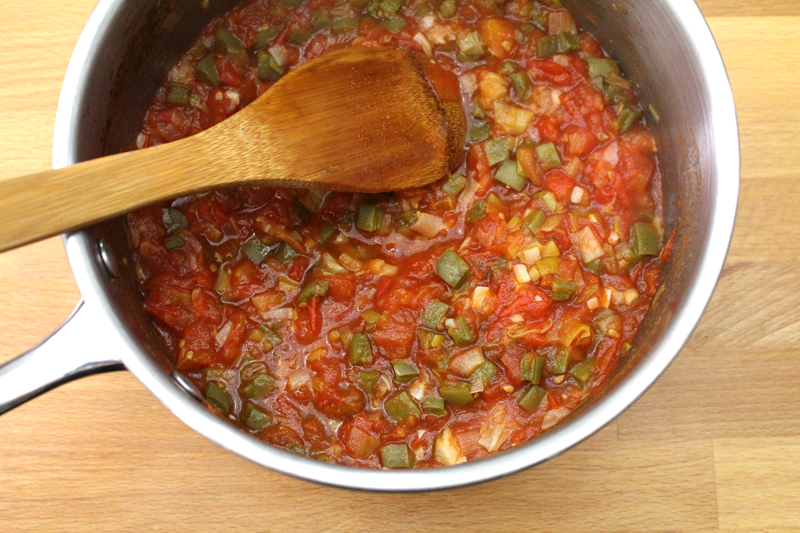
You could just leave it chunky, but I like my salsas and jams a little smoother, so I blended it up a bit with a hand blender (a regular blender or food processor would work fine too).

NoplaesTomatoRelish-6

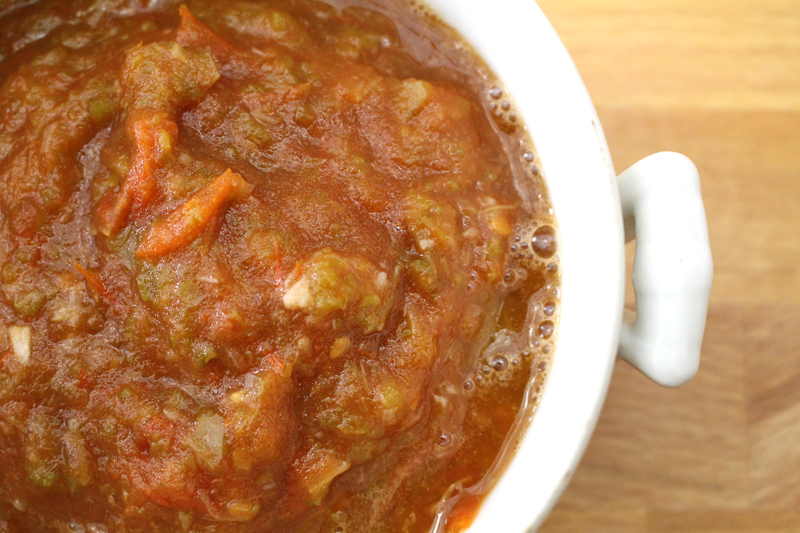
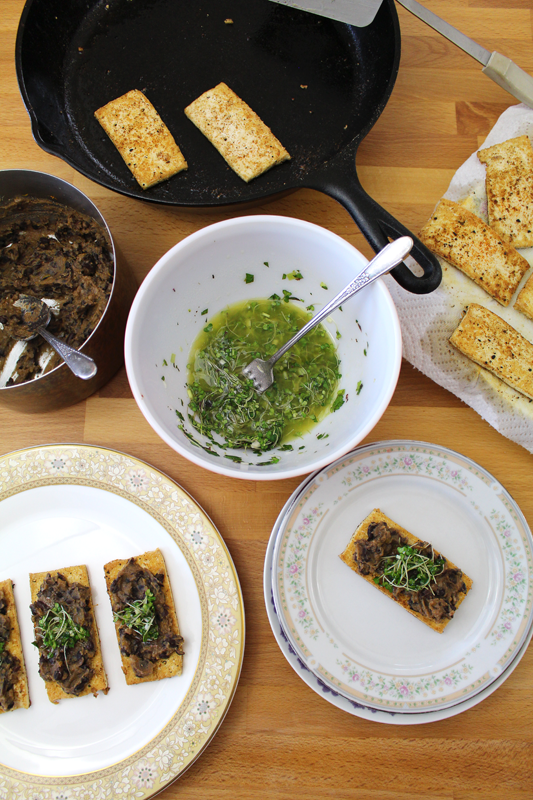
After that, all that’s left to do is decide what to serve it with. May I suggest serving the relish atop avocados on toast, on crostini, like salsa (for quesadillas, taco salad, or corn chips), with brie and crackers, or use it to top fried tofu, chicken, or beef.

Happy Eating!

Nopales and Tomato Relish

Prep Time: 10 minutes

Cook Time: 24 minutes

Total Time: 34 minutes

Yield: 18 oz.

Nopales and Tomato Relish

Ingredients

  • 3 1/2 C tomatoes, chopped
  • 1 1/2 C nopales, chopped
  • 1/2 C spring onion (or green or regular onion), chopped
  • 2-3 T chopped fresh garlic (or 2-3 garlic cloves), diced
  • to taste salt
  • good sprinkle cayenne
  • 1 T plus 1 t lemon juice, divided
  • 3 t maple syrup (or 2 t maple syrup and 1 t honey)

Instructions

  1. Place the tomatoes through maple syrup in a medium saucepan. Bring it to a simmer over medium-low heat. After about 5 minutes/once tomatoes have released some of their juices, mash (with a potato masher), bring to a rolling boil and cook for about 1 minute. Reduce to a simmer and cook until thickened about 15-18 minutes. Remove from heat and stir in remaining lemon juice.
  2. Optional: Blend with hand blender (or regular blender or food processor) (it can also be left chunky). Taste and adjust seasoning if needed.
  3. Serve warm, cold, or at room temperature.

Notes

Serve with avocados on toast, on crostini, like salsa (for quesadillas, taco salad, or corn chips), with brie and crackers, or use it to top fried tofu, chicken, or beef.

http://www.de-ma-cuisine.com/nopales-and-tomato-relish/

Monday

13

April 2015

0

COMMENTS

Vegan Tofu Fried Quinoa

Written by , Posted in Dairy-Free, Dinner, Fruit, Gluten Free, Grains, Leftovers, Lunch, Main Dishes, One Dish Dinners, Quick and Easy, Quinoa, Rice, Vegan, Vegetables, Vegetarian

VeganTofuFriedQuinoa-6

We don’t eat a lot of meat. We enjoy it, but it’s expensive, and we’ve found that there are plenty of other ways to get enough protein in our diet. So the meals containing meat are few and far between, and we fill in the gaps with meals like this take on Fried Rice.

VeganTofuFriedQuinoa-1

It starts with some seasonal veggies. Right now we’ve got greens like kale, chard, and mei qing choi. There are carrots, snap peas, and spring onions. And we’ve got the most delicious spring onions.

If you wanted to adapt this to suit another season, you could try some of these options:

Spring: Radishes, green beans, asparagus, fava beans, garlic scapes, or kohlrabi.

Summer: Zucchini/summer squash, tomatoes, bell peppers, eggplant, or sinqua.

Fall: Beets, arugula, cabbage, celery, chard, fennel, or radicchio.

Winter: Broccoli, cauliflower, winter squash, bok choy, mustard greens, or daikon radishes.

VeganTofuFriedQuinoa-2

No matter the veggies, it’s going to come together super quickly, so I’d suggest having all of the components ready to go before you begin cooking. Stir fry type dishes generally tend to cook over pretty high heat, which means they need to be stirred almost constantly. This doesn’t leave time for chopping up the next ingredients while the first ones cook.

VeganTofuFriedQuinoa-3

I’d made some quinoa the day before, and used the leftovers in this dish. You could also use bulgur wheat, rice noodles, or regular brown rice (cook according to the package’s directions).

VeganTofuFriedQuinoa-4

The quinoa takes the place of brown rice, since it has a bit more protein. The tofu mimics the egg, to make it vegan. I asked Tim if he could tell that there weren’t eggs in here. He said that it wasn’t noticeable.

VeganTofuFriedQuinoa-5

Like a lot of things, I enjoy this served with a wedge of lemon to squeeze over top. The brightness that it adds is the perfect way to complete this dish.

Happy Eating!

Vegan Tofu Fried Quinoa

Prep Time: 20 minutes

Cook Time: 10 minutes

Total Time: 30 minutes

Yield: 4

Vegan Tofu Fried Quinoa

Ingredients

  • 2 T oil
  • 1 C snap peas (or green beans), strings removed, chopped
  • 1 C carrots, chopped
  • 1/2 C fennel (or celery), chopped
  • 1 C onion, chopped
  • 2 C greens, chopped
  • sprinkle ginger
  • to taste salt
  • to taste pepper
  • sprinkle cayenne
  • 2 cloves garlic, diced
  • 2 T soy sauce or gluten-free aminos
  • 2 T rice vinegar
  • 1 C quinoa (or bulgur wheat, brown rice, or rice noodles) (cooked)
  • 7 oz. tofu (firm), drained and crumbled
  • 1/4 C green or spring onions, chopped
  • 1/2 to 1 C microgreens
  • lemon wedges, for serving

Instructions

  1. Heat a wok, add oil over medium-high heat. Add snap peas through cayenne and cook for 3-5 minutes, turning constantly.
  2. Add greens through microgreens (if microgreens are very delicate, wait to add them until 1 minute before you finish cooking) and cook for 3-5 minutes, stirring constantly.Taste and adjust seasoning if needed.
  3. Serve with lemon wedges for squeezing.
http://www.de-ma-cuisine.com/vegan-tofu-fried-quinoa/

Monday

30

March 2015

1

COMMENTS

Artichoke Heart Dip

Written by , Posted in Appetizers, Cheese, Condiments, Dairy-Free, Fruit, Gluten Free, Herbs, Lunch, Sides, Snacks, Vegan, Vegetables, Vegetarian

ArtichokeHeartDip-9

When I was a kid we ate artichokes dipped in mayo. Nothing fancy. We each got a whole artichoke and we dipped then scraped it all off with our teeth. That’s the simple way to do artichokes. And you could do that here too. Just steam the artichokes, dip the leaves, then when you get down to the heart, scrape out the choke and dip it too. But, I liked the idea of dipping the artichoke leaves into a dip that contains the heart. It feels a little bit like eating an egg and some chicken in the same dish. Kinda wrong, but maybe really right.

Definitely right.

ArtichokeHeartDip-1

The artichokes that I had didn’t take long to steam. Maybe 15 or 20 minutes once the water came to a boil. It could take longer depending on their size.

ArtichokeHeartDip-3

While the artichokes steam, the dip comes together quickly. It’s a combination of things like chickpeas, fresh parsley, and olive oil. I used some ricotta and Greek yogurt for creaminess, but if you want this to be a vegan dish, try using silken tofu instead.

ArtichokeHeartDip-2

The cooked artichokes hop into an ice bath. This stops the cooking and cools them down so they don’t burn the fingers.

ArtichokeHeartDip-4

The artichoke leaves are removed and saved for later.

ArtichokeHeartDip-5

ArtichokeHeartDip-6

The fuzzy choke is removed and the hearts and stems are chopped up (be sure to discard any tough leaves that may be left on there). They’re added to the dip and stirred in. You could blend them if you want, but I like the added texture that the chunks of tender artichoke bring.

ArtichokeHeartDip-8

I ate this for lunch today: carrot sticks, artichokes, and a few slices of homemade bread. Other raw veggies like snap peas, green beans, fava beans, bell peppers, celery, fennel, mushrooms, and tomatoes (ok, not a vegetable, but close enough) could be fabulous too.

ArtichokeHeartDip-7

Perfect for lunch, snack, or an appetizer at your next dinner party.

Happy Eating!

Artichoke Heart Dip

Prep Time: 30 minutes

Cook Time: 20 minutes

Total Time: 50 minutes

Yield: 2.5 cups

Artichoke Heart Dip

Ingredients

  • 10-12 medium sized artichokes, stems trimmed, bottom 2-4 rows of leaves removed
  • 5 oz. ricotta cheese or soft (silken) tofu
  • 1/2 C Greek yogurt or soft (silken) tofu
  • 2 T carrot greens (just the tops, no stems) (optional)
  • 1/2 C chickpeas
  • 1/4 C fresh parsley
  • 1 stalk green garlic, roughly chopped
  • 1-2 cloves garlic
  • 1/4 C olive oil
  • 2-3 T lemon juice
  • to taste salt
  • to taste pepper
  • good pinch cayenne
  • ice water
  • juice from 1/2 lemon
  • carrots, sliced, for serving

Instructions

  1. Place artichokes in a steamer basket in a pot with 1 1/2 -2" water. Cover and bring it to a boil then simmer and steam for 15-20 minutes (or until tender and stems pierce easily with a sharp knife).
  2. Blend (with a hand blender or in a food processor, regular blender could work too) ricotta or tofu through cayenne. Blend for about 1 minute, or until it's as smooth as you'd like it. Taste and adjust seasoning if needed. Chill it in the fridge until you need it.
  3. When artichokes are tender, remove them from the pot and plunge into ice water that has the juice of half a lemon mixed in. When they're cool enough to handle, pull off most of the leaves (stop when you get to the small ones) and set them aside for later. Slice off the tougher top part off the leaves (you can save the tender bottom part for dipping) and slice through the top of the heart. Scrape out the choke (the fuzzy center) in the heart (and if there's any on the leaves scrape that, if you're going to eat them). Once each heart is done, return it to the lemon water. Once all hearts are done, chop up and stir in to the ricotta mixture (or you can blend it in if you prefer). Taste and adjust seasoning if needed.
  4. Serve dip with carrots and artichoke leaves for dipping.
http://www.de-ma-cuisine.com/artichoke-heart-dip/

Thursday

26

March 2015

0

COMMENTS

Chicken Noodle Soup

Written by , Posted in Dinner, Fruit, Gluten Free, Herbs, Kid-Friendly, Lunch, Main Dishes, Meat, Pasta, Poultry, Soups, Vegetables

ChickenNoodleSoup-6

I know that Chicken Noodle Soup is one of those meals that’s made when someone feels under the weather. But, I want to enjoy it any day. It’s just so good.

ChickenNoodleSoup-2

It starts with some chicken that’s cooked in a bit of olive oil. The skin gets all crispy and the inside tender and juicy. It takes a while, just be patient. Once the chicken is cooked, it rests for a bit, and gets cool enough to handle. And those crispy bits on the bottom of the pan, they’re on their way to make this soup simply divine.

ChickenNoodleSoup-1

A little butter and oil is added to that same pan. No washing out required. The bits at the bottom will loosen as you stir the veggies and help make the broth a deep, rich brown.

Back to the veggies for a sec – there are tons of ’em. Fennel, carrots, kohlrabi, greens, cauliflower… and even more that you could add, depending on what you have on hand (check out the recipe for more). If you’re using this as an under the weather helper, it’s perfect because it’s packed with nutrients. If you’re not, well, it’s great for the same reason. 😉

ChickenNoodleSoup-3

The veggies are cooked covered, for about 10 minutes. They just need to sweat it all out. No big deal.

ChickenNoodleSoup-4

Once they’re ready, the chicken, which has been shredded, is added, along with the stock.

ChickenNoodleSoup-5

I like to cook the pasta separately. I have a hard time making the right amount of food for just two of us, so this way I can save the leftovers for another day without worrying that the pasta will absorb all the liquid and become a soggy, mushy mess. If you’re going to eat it all in one sitting, feel free to cook the pasta in the soup (you may want to add a bit more stock).

ChickenNoodleSoup-7

The pasta is divided into the bowls and topped with some soup for a hearty and delicious meal.

Happy Eating!

Chicken Noodle Soup

Prep Time: 10 minutes

Cook Time: 1 hour, 7 minutes

Total Time: 1 hour, 17 minutes

Yield: 4

Chicken Noodle Soup

Ingredients

  • 2 T olive oil
  • 3-4 chicken drumsticks (or 2-3 thighs, or 1 breast) (ending up with about 1-2 C cooked and shredded meat)
  • to taste salt
  • to taste pepper
  • 1 T butter
  • 1 t olive oil
  • 1 C fennel (any part), chopped
  • 1 C cauliflower, chopped
  • 1 C carrot, chopped
  • 1 C onion (or shallot or leek), chopped
  • 1-2 C greens (kale, collard greens, chard etc), chopped
  • 1/2 C turnip (or rutabaga), chopped
  • 1/2 C radish, chopped
  • 1/2 C kohlrabi, chopped
  • (could also add celery, broccoli, parsnip, summer squash, bell pepper, peas, green beans, beets, asparagus, or mushrooms)
  • 3 cloves garlic, diced
  • 1 T balsamic vinegar
  • 1/2 t each dried (or 1/2 T fresh) rosemary, thyme, basil, and parsley (or replace all four with tarragon, dill, and parsley)
  • pinch each cayenne, ginger, and paprika
  • 6-8 C stock (vegetable or chicken)
  • 1 C pasta (any kind)
  • 1 T butter
  • 1 T lemon juice
  • lemon slices, for serving

Instructions

  1. Heat a soup pot over medium heat. Add 2 T olive oil. When oil is hot, add chicken and sprinkle with salt and pepper. Cook for about 30-35 minutes (for drumsticks), or until internal temperature reaches 180F, turning every 5 minutes or so.
  2. Remove chicken from soup pot and let cool slightly on a paper towel lined plate. Return soup pot to the heat, add 1 T butter and 1 t olive oil. Add fennel through kohlrabi, stir to scrape browned bits off the bottom of the pan, and cook covered for about 10 minutes, stirring occasionally. Add garlic and cook for 1 minute. Add balsamic vinegar and deglaze the pan, scraping the bottom, about 1 minute.
  3. Add seasonings and stock. Bring to a boil, then reduce to a simmer for 15-20 minutes.
  4. Cook pasta in boiling salted water. Drain.
  5. Remove soup from heat, stir in 1 T butter and lemon juice. Taste and adjust seasoning if needed.
  6. Divide pasta between 4 bowls and top with soup. Serve with a lemon wedge for squeezing.
http://www.de-ma-cuisine.com/chicken-noodle-soup/

Wednesday

18

March 2015

0

COMMENTS

Crispy Tofu with Black Bean Purée and Microgreens

Written by , Posted in Appetizers, Beans, Dairy-Free, Dinner, Fruit, Gluten Free, Herbs, Legumes, Lunch, Main Dishes, Quick and Easy, Sandwiches, Sides, Snacks, Vegan, Vegetables, Vegetarian

CrispyTofuBlackBeanPureeMicrogreens-8

I think of this dish as a sort of open faced sandwich. We eat bread in our house. We also eat gluten. But, there are plenty of folks who don’t. There are also plenty of vegan-loving people out there. This is a shout out to all of you. But, but but but, not just for you GF+V friends! Because let me tell you, as a carnivore and gluten-eater, I loved this meal. So much so that I re-heated the leftovers and ate it again for dinner the day that I made it.

CrispyTofuBlackBeanPureeMicrogreens-1

My goal was to make a bean purée (ish) topping. I love to eat beans. They’re full of protein and add so much to most any dish. But, I didn’t want it to taste like I’d just opened a can of beans and mashed them up. So I added things like a touch of lemon and vinegar for acidity and brightness, butternut squash for creamy richness, and cayenne for a hint of spice.

CrispyTofuBlackBeanPureeMicrogreens-2

Which all tasted great topped with these super cute microgreens. Hello yum! Hello packed with nutrients!

CrispyTofuBlackBeanPureeMicrogreens-3

I mixed up a lemony dressing to toss the microgreens in. Note: wait until right before serving to toss them. They will wilt if left too long (lesson learned). If you have extra dressing, just save it for tomorrow’s lunch, use it for drizzling on some soup, or make a double batch of these yummy treats and have a party!

CrispyTofuBlackBeanPureeMicrogreens-4

I’m seriously digging crispy pan fried tofu these days. I love to sprinkle it with lots of cayenne and a bit of ginger (plus salt and pepper). In a super hot pan they’ll cook in no time at all.

CrispyTofuBlackBeanPureeMicrogreens-7

The tofu gets spread with beans and topped with the microgreens (mine were kinda swimming in the dressing, so I had to quickly consume as many as possible – not a problem).

CrispyTofuBlackBeanPureeMicrogreens-5

The perfect little gluten-free, vegan treat for lunch, dinner, snack, appetizer… maybe even for breakfast!

Happy Eating!

Crispy Tofu with Black Bean Purée and Microgreens

Prep Time: 10 minutes

Cook Time: 22 minutes

Total Time: 32 minutes

Yield: 2-3

Crispy Tofu with Black Bean Purée and Microgreens

Ingredients

  • 1 C black beans (if canned, drained and rinsed)
  • 1/4 C water
  • 1 T lemon juice
  • 1 t rice vinegar
  • sprinkle cayenne
  • 1/4 C mashed butternut squash or sweet potato
  • to taste salt
  • to taste pepper
  • 1/4 C lemon juice
  • 1 T parsley, minced
  • 1 t mint, minced
  • 1 T green garlic/green onion/chives/garlic, minced
  • to taste salt
  • 2-3 T olive oil
  • 1-2 C microgreens
  • olive oil, for frying
  • 14 oz. tofu (extra firm or firm)
  • to taste salt
  • to taste pepper
  • to taste cayenne
  • to taste ground ginger

Instructions

  1. Heat beans, water, 1 T lemon juice, rice vinegar, cayenne, squash, salt, and pepper in a saucepan over medium-low heat for about 10 minutes, stirring occasionally. Mash, taste and adjust seasoning if needed, and set aside and keep warm.
  2. Whisk lemon juice, parsley, mint, green garlic, and salt. Stream in olive oil while whisking. Taste and adjust seasoning if needed. Set aside.
  3. Heat a large skillet over medium-high. Add olive oil. Add tofu and sprinkle with salt, pepper, cayenne, and ginger. Cook for about 2-3 minutes per side, or until golden brown and crispy. Work in batches so the pan isn't overcrowded, adding more oil as needed. Set on a paper towel lined plate as they are done.
  4. Spread beans on top of tofu, toss microgreens with dressing (right before serving, being careful not to overdress, as they will get soggy) and place them on top of the beans.
http://www.de-ma-cuisine.com/crispy-tofu-with-black-bean-puree-and-microgreens/