De Ma Cuisine

Guest Posts Archive

Friday

2

December 2011

1

COMMENTS

Crêpes, by Katy – Guest Post!

Written by , Posted in Guest Posts, Thoughts

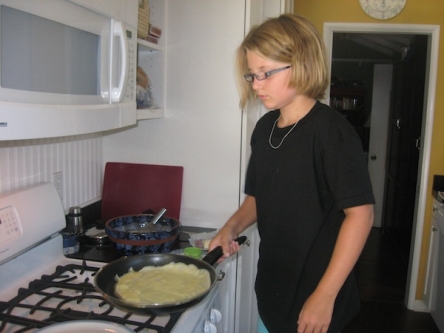
My friend Katy loves to cook. She is twelve, and is already a master at Crêpes and Omeletes (among other dishes). I asked her to share her recipe for Crêpes with us. I hope you enjoy it!

Here’s Katy:

Hello, my name is Katy and I’m a friend of Rachel’s. Today I’m going to show you how to make my favorite and very easy crêpes!

I was introduced to crêpes a couple of years ago by my uncle, Andrew. He absolutely loves France and made them one summer for a small family get-together. I didn’t stop loving them since. In fact, for the past couple of years I’ve helped my uncle cook the crêpes for the annual crêpe family night in the summer. These crêpes are really good, but in the recipe, you have to let the batter sit for an hour, sigh. It already takes a long time to cook for 10 people, why add more time? Well I found a recipe that doesn’t have to sit for an hour, and it tastes exactly like my uncle’s!


Katy’s Crêpes

Last modified on 2012-05-25 23:55:00 GMT. 0 comments. Top.

Crêpes
Recipe Type: Breakfast, Lunch, Dinner, Crêpes
Author: Katy Durrance
Prep time: 10 mins
Cook time: 30 mins
Total time: 40 mins
Serves: 8-9
Pretend like you’re in France and make Crêpes!
Ingredients
  • 2 eggs
  • 1 cup of flour
  • 1 1/2 cups of milk
  • 1 TB of cooking oil
  • a teaspoon of salt (if you are making dessert crêpes use 2 tablespoons of sugar instead of salt!)
  • butter (for the pan)
Instructions
  1. In a bowl, combine eggs, flour, milk, cooking oil, and salt (or sugar if dessert crêpes).
  2. Heat a pan on the stove on medium-high heat until pan is fairly hot, then turn it down to medium heat.
  3. Take a little bit of butter and set it in the middle of the pan. Then, using your hands, lift up the pan and twist it in a circular motion until most of the pan is coated. Then put 1/4 of a cup of the batter on the middle of the pan, and using the same circular motion, coat all of the pan with batter. If there are holes use a spoon and put some of the batter in the holes. Remember, you want this to be as THIN as possible!
  4. After a minute or so you can flip it over with a spatula.
  5. After another minute you can just slide it on a plate!
Notes

It takes around 30 minutes to cook all of the crepes, while one take about 1 minute and 30 seconds. This batch makes about 18 crepes and serves 8-9 people.


You can eat this by itself but……… With toppings it tastes much better!
Topping Ideas

  • Ham and cheese
  • Turkey and cheese
  • Cheese
  • Spicy cheese spread (My favorite savory filling!)
  • Nutella with strawberries topped with powdered sugar
  • Cinnamon apples topped with whipped cream
  • And my personal favorite, lemon and sugar topped with sugar!

Our family (Me) even makes crêpes without my uncle, and our favorite time to have them is Christmas time! Here’s a couple of our favorite meals with crêpes.

If you want to feel cozy….
This is a good combination if you want to curl up by the fire or watch a movie while eating! Make sure you fold the end of the crepes on each side so you can use your fingers instead of utensils.
Turkey and cheese crêpes with sliced apples, and for dessert Nutella and strawberry crêpes with hot chocolate.

A good lunch on a cold day
The sun might be shining but it’s really cold outside! This meal keeps you happy and warm.
Spicy cheese spread crêpes with caesar salad, and lemon sugar crêpes with good ol’ non alcoholic (Since I’m 12!) egg nog!

Bon Appetite!    

Friday

2

December 2011

0

COMMENTS

Katy’s Crêpes

Written by , Posted in Breakfast, Dinner, Eggs, Guest Posts, Lunch, Main Dishes

Crêpes
Recipe Type: Breakfast, Lunch, Dinner, Crêpes
Author: Katy Durrance
Prep time: 10 mins
Cook time: 30 mins
Total time: 40 mins
Serves: 8-9
Pretend like you’re in France and make Crêpes!
Ingredients
  • 2 eggs
  • 1 cup of flour
  • 1 1/2 cups of milk
  • 1 TB of cooking oil
  • a teaspoon of salt (if you are making dessert crêpes use 2 tablespoons of sugar instead of salt!)
  • butter (for the pan)
Instructions
  1. In a bowl, combine eggs, flour, milk, cooking oil, and salt (or sugar if dessert crêpes).
  2. Heat a pan on the stove on medium-high heat until pan is fairly hot, then turn it down to medium heat.
  3. Take a little bit of butter and set it in the middle of the pan. Then, using your hands, lift up the pan and twist it in a circular motion until most of the pan is coated. Then put 1/4 of a cup of the batter on the middle of the pan, and using the same circular motion, coat all of the pan with batter. If there are holes use a spoon and put some of the batter in the holes. Remember, you want this to be as THIN as possible!
  4. After a minute or so you can flip it over with a spatula.
  5. After another minute you can just slide it on a plate!
Notes

It takes around 30 minutes to cook all of the crepes, while one take about 1 minute and 30 seconds. This batch makes about 18 crepes and serves 8-9 people.

Friday

18

November 2011

3

COMMENTS

Sheila’s Biscotti

Written by , Posted in Guest Posts, Thoughts

Sheila and I were roommates for 4 years when I lived in Texas. She is a dear friend of mine, and a wonderful cook. I have so many fond memories with her, many involving silliness and laughter. She was one of the people who encouraged me in my learning to cook, and even let me help her in her kitchen cooking for 70 people at the Bible School we worked at (where she still works). She was also the one who gave me my start in the cooking show business… we filmed a small show together during our time as roommates. (We may have mostly laughed and not actually cooked anything.)

Thanks for being a guest on De Ma Cuisine, Sheila! (P.S. I’ve made the Espresso-Chocolate Chip ones… oh my, so good! I want to make them right now… maybe I will.)

Here’s Sheila…

Thanksgiving is just around the corner, and if you are anything like me, the holidays herald good smells wafting from the kitchen and mouths watering at the thought of the yummy goodness that awaits.  As the chef of a Bible school and conference/retreat center, I have a busy few weeks building up to Thanksgiving, getting ready for conference guests and making things fun and special for our resident staff and students.  I try to have fun and different snacks for our many coffee break times during our big conference, so one of my staples every year is to bake a few different kinds of biscotti. It’s good for busy times because you can make it ahead:  it freezes well. Or, if you don’t have freezer space, it holds well at room temperature in a zip-lock bag or container, because it is supposed to be pretty crispy. Plus, people love it (I love it!). And most people have never tried to bake it, so it seems a little exotic or “coffee-shop-ish”.  Either way, I hope you can enjoy being creative with the mix-ins and come up with your own signature style.  My favorite lately has been rough-chopped almonds with dried cranberries.

Sheila’s Almond Biscotti

Last modified on 2012-05-18 23:15:08 GMT. 0 comments. Top.

Sheila’s Almond Biscotti
Recipe Type: Dessert, Baking, Snack
Author: Sheila Stachofsky
Ingredients
  • 3 1/4 cup flour
  • 1 T baking powder
  • 1/2 t salt
  • 3 eggs
  • 1 cup sugar
  • 1/2 cup oil
  • 1 t each, almond extract and vanilla
  • 1 1/3 C (5 oz) slivered blanched almonds (toasted first, 10 minutes at 350 degrees, cooled)
Instructions
  1. Heat oven to 350 degrees. Line sheet pan with parchment paper or foil that’s been greased.
  2. Sift together first 3 ingredients and set aside. Beat eggs and sugar for 2 minutes till light and fluffy. Add oil, vanilla and almond, mix until thick and smooth, 1 minute. On slow speed, add flour mixture. Knead in nuts (also you can add chopped dried apricots, cranberries, dried cherries, walnuts, white chocolate or chocolate chips. Be creative!).
  3. Divide dough in half. Form 2 logs, 14 inches long and 2 1/2 inches wide, 3/4 inches high. Place side by side on parchment-lined sheet pan. Bake 3- minutes. Remove and cut in 3/4 inch slices, diagonally. Use a sharp, serrated bread knife for this, cutting gently in a sawing motion so the biscotti does not crumble. Arrange slices on the pan, and bake an additional 10 minutes to toast and make crunchy. Flip and toast again (you do not have to do this step if you prefer your biscotti chewy).
  4. Store at room temperature in a sealed container or plastic bag, or in the freezer.


Sheila’s Chai Spice Biscotti

Last modified on 2012-05-18 23:14:11 GMT. 0 comments. Top.

Sheila’s Chai Spice Biscotti
Recipe Type: Dessert, Baking, Snack
Author: Sheila Stachofsky
Ingredients
  • 2 3/4 cups flour
  • 1 cup sugar
  • 1 T loose Chai spice tea or orange spice tea (about 3 tea bags)
  • 2 t baking powder
  • 1 1/2 t ground ginger
  • 1 1/2 t ground cinnamon
  • 1 1/2 t ground allspice
  • 1 1/2 t ground cardamom
  • 1 T veg. Oil
  • 1 T orange juice
  • 3 large eggs
Instructions
  1. In the bowl of a stand mixer, mix the flour through cardamom. Add the wet ingredients and blend well until mixture resembles a stiff cookie dough.
  2. Divide dough in half. Form 2 logs, 14 inches long and 2 1/2 inches wide, 3/4 inches high. Place side by side on parchment-lined sheet pan. Bake 3- minutes.
  3. Remove and cut in 3/4 inch slices, diagonally. Use a sharp, serrated bread knife for this, cutting gently in a sawing motion so the biscotti does not crumble.
  4. Arrange slices on the pan, and bake an additional 10 minutes to toast and make crunchy. Flip and toast again (you do not have to do this step if you prefer your biscotti chewy).
  5. Store at room temperature in a sealed container or plastic bag, or in the freezer.


Sheila’s Espresso-Chocolate Chip Biscotti

Last modified on 2012-05-18 22:51:05 GMT. 0 comments. Top.

Espresso-Chocolate Chip Biscotti
Recipe Type: Baking, Dessert, Snack
Author: Sheila Stachofsky
Ingredients
  • 2 3/4 cup flour
  • 1 cup sugar
  • 1/2 cup choc. Chips
  • 2 t baking powder
  • 1 t cinnamon
  • 1/8 t salt
  • 1/2 cup instant coffee granules
  • 1 T hot water
  • 1 T veg. Oil
  • 2 t vanilla
  • 3 large eggs
Instructions
  1. In the bowl of a stand mixer, mix flour through the salt. In a small bowl, mix the instant coffee with 1 T hot water until the granules are dissolved. Blend the rest of the ingredients, along with dissolved coffee, into the dry ingredients until mixture is blended and seems like a stiff cookie dough.
  2. Divide dough in half. Form 2 logs, 14 inches long and 2 1/2 inches wide, 3/4 inches high. Place side by side on parchment-lined sheet pan. Bake 3- minutes. Remove and cut in 3/4 inch slices, diagonally. Use a sharp, serrated bread knife for this, cutting gently in a sawing motion so the biscotti does not crumble. Arrange slices on the pan, and bake an additional 10 minutes to toast and make crunchy. Flip and toast again (you do not have to do this step if you prefer your biscotti chewy).
  3. For an added special touch, you can dip one end of the biscotti in melted chocolate.
  4. Store at room temperature in a sealed container or plastic bag, or in the freezer.


Friday

11

November 2011

0

COMMENTS

My Friend Gen

Written by , Posted in Guest Posts, Thoughts

My good friend, Genevieve is attending culinary school right now. I asked if she would share some of what she’s learning on this little blog. It’s so fun to chat about food and nutrition with her. She knows a lot, and is learning even more. Thanks, Gen!!

Here she is…

As a fellow organic, seasonal, nutrition-oriented food lover and cook, I am excited to share a recent creation. Like my good friend Rach, I love to cook and share food, nutrition info, technique tips and more…inspiring YOU to get in the kitchen! Creating is one of my passions and my favorite place to express creativity is in the kitchen. This seasonally inspired cookie recipe is adapted from Rachael Ray, and the basic frosting recipe is based off a recipe of one of my instructors at culinary school.

Having made the Rachael Ray version of these cookies with a classic cream cheese icing several times, I was ready to give these delicious fall treats a healthy makeover! Here are a few highlights of this guilt-free dessert:

-Spelt flour is high in protein and fiber compared to white flour.
-Sucanat is made from evaporated cane juice and is still full of minerals. If possible, for optimal flavor AND fall fun- steam a small pumpkin and puree in the food processor.
-Pumpkin is rich in beta-carotene, zinc, fiber and Vitamin A and C, boosting the immune system at this critical time of year. Side note- save the pumpkin seeds! We could not stop eating the seeds I roasted last week- so simple: 325° for 25 minutes, tossed with a little olive oil and sea salt. Particularly good for men and their prostate.
-No refined sugar in the frosting- only natural sugars found in dates. Much easier on the body in regards to blood sugar balance.
-Brazil nuts are the highest natural source of selenium, important for women in supporting thyroid health. Eat one brazil nut a day!

I hope you enjoy testing out my recent culinary experimentation…and a word of advice: don’t be scared to adapt your favorite recipe to make it nutritionally beneficial. Oh, and the leftover frosting was delicious served on my steaming bowl of oat groats this morning. Frosting on breakfast cereal…you heard me right. The joys of healthy food!

Gen’s Pumpkin Cookies with Brazil Nut Cream Frosting

Last modified on 2012-05-18 00:16:26 GMT. 0 comments. Top.

Pumpkin Cookies with Brazil Nut Cream Frosting
Recipe Type: Cookies, Dessert
Author: Genevieve Gladysz
Cook time: 10 mins
Total time: 10 mins
Ingredients
  • Cookies: 1/2 cup butter, melted
  • 3/4 cup sucanat
  • 2 eggs
  • 1 cup pumpkin puree
  • 1 Tbs pumpkin pie spice
  • 1tsp vanilla
  • 1 tsp baking powder
  • 1 tsp baking soda
  • 3/4 tsp salt
  • 1 2/3 cup spelt flour
  • Frosting: 1/2-3/4 cup water, divided
  • 1/2 tsp vanilla
  • 1/2 tsp salt
  • 1/4 coconut butter
  • 6 dates
  • 1 1/2 cups brazil nuts
  • Optional: 3 Tbs chai tea latte concentrate
  • 1 Tbs grated ginger
Instructions
  1. Cookies: Preheat oven to 350°F. Whisk melted butter with sucanat, followed by eggs, pumpkin, pumpkin pie spice, vanilla, baking powder, baking soda and salt.
  2. Using a spatula, gently fold in flour.
  3. Using a small cookie scoop or spoon, scoop a generous tablespoon size amount of batter on a stone baking sheet or a parchment lined metal baking pan.
  4. Bake for 10 minutes or until springy to touch. Cool.
  5. Top each cookie with a dollop of frosting or use two cookies to create a whoopie pie. Enjoy!
  6. Frosting: The frosting will be creamiest if you have a good blender that can handle a brazil nut (VitaMix is the absolute best- expensive but worthy investment!). The food processor will be your next best option, creating a texture slightly more coarse. I chose to spice up the basic frosting, adding a chai flavor using an organic concentrate and grated fresh ginger. The same affect could be achieved with the addition of the traditional chai spices of cardamom, cinnamon, cloves, fennel, ginger and black peppercorns instead of the concentrate. The water amount will have to be adjusted, depending on other liquids used.
  7. Using a blender, add 1/2 cup of water, followed by all remaining ingredients in order listed above in blender. Blend on high until frosting is similar to the consistency of whipped cream. Add additional water as needed.
  8. If using a food processor, add all ingredients expect water. Pulse, gradually pouring in water until desired consistency is reached.

Friday

4

November 2011

1

COMMENTS

A Family Thing

Written by , Posted in Guest Posts, Thoughts

My mom is a great cook. Even though I wasn’t super interested in cooking as a child, I’m sure a lot of my love for all things food is inherited from her. I’m so thankful for her. I think of her all the time and laugh to myself as I find myself doing or enjoying things she and Dad did (and probably still do) that I might have thought weird as a kid. I see it in so many ways, especially as I get older… I am my mother’s daughter.

I asked my Mom if she would do a guest post with an Apple Bavarian Torte she made when we were in town for Oma’s birthday. She kindly obliged.

So, without further ado, here’s my Mom:

Let me introduce myself: I’m Rachel’s mom, up in the cold, soon-to-be-white, north – Canada.  I think I always enjoyed helping in the kitchen (the cooking part – definitely not the clean-up) while growing up in California.  Education-wise, I took a class in cake decorating at the local community college.  This was the only course outside of my major of music that I had room for in my 2 years at Reedley College.  Our children sometimes think it ridiculous that I got college credits for a class like that.  But, they did think it was neat that they had specially decorated cakes for their birthdays.  I’m sure that this was one of the steps to my becoming a creative cook.  I don’t decorate many cakes anymore, all that icing is just too sweet for me and most of my guests, but sometimes I use silk flowers to top off a special cake.

I’ve been cooking more officially since my first real job here in Canada almost 35 years ago, where I worked part-time as a house-parent at a group home for delinquent teenage boys.  There were many things I was supposed to do while working there, but by far my favourite (that’s the correct Canadian spelling) was cooking for the group of about 10 big eaters.

Now, husband, John and I own RiverSong Banquet Hall just outside St. Jacobs Ontario, where I do most of the cooking for the guests at our banquet hall.

We have apples readily available in our area, so I always have lots on hand.  My favourite fall dessert this year is APPLE BAVARIAN TORTE.  The original recipe came from allrecipes.com, and I have adapted it to suit my tastes. Â  You can omit the apples and top with thickened fruit, such as raspberries or cherries. I hope you enjoy this recipe as much as we do.

Susan Pries at RiverSong Banquet Hall

Apple Bavarian Torte

Last modified on 2012-05-17 23:41:19 GMT. 0 comments. Top.

Mom’s APPLE  BAVARIAN  TORTE

pie or torte pan 9’ round 2  9” rounds 6  9” rounds
64 sq “ 128 sq “ 384 sq “
servings 10 – 12servings 20 – 24servings 60 – 72servings
Cream:
Butter ½ cup 1 cup 3 cups
Sugar 1/3 cup 2/3 cup 2 cups
Vanilla ¼ tsp ½ tsp 1 ½Â tsp
Flour 1 cup 2 cups 6 cups
Press mixture into pan
Combine in blender:
Eggs 2 large 4 lg 12 lg
Cottage or Cream Cheese 8 oz 16 oz 48 oz
White Sugar or Honey 1/3 cup 2/3 cup 2 cups
Dry Milk Solids ¼ cup ½ cup 1 ½Â cups
Lemon Juice 1 – 2  Tbl 2 – 4 Tbl 6 – 12 Tbl
Vanilla 2 tsp 4 tsp 4 Tbl
Pour over crust
Peel, core, slice & arrange in a circle over filling:
Apples 5 med 10 med 30 med
Mix and sprinkle over apples:
White sugar 1/3 cup 2/3 cup 2 cups
Cinnamon ½ tsp 1 tsp 1 Tbl
Bake at 375‘ 25-35 minutes
Serve warm or at room temperature